11.5.2 Packet Tracer – Default Routing and Fine-tuning OSPF Answers
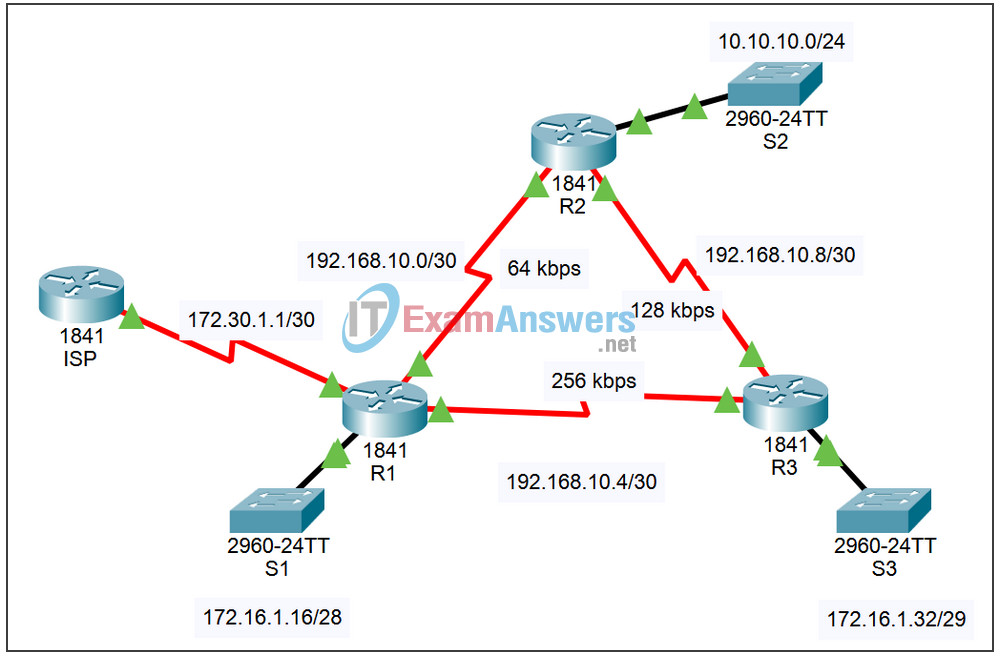
Topology

| Device | Interface | IP Address | Subnet Mask |
|---|---|---|---|
| ISP | S0/1/0 | 172.30.1.2 | 255.255.255.252 |
| R1 | Fa0/0 | 172.16.1.17 | 255.255.255.240 |
| S0/0/0 | 192.168.10.1 | 255.255.255.252 | |
| S0/0/1 | 192.168.10.5 | 255.255.255.252 | |
| S0/1/0 | 172.30.1.1 | 255.255.255.252 | |
| R2 | Fa0/0 | 10.10.10.1 | 255.255.255.0 |
| S0/0/0 | 192.168.10.2 | 255.255.255.252 | |
| S0/0/1 | 192.168.10.9 | 255.255.255.252 | |
| R3 | Fa0/0 | 172.16.1.33 | 255.255.255.248 |
| S0/0/0 | 192.168.10.6 | 255.255.255.252 | |
| S0/0/1 | 192.168.10.10 | 255.255.255.252 |
Objectives:
- Configure and redistribute a default route
- Verify default route is redistributed
- Verify current OSPF intervals
- Modify OSPF intervals
- Verify adjacency is re-established
Task 1: Configure and redistribute a default route
Step 1 – Configure a default route on R1.
Configure a default route on R1 using the interface attached to ISP as the exit interface.
Step 2 – Configure R1 to originate the default route in OSPF updates.
OSPF uses the same default-information originate command used by RIPv1 and RIPv2. In routing configuration mode, configure R1 with this command.
Task 2: Verify default route is redistributed
Step 1 – Verify route is redistributed to R2 and R3.
On R2 and R3, verify each router has now received the default route. For R2, the routing table should have the following entry:
O*E2 0.0.0.0/0 [110/1] via 192.168.10.10, 00:02:36, Serial0/0/1
Step 2 – Verify R2 and R3 can ping ISP.
You should also be able to successfully ping the ISP router from R2 and R3.
Task 3: Verify current OSPF intervals
On each router, use the show ip ospf interface command to verify the current timer intervals. What are the current Hello and Dead intervals?
Task 4: Modify OSPF intervals
Step 1 – Modify R1 intervals.
- On R1, change the Hello interval to 5 seconds and the Dead interval to 20 seconds. Use the interface configuration commands ip ospf hello-interval and ip ospf dead-interval.
- Wait for the neighbor relationships with R2 and R3 to transition from the FULL state to the DOWN state.
- Verify R1 no longer has any neighbors using the show ip ospf neighbor command
Step 2 – Modify R2 and R3 intervals.
Repeat Step 1 for R2 and R3.
Task 5: Verify adjacency is re-established
Neighbor adjacencies may take a few minutes to re-establish. Verify each router has two neighbors with the show ip ospf neighbor command.
