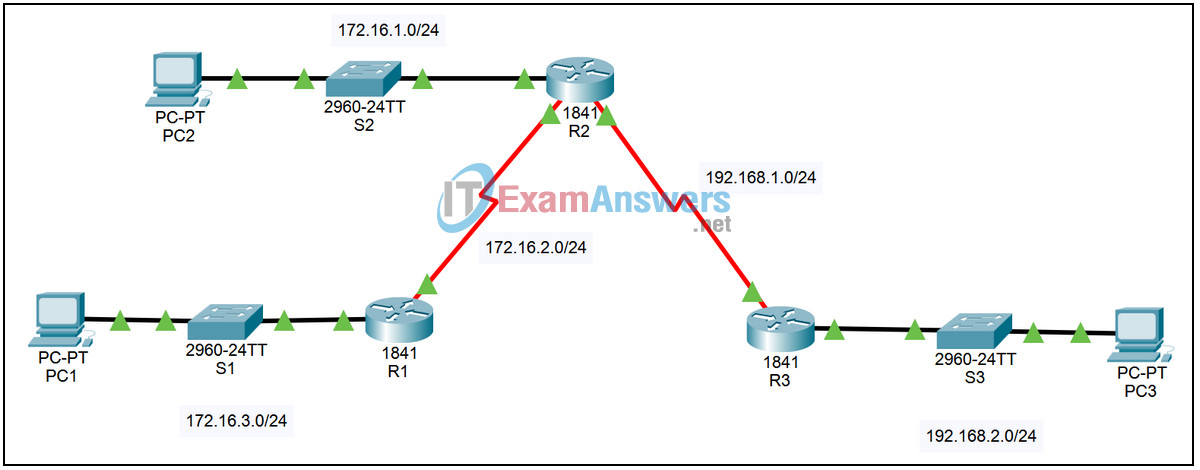
2.5.3 Packet Tracer – Removing and Configuring Static Routes Answers
Topology

| Device | Interface | IP Address | Subnet Mask | Default Gateway |
|---|---|---|---|---|
| R1 | Fa0/0 | 172.16.3.1 | 255.255.255.0 | N/A |
| S0/0/0 | 172.16.2.1 | 255.255.255.0 | N/A | |
| R2 | Fa0/0 | 172.16.1.1 | 255.255.255.0 | N/A |
| S0/0/0 | 172.16.2.2 | 255.255.255.0 | N/A | |
| S0/0/1 | 192.168.1.2 | 255.255.255.0 | N/A | |
| R3 | Fa0/0 | 192.168.2.1 | 255.255.255.0 | N/A |
| S0/0/1 | 192.168.1.1 | 255.255.255.0 | N/A | |
| PC1 | NIC | 172.16.3.10 | 255.255.255.0 | 172.16.3.1 |
| PC2 | NIC | 172.16.1.10 | 255.255.255.0 | 172.16.1.1 |
| PC3 | NIC | 192.168.2.10 | 255.255.255.0 | 192.168.2.1 |
Introduction:
In this activity, we will examine the chapter topology configured with static routes that reference the next hop IP address and require a recursive lookup. We will replace these static routes with static routes that specify the outbound interfaces and do not require a recursive lookup and examine the results of the change.
Learning Objectives:
- Examine the network with next hop static routes.
- View the configuration.
- Verify connectivity.
- Update the network with outbound interface static routes.
- Remove the next hop static routes.
- Configure outbound interface static routes.
- Examine the network with outbound interface static routes.
- View the configuration.
- Verify connectivity.
Task 1: Examine the network with next hop static routes.
Step 1 – View the configuration.
On each of the three routers:
- Login to the router using password cisco. Enter privileged exec mode using password class.
- Enter the command show running-config to see how static routing is currently configured.
- Enter the command show ip route to see the effect of the configuration. Each static route must do a recursive lookup to a connected route to forward a packet.
Step 2 – Verify connectivity.
From the command line prompt on each of the three PCs, ping the other two PCs. All pings should succeed.
Task 2: Update the network with outbound interface static routes.
Step 1 – Remove the next hop static routes.
On each of the three routers enter global configuration mode and enter the following commands:
R1
R1(config)# no ip route 172.16.1.0 255.255.255.0 172.16.2.2
R1(config)# no ip route 192.168.1.0 255.255.255.0 172.16.2.2
R1(config)# no ip route 192.168.2.0 255.255.255.0 172.16.2.2
R2
R2(config)# no ip route 172.16.3.0 255.255.255.0 172.16.2.1
R2(config)# no ip route 192.168.2.0 255.255.255.0 192.168.1.1
R3
R3(config)# no ip route 172.16.1.0 255.255.255.0 192.168.1.2
R3(config)# no ip route 172.16.2.0 255.255.255.0 192.168.1.2
R3(config)# no ip route 172.16.3.0 255.255.255.0 192.168.1.2
Step 2 – Configure outbound interface static routes.
On each of the three routers, enter the following commands:
R1
R1(config)# ip route 172.16.1.0 255.255.255.0 s0/0/0
R1(config)# ip route 192.168.1.0 255.255.255.0 s0/0/0
R1(config)# ip route 192.168.2.0 255.255.255.0 s0/0/0
R2
R2(config)# ip route 172.16.3.0 255.255.255.0 s0/0/0
R2(config)# ip route 192.168.2.0 255.255.255.0 s0/0/1
R3
R3(config)# ip route 172.16.1.0 255.255.255.0 s0/0/1
R3(config)# ip route 172.16.2.0 255.255.255.0 s0/0/1
R3(config)# ip route 172.16.3.0 255.255.255.0 s0/0/1
Step 3 – Save the updated configurations.
On each of the three routers, exit configuration mode by hitting Ctrl+z. Save the configuration by issuing the command copy run start.
Task 3: Examine the network with outbound interface static routes.
Step 1 – View the configuration.
On each of the three routers:
- Enter the command show running-config to see the revised configuration.
- Enter the command show ip route to see the effect of the changed configuration. Each static route appears as directly connected and no recursive lookup is needed to forward a packet.
Step 2 – Verify connectivity.
From the command line prompt on each of the three PCs, ping the other two PCs. All pings should succeed, if not troubleshoot the static routes.
