13.0 – Introduction
13.0.1 – Welcome
13.0.1.1 – Chapter 13: Security
This chapter reviews the types of attacks that threaten the security of computers and the data contained on them. An IT technician is responsible for the security of data and computer equipment in an organization. To successfully protect computers and the network, a technician must understand the threats to physical equipment, such as servers, switches, and wiring, and threats to data such as authorized access, theft, or loss.
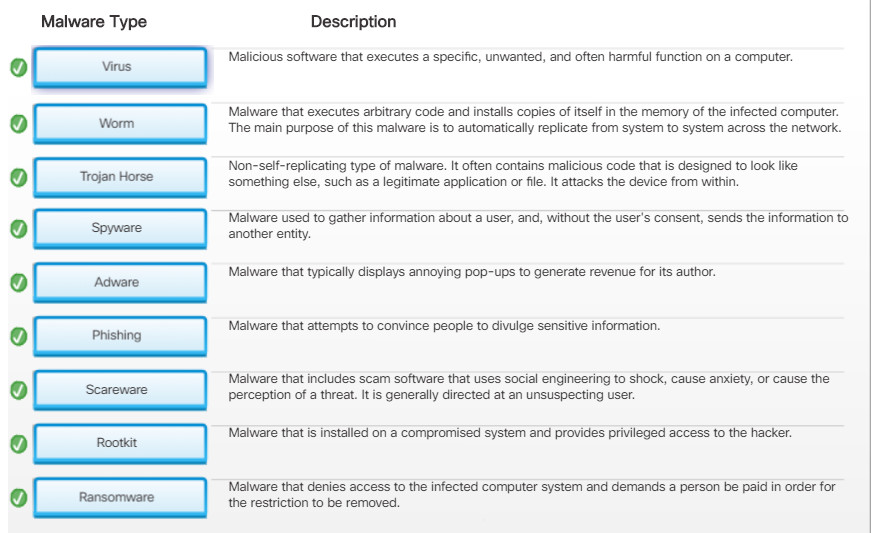
In this chapter, you will learn about the many types of threats to computers and networks, the greatest and most common being malware. You will learn about common types of computer malware such as viruses, trojan horses, adware, ransomware, rootkits, spyware, and worms and the techniques to protect against them. You will also learn about TCP/IP attacks like denial of service, spoofing, syn flood, and man-in-the-middle. Cybercriminals often use social engineering techniques to deceive and trick unsuspecting individuals to reveal confidential information or account login credentials. You will learn about the many forms of social engineering attacks such as phishing, pretexting, baiting, and dumpster diving and how to protect against these attacks.
You will also learn about the importance of having a security policy which is a set of security objectives that ensure the security of a network, the data, and the computers in an organization. You will learn that a good security policy should specify the persons authorized to access network resources, the minimum requirements for passwords, acceptable uses for network resources, how remote users can access the network, and how security incidents will be handled. You will learn about host-based firewalls like Windows Defender how to configure it to allow or deny access to specific programs or ports. You will explore the Windows Defender Firewall in a lab and configure firewall advanced settings. You will also learn about wireless security and configure wireless security in a packet tracer activity.
Finally, you will learn the six steps in the troubleshooting process as they are applied to security.
13.1 – Security Threats
13.1.1 – Malware
13.1.1.1 – Malware
There are many types of threats created to disrupt computers and networks. The greatest and most common threat for computers and the data contained on them is malware.
Malware is software developed by cybercriminals to perform malicious acts. In fact, the word malware is an abbreviation of malicious software.
Malware is typically installed on a computer without user knowledge. Once a host is infected, the malware could:
- Change the computer configuration.
- Delete files or corrupt hard drives.
- Collect information stored on the computer without the user’s consent.
- Open extra windows on the computer or redirect the browser.
How does malware get on your computer? Cybercriminals use a variety of methods such as those listed in the figure to infect hosts.
Depending on their goals, cybercriminals will use different types of malware. The choice of malware depends on the target and what they are after.
Non-compliant and legacy systems are especially vulnerable to software exploitations. A non-compliant system is one which has not been updated with operating system or application patches or missing antivirus and firewall security software. Legacy systems are those which the vendor no longer provides support or fixes for vulnerabilities.
13.1.1.2 – What Do You Already Know? – Malware
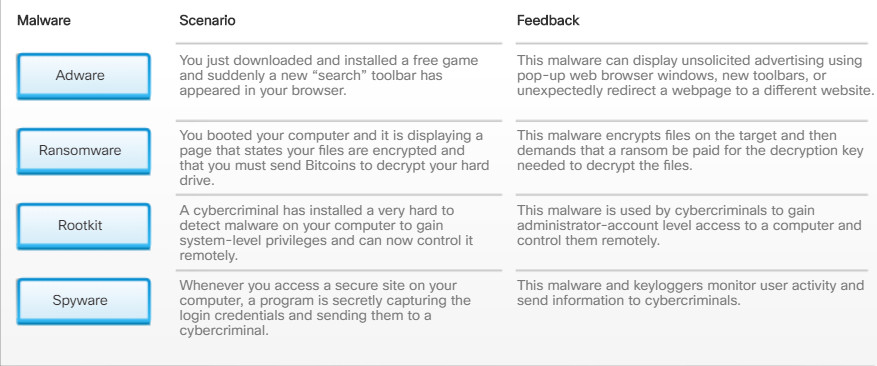
13.1.1.2 – What Do You Already Know? – Malware
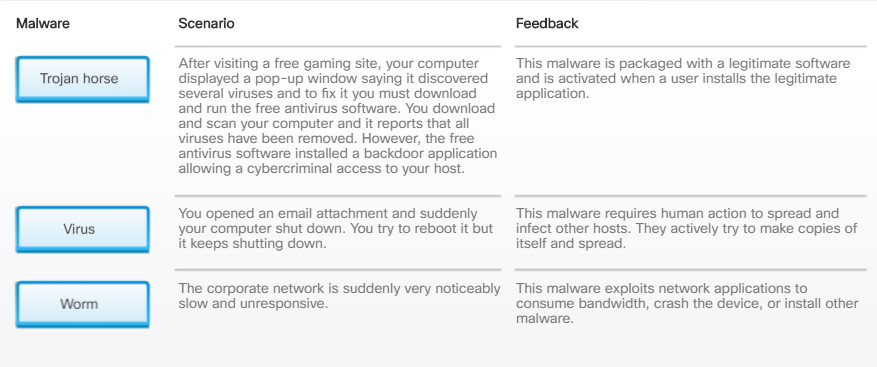
13.1.1.2 – What Do You Already Know? – Malware
13.1.1.3 – Viruses and Trojan Horses
The first and most common type of computer malware is a virus. Viruses require human action to propagate and infect other computers. For example, a virus can infect a computer when a victim opens an email attachment, opens a file on a USB drive, or downloads a file.
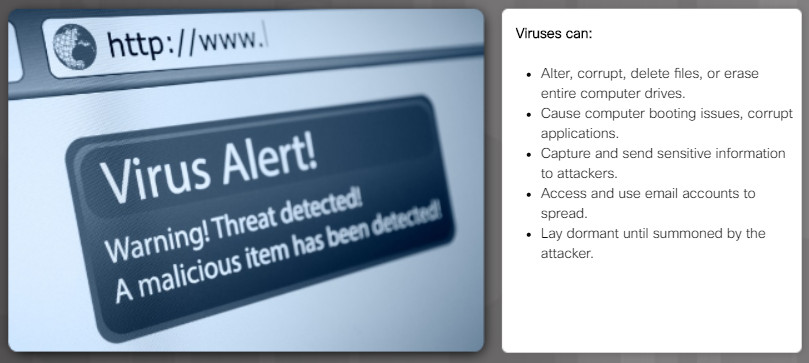
The virus hides by attaching itself to computer code, software, or documents on the computer. When opened, the virus executes and infects the computer. Figure 1 lists examples of what can happen once a virus has infected a host. Modern viruses are developed for specific nefarious intent such as those listed in Figure 2.
Viruses

Types of Viruses
Cybercriminals also use Trojan horses to compromise hosts. A Trojan horse is a program that looks useful but also carries malicious code. Trojan horses are often provided with free online programs such as computer games. Unsuspecting users download and install the game, installing the Trojan malware.
There are several types of Trojan horses as described in Figure 3.

Types of Trojan Horses
Viruses and Trojan horses are only two types of malware that cybercriminals use. There are many other types of malware that have been designed for specific purposes.
To fix some issues caused by viruses, it may be necessary to boot the computer using the Windows product disk and then use the Windows Recovery Console, which replaces the recovery console from Windows 2000, to run commands from a “clean” command environment. The Recovery Console is able to perform functions such as repairing the boot file and writing a new master boot record or volume boot record.
13.1.1.4 – Types of Malware
13.1.1.5 – Check Your Understanding – Malware
13.1.1.5 – Check Your Understanding – Malware
13.1.2.1 – Anti-Malware Programs
Malware is designed to invade privacy, steal information, damage the operating system, or allow hackers to take control of a computer. It is important that you protect computers and mobile devices using reputable antivirus software.
This is the seven-step best practice procedure for malware-removal:
1. Identify and research malware symptoms
2. Quarantine the infected systems
3. Disable System Restore (in Windows)
4. Remediate infected systems
5. Schedule scans and run updates
6. Enable System Restore and create restore points (in Windows)
7. Educate the end user
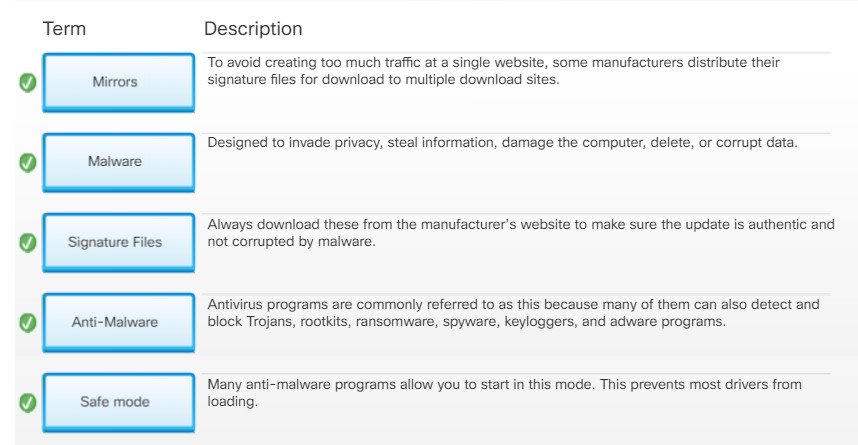
Today, antivirus programs are commonly referred to as anti-malware programs because many of them can also detect and block Trojans, rootkits, ransomware, spyware, keyloggers, and adware programs, as shown in Figure 1.
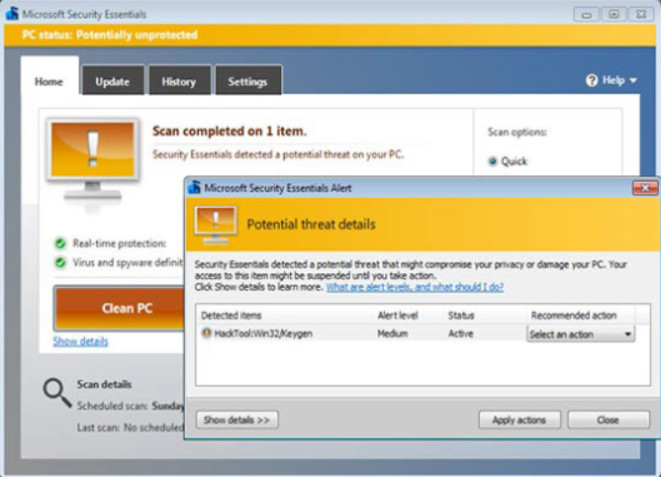
Virus Detection
Anti-malware programs are the best line of defense against malware because they continuously look for known patterns against a database of known malware signatures. They can also use heuristic malware identification techniques which can detect specific behavior associated with some types of malware.
Anti-malware programs are started when a computer boots checking the system resources, drives, and memory for malware. It then runs continuously in the background scanning for malware signatures. When a virus is detected, the anti-malware software displays a warning similar as shown in the figure. It may automatically quarantine or delete the malware depending on software settings.
Anti-malware programs are available for Windows, Linux, and macOS by many reputable security organizations such as McAfee, Symantec (Norton), Kaspersky, Trend Micro, Bitdefender and more.
Note: Using two or more anti-malware solutions simultaneously can negatively impact computer performance.
The most common method of malware delivery is through email. Email filters are a line of defense against email threats, such as spam, viruses, and other malware, by filtering email messages before they reach the user’s inbox. File attachments can also be scanned before they are opened.
Email filtering is available on most email applications or it can be installed at the organization’s email gateway. In addition to detecting and filtering out spam messages, email filters also allow the user to create blacklists of known spammer domains and to whitelist known trusted or safe domains.
Malware can also be delivered through applications that are installed. Installation of software from untrusted sources can lead to the spread of malware such as Trojans. To mitigate this risk vendors implement various methods to restrict the ability of users to install untrusted software. Windows uses the system of Administrator and Standard user accounts along with User Account Control.(UAC) and system policies to help prevent installation of untrusted software.
Be cautious of malicious rogue antivirus products that may appear while browsing the Internet. Most of these rogue antivirus products display an ad or pop-up that looks like an actual Windows warning window, as shown in Figure 2. They usually state that the computer is infected and must be cleaned. Clicking anywhere inside the window may begin the download and installation of the malware.
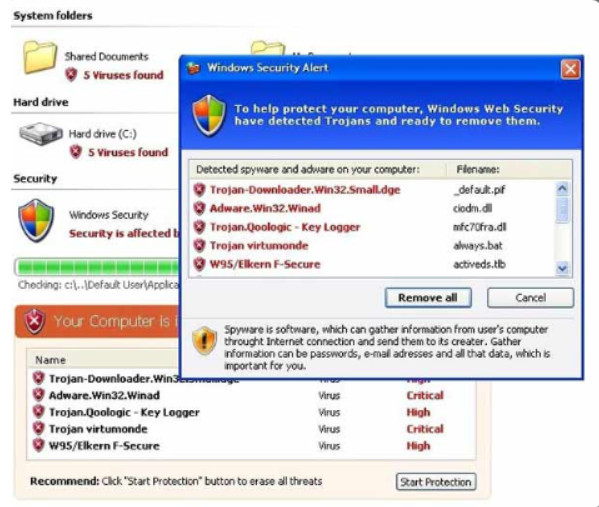
Example of a Rogue Antivirus
When faced with a warning window that is suspect, never click inside the warning window. Close the tab or the browser to see if the warning window goes away. If the tab or browser does not close, press ALT+F4 to close the window or use the task manager to end the program. If the warning window does not go away, scan the computer using a known, good antivirus or adware protection program to ensure that the computer is not infected.
Click here to read a blog about rogue antivirus malware.
In Linux, users are prompted if they attempt to install untrusted software. The software is signed with a cryptographic private key and requires the public key for the repository to install the software. 4
Mobile OS vendors use the walled garden model to prevent installation of untrusted software. Under this model, apps are distributed from an approved store, such as the App Store for Apple or the Windows Store for Microsoft.
13.1.2.2 – Signature File Updates
New malware is always being developed therefore anti-malware software must be updated regularly. This process is often enabled by default. However, a technician should know how to manually update anti-malware software signatures.
To update the signature file manually follow the suggested step in the figure.
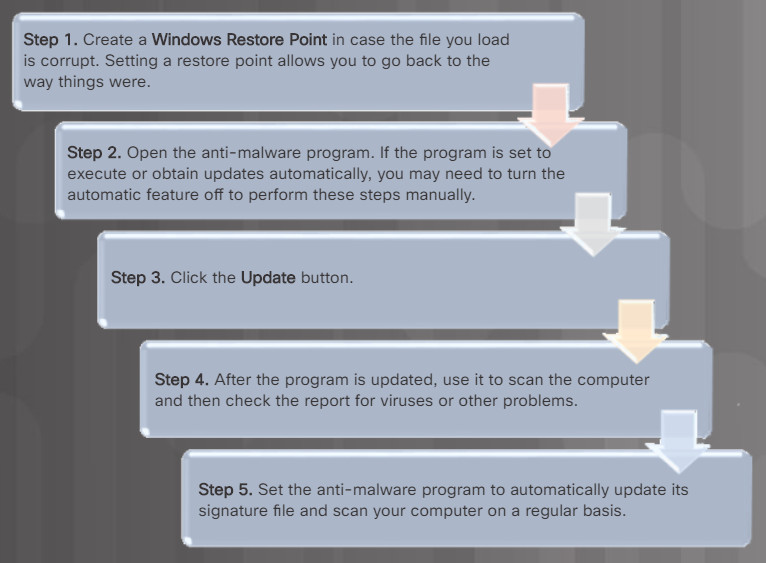
Steps for Updating a Anti-Malware Signature File
Always download the signature files from the manufacturer’s website to make sure the update is authentic and not corrupted by malware. This can put great demand on the manufacturer’s website, especially when new malware is released. To avoid creating too much traffic at a single website, some manufacturers distribute their signature files for download to multiple download sites. These download sites are called mirrors.
CAUTION: When downloading signature files from a mirror, ensure that the mirror site is a legitimate site. Always link to the mirror site from the manufacturer’s website.
13.1.2.3 – Video Explanation – Protecting Against Malware
Click Play in the figure to view an explanation of protecting against malware.
Click here to read the transcript of this video.
13.1.2.4 – Remediating Infected Systems
When a malware protection program detects that a computer is infected, it removes or quarantines the threat. However, the computer is most likely still at risk.
When malware is discovered on a home computer, you should update your anti-malware software and perform full scans of all your media. Many anti-malware programs can be set to run on system start before loading Windows. This allows the program to access all areas of the disk without being affected by the operating system or any malware.
When malware is discovered on a business computer, you should remove the computer from the network to prevent other computers from becoming infected. Unplug all network cables from the computer and disable all wireless connections. Next, follow the incident response policy that is in place. This may include notifying IT personnel, saving log files to removable media, or turning off the computer.
Removing malware may require that the computer be rebooted into Safe Mode. This prevents most drivers from loading. Some malware may require that a special tool from the anti-malware vendor be used. Be sure that you download these tools from a legitimate site.
For really stubborn malware, it may be necessary to contact a specialist to ensure that the computer has been completely cleaned. Otherwise, the computer may need to be reformatted, the operating system reinstalled, and recover your data from the most recent backups.
The OS system restore service may include infected files in a restore point. Therefore, once a computer has been cleaned of any malware, the system restore files should be deleted, as shown in the figure.
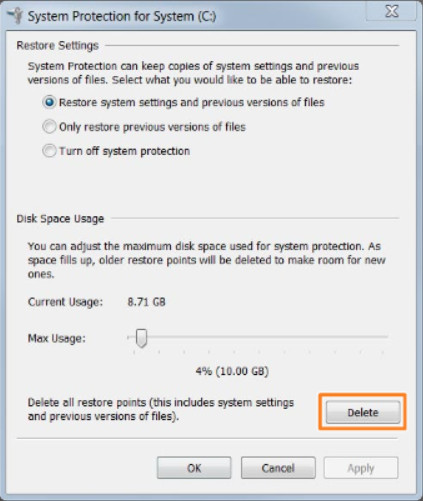
Deleting Restore Points
After remediation, you may need to fix some issues caused by viruses, it may be necessary to boot the computer using the Windows product disk and then use the Windows Recovery Console, which replaces the recovery console from Windows 2000, to run commands from a “clean” command environment. The Recovery Console can perform functions such as repairing the boot file and writing a new master boot record or volume boot record.
13.1.2.5 – Video Explanation – Remediating an Infected System
Click Play in the figure to view an explanation of how to remediate an infected system.
Click here to read the transcript of this video.
13.1.2.6 – Check Your Understanding – Preventing Malware
13.1.2.6 – Check Your Understanding – Preventing Malware
13.1.3 – Network Attacks
13.1.3.1 – Networks Are Targets
- Perform an information query of a target
Attacker is looking for network information about a target using various tools including Google search, organizations website, whois, and more. - Initiate a ping sweep of the target network
Attacker initiates a ping sweep of the discovered target’s public network address to determine which IP addresses are active. - Initiate a port scan of active IP addresses
Attacker determines which services are available on the active ports using tools such as Nmap, SuperScan, and more. - Run Vulnerability Scanners
Attacker runs vulnerability scanner to discover the type and version of the application and operating system running on the target host using tools such as Nipper, Secuna PSI, and more. - Run Exploitation tools
Attacker attempts to discover vulnerable services that can be exploited using tools such as Metasploit, Core Impact, and more.
13.1.3.2 – Types of TCP/IP Attacks
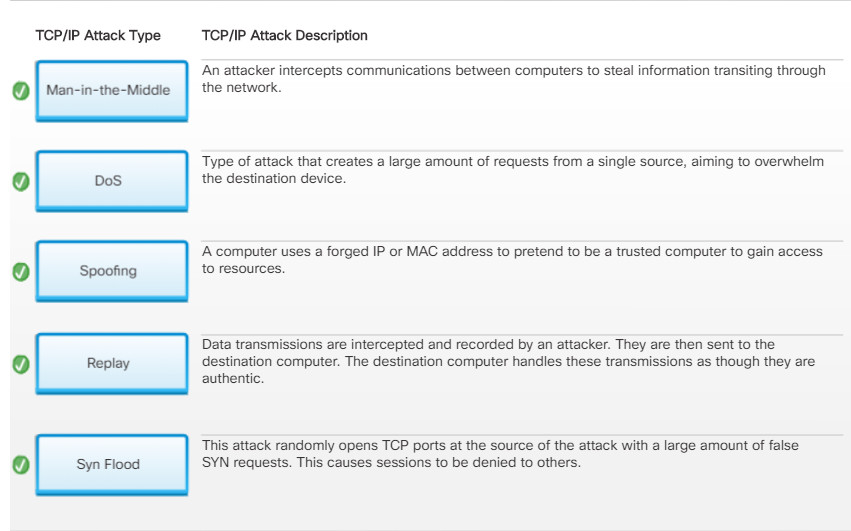
Denial of Service (DoS)
- In a DoS attack, the attacker completely overwhelms a target device with false requests to create a denial of service for legitimate users.
- An attacker could also cut or unplug a network cable to a critical network device to cause a network outage.
- DoS attacks may be caused for malicious reasons or used in conjunction with another attack.
Distributed DoS
- A DDoS attack is an amplified DoS attack using many infected hosts called zombies to overwhelm a target.
- Attackers control zombies using a handler computer and botnet is an army of compromised hosts.
- Botnets remain dormant until instructed by the handler.
- Botnets can be also be used for SPAM and phishing attacks.
DNS Poisoning
- In a DNS poisoning attack, the attacker has successfully infected a host to accept false DNS records pointing to malicious servers.
- Subsequently, traffic is diverted to these malicious servers to capture confidential information.
- An attacker can then retrieve the data from that location.
Man-in-the-Middle
- In a TCP/IP MitM attack, an attacker intercepts communications between two hosts.
- If successful, the attacker could capture packets and view their content, manipulate packets, and more.
- MitM attacks can be created using an ARP poisoning spoofing attack.
Replay
- A replay attack is a type of spoofing attack, where the attacker has:
- Captured an authenticated packet.
- Altered the packet’s contents.
- Sent it to its original destination.
- The goal is to have the target host accept the altered packet as authentic.
Spoofing
- In a TCP/IP spoofing attack, the attacker forges IP addresses.
- For example, an attacker has spoofed the IP address of a trusted host to gain access to resources.
Syn Flood
- A SYN flood attack is a type of DoS attack that exploits the TCP three-way handshake.
- The attacker sends continuous false SYN requests to the target.
- The target is eventually overwhelmed and unable to establish valid SYN requests creating a DoS attack.
13.1.3.3 – Check Your Understanding – Identify the TCP/IP Attack
13.1.3.3 – Check Your Understanding – Identify the TCP/IP Attack
13.1.3.4 – Zero-Day
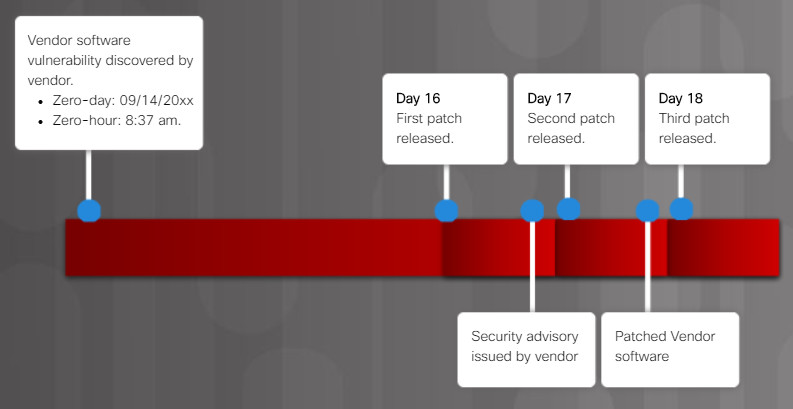
The following two terms are commonly used to describe when a threat is detected:
- Zero-day – Sometimes also referred to as zero-day attacks, zero-day threat, or zero-day exploit. This is the day that an unknown vulnerability has been discovered by the vendor. The term is a reference to the amount of time that a vendor has had to address the vulnerability.
- Zero-hour – This is the moment when the exploit is discovered.
A network remains vulnerable between the zero-day and the time it takes a vendor to develop a solution.
In the example in the figure, a software vendor has learned of a new vulnerability. The software can be exploited until a patch that addresses the vulnerability is made available. Notice that in the example, it took several days and a few software patch updates to mitigate the threat.
Zero-Day
How can networks be protected against all of the threats and zero-day attacks?
13.1.3.5 – Protecting Against Network Attacks
Many network attacks are fast moving, therefore, network security professionals must adopt a more sophisticated view of the network architecture. There is no one solution to protect against all TCP/IP or zero-day attacks.
One solution is to use a defense-in-depth approach also known as a layered approach to security. This requires a combination of networking devices and services working together in tandem.
Consider the network in the figure. There are several security devices and services implemented to protect its users and assets against TCP/IP threats.
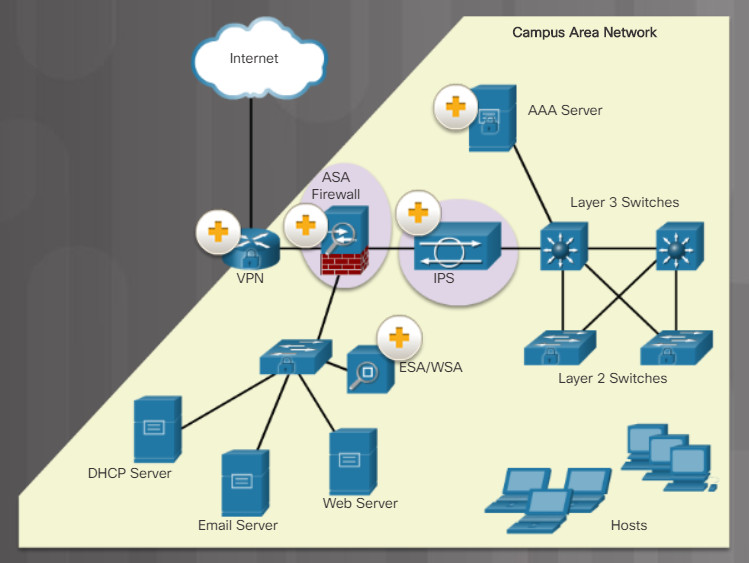
All network devices including the router and switches are also hardened as indicated by the combination locks on their respective icons. This indicates that they have been secured to prevent attackers from tampering with the devices.
13.1.4 – Social Engineering Attacks
13.1.4.1 – Social Engineering
To secure networks and hosts, organizations often deploy the network security solutions and latest anti-malware solutions for their hosts. However, they still have not addressed the weakest link … the users.
Social engineering is likely the single most serious threat to a well-configured and well-secured network.

Social Engineering Techniques
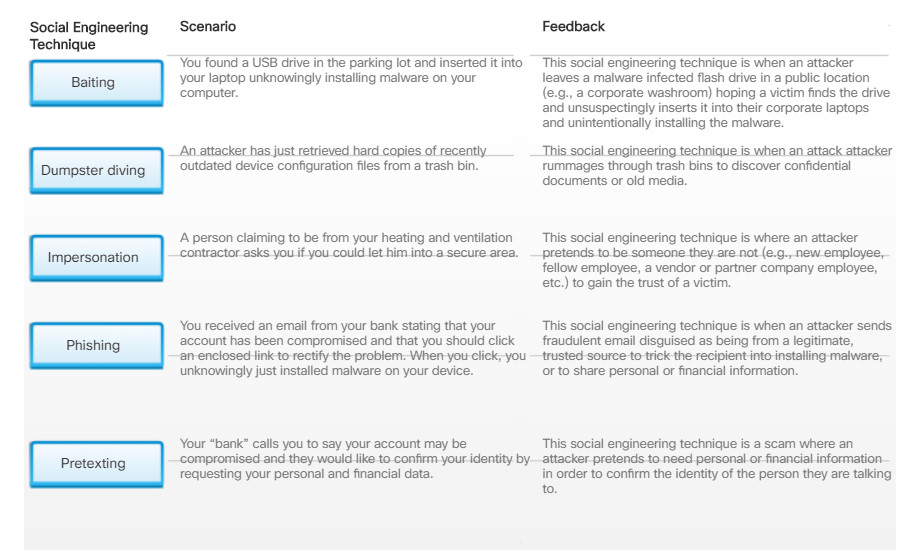
Cybercriminals use social engineering techniques to deceive and trick unsuspecting targets to reveal confidential information or violate security gain information. Social engineering is an access attack that attempts to manipulate individuals into performing actions or divulging confidential information.
Social engineers prey on people’s weaknesses and often rely on human nature and people’s willingness to be helpful.
Note: Social engineering is often used in conjunction with other network attacks.
13.1.4.2 – What Do You Already Know? – Social Engineering Techniques
13.1.4.2 – What Do You Already Know? – Social Engineering Techniques
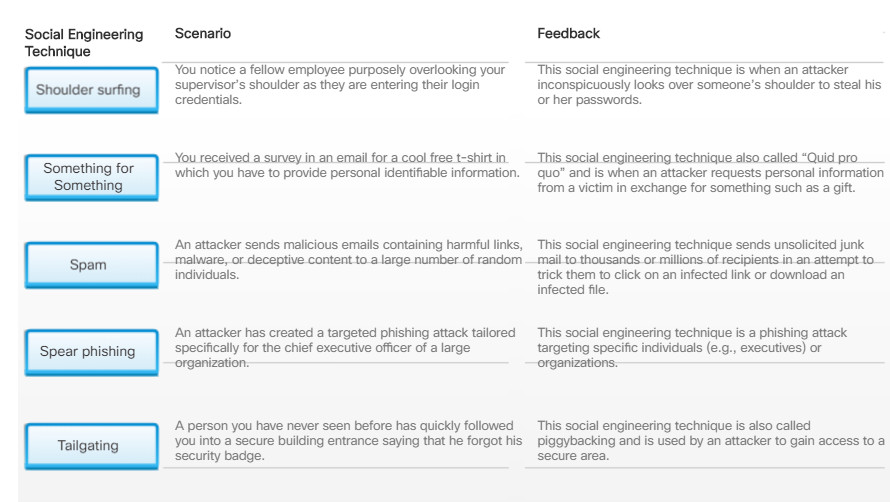
13.1.4.2 – What Do You Already Know? – Social Engineering Techniques
13.1.4.3 – Social Engineering Techniques
There are many different ways to use social engineering techniques. Some social engineering techniques are used in-person while others may use the telephone or Internet.
For example, a hacker could call an authorized employee with an urgent problem that requires immediate network access. The hacker could appeal to the employee’s vanity, invoke authority using name-dropping techniques, or appeal to the employee’s greed.
Click the + sign in the figure to learn about social engineering techniques.
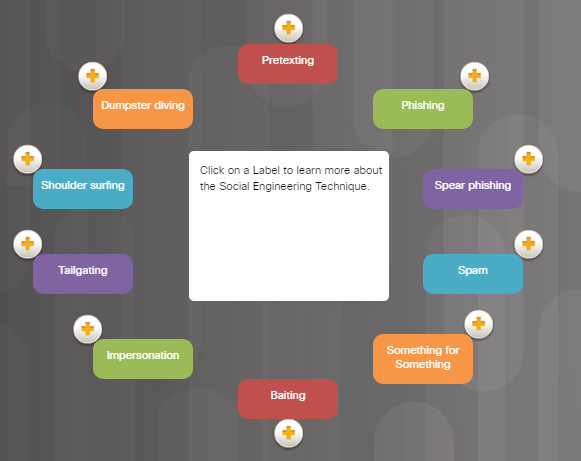
Social Engineering Techniques
13.1.4.4 – Protecting Against Social Engineering
Enterprises must train and educate their users about the risks of social engineering, and develop strategies to validate identities over the phone, via email, or in person.
The figure lists recommended practices that should be followed by all users.
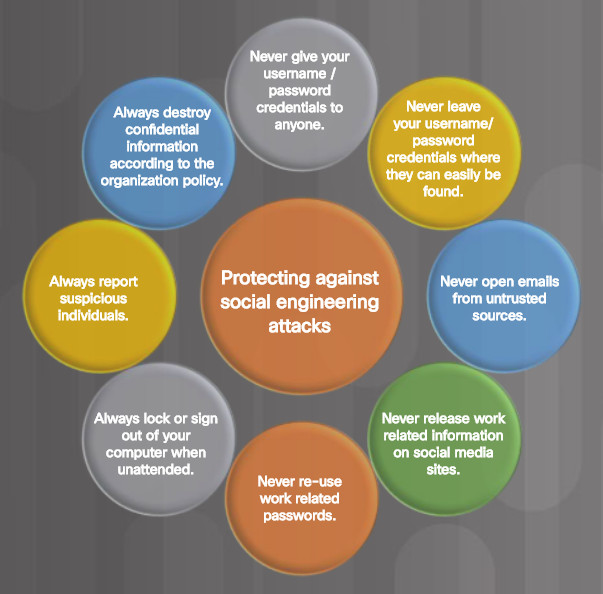
Protecting Against Social Engineering
13.1.4.5 – Check Your Understanding – Personal and Corporate Social Engineering Techniques
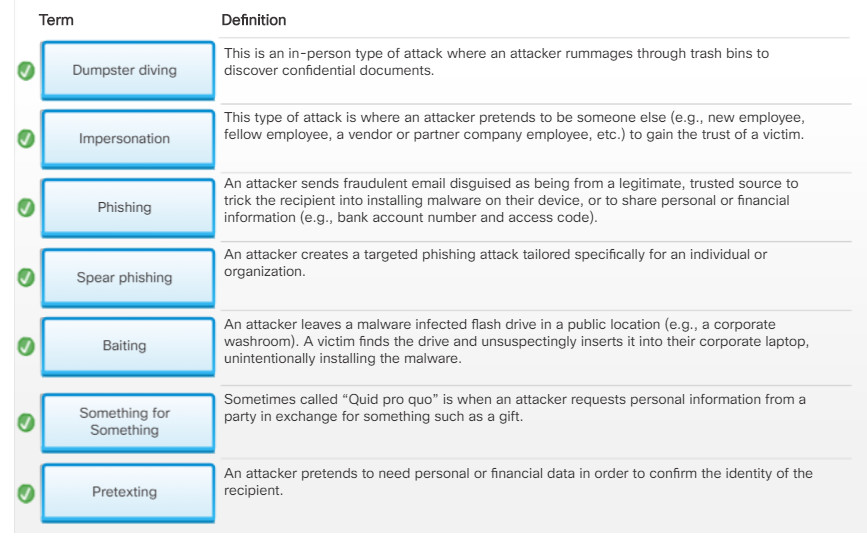
13.1.4.5 – Check Your Understanding – Personal and Corporate Social Engineering Techniques
13.2 – Security Procedures
13.2.1 – Security Policy
13.2.1.1 – What is a Security Policy
A security policy is a set of security objectives that ensure the security of a network, the data, and the computers in an organization. The security policy is a constantly evolving document based on changes in technology, business, and employee requirements.
The security policy is usually created by a committee with members consisting of management and IT staff. Together they create and manage a document that should answer the questions listed in the figure.
Security Policy Identifies
- Which assets require protection?
- What are the possible threats?
- What to do in the event of a security breach?
- What training will be in place to educate the end users?
A security policy typically addresses the items described in the figure. This list is not exhaustive and would include other items related specifically to the operation of an organization.
Security Policy
- Identification and Authentication Policies
- Password Policies
- Acceptable Use Policies
- Remote Access Policies
- Network Maintenance Policies
- Incident Handling Policies
It is up to the IT staff to implement security policy specifications in the network. For example, to implement recommendations on a Windows host, IT staff could use the Local Security Policy feature.
13.2.1.2 – Security Policy Category

Security Policy Category
- Identification and Authentication Policies
Specifies authorized persons that can have access to network resources and outlines verification procedures. - Password Policies
Ensures passwords meet minimum requirements and are changed regularly. - Acceptable Use policies
Identifies network resources and usages that are acceptable to the organization. It may also identify ramifications if this policy is violated. - Remove Access policies
Identifies how remote users can access a network and what is accessible via remote connectivity. - Network Maintenance Policies
Specifies network device operating systems and end-user application update procedures. - Incident Handling Policies
Describes how security incidents are handled.
13.2.1.3 – Securing Devices and Data
The goal of the security policy is to ensure a safe network environment and to protect assets. As shown in the figure, an organization’s assets include their data, employees, and physical devices such as computers and network equipment.
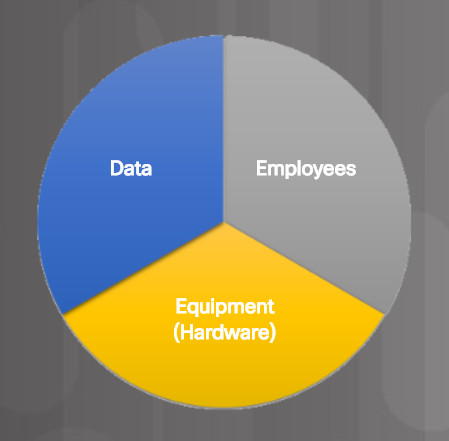
Organization’s Assets
The security policy should identify hardware and equipment that can be used to prevent theft, vandalism, and data loss.
13.2.2 – Protecting Physical Equipment
13.2.2.1 – Physical Security
Physical security is as important as data security. For example, if a computer is taken from an organization, the data is also stolen or worse, lost.
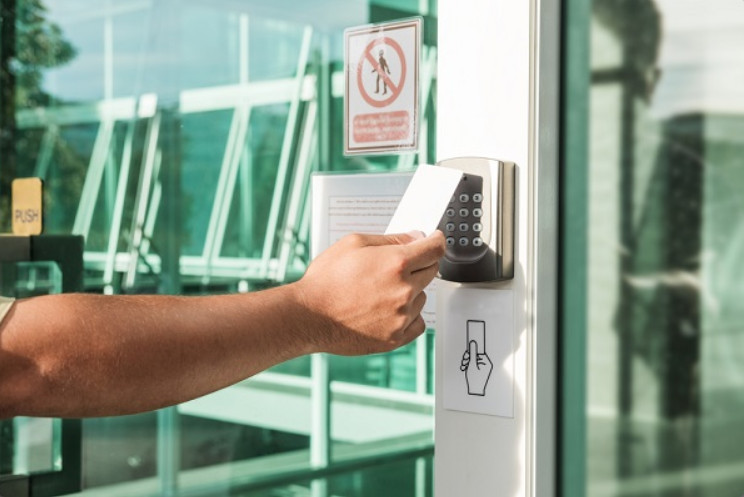
Secure Entrance
Physical security involves securing:
- Access to an organization’s premise
- Access to restricted areas
- The computing and network infrastructure
The level of physical security implemented depends on the organization as some have higher physical security requirements than others.
For example, consider how data centers, airports, or even military installations are secured. These organizations use perimeter security including fences, gates, and checkpoints posted with security guards.
Entrance to a building premise and restricted areas is secured using one or more locking mechanism. Building doors typically use self-closing and self-locking mechanisms. The type of locking mechanism required varies based on the level of security required.
A visitor accessing a secure building may have to pass through a security checkpoint manned by security guards. They may scan you and your belongings, and have you sign in an entry control roster when you enter the building and sign out when you leave.
Higher security organizations have all employees wear identification badges with photographs. These badges could be smart cards containing the user information and security clearance to access restricted areas. For additional security requirements, RFID badges can also be used with proximity badge readers to monitor the location of an individual.
13.2.2.2 – Types of Secure Locks
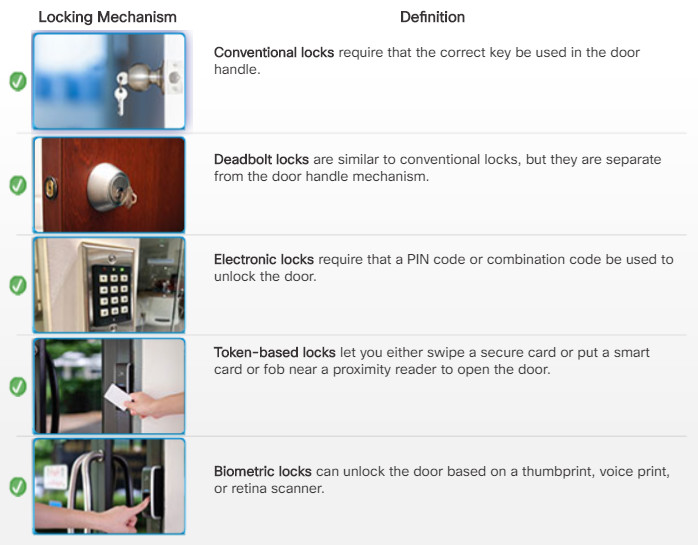
Below are types of secure locks.

Unlocked by entering the required key into the door handle mechanism.

Unlocked by entering the required key into a lock separate from the door handle mechanism.

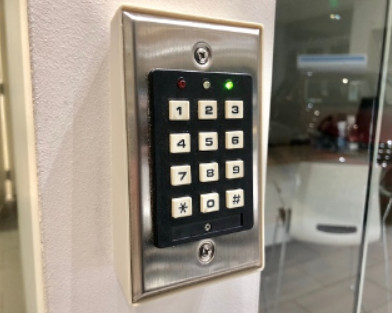
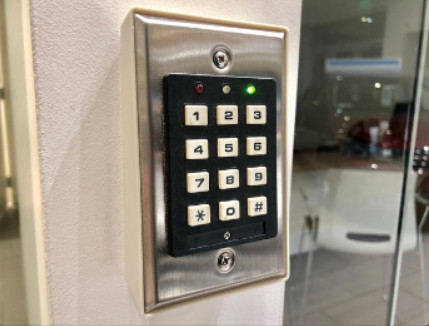
Unlocked by entering a secret combination code or PIN into the keypad.
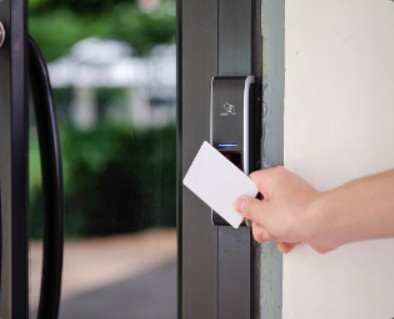
Unlocked by swiping a secure card or by using a near proximity reader to detect a smart card or wireless key fob.
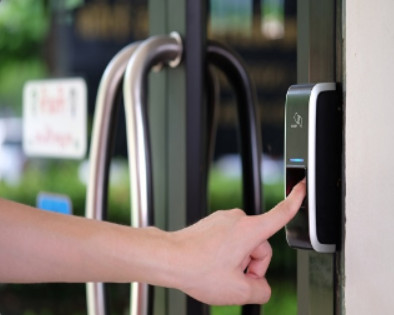
Unlocked using a biometric scanner such as a thumbprint reader. Other biometric scanners include voice print or a retina scanner.
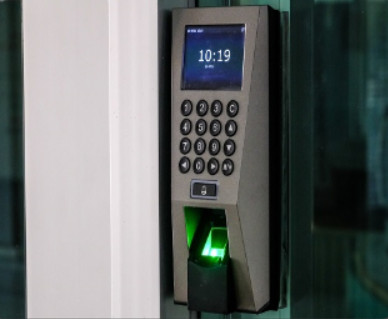
A lock that uses a combination of mechanisms. For example, a user must enter a PIN code and then scan their thumb.
13.2.2.3 – Mantraps
In high-security environments, mantraps are often used to limit access to restricted areas and to prevent tailgating. A mantrap is a small room with two doors, one of which must be closed before the other can be opened.
Typically, a person enters the mantrap by unlocking one door. Once inside the mantrap, the first door closes and then the user must unlock the second door to enter the restricted area.
The figure illustrates how a mantrap is used to secure access to a restricted area.
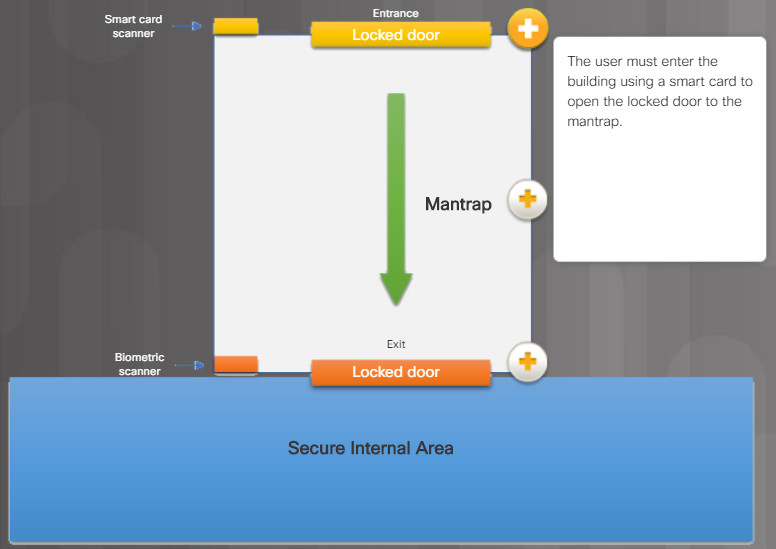
The user must enter the building using a smart card to open the locked door to the mantrap
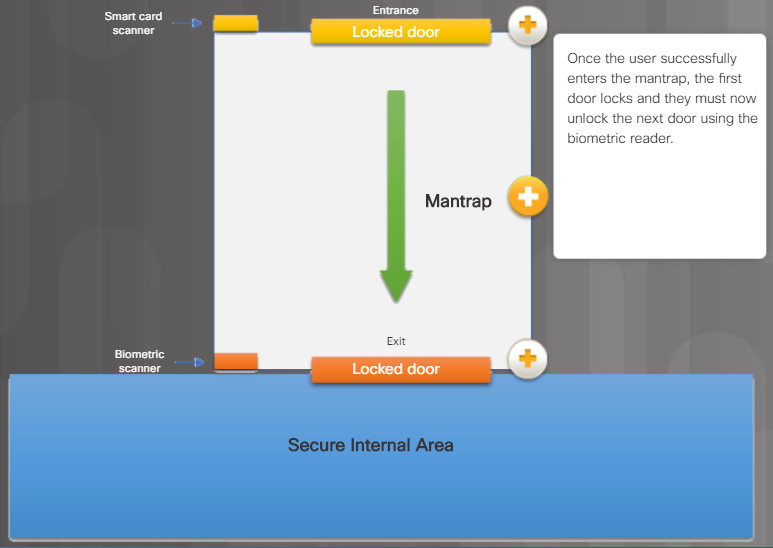
Once the user successfully enters the mantrap, the first door locks and they must now unlock the next door using the biometric reader.
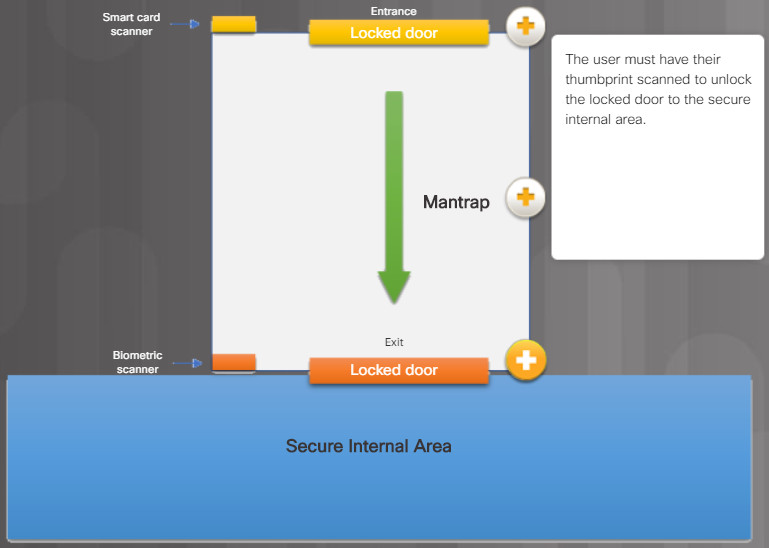
The user must have their thumbprint scanned to unlock the locked door to the secure internal area
13.2.2.4 – Securing Computers and Network Hardware
Organizations must protect their computing and network infrastructure. This includes cabling, telecommunication equipment, and network devices.
There are several methods of physically protecting computer and networking equipment as listed in the figure.
- Use webcams with motion-detection and surveillance software.
- Install physical alarms triggered by motion-detection sensors.
- Label and install RFID sensors on equipment
- Use locking cabinets or security cages around equipment.
- Fit equipment with security screws.
- Keep telecommunication rooms locked.
- Use cable locks with equipment.
Securing the Computing and Network Infrastructure
Network equipment should only be installed in secured areas. As well, all cabling should be enclosed within conduits or routed inside walls to prevent unauthorized access or tampering. Conduit is a casing that protects the infrastructure media from damage and unauthorized access.
Access to physical switch ports and switch hardware should be restricted to authorized personnel by using a secure server room and locking hardware cabinets. To prevent the attachment of rogue or unauthorized client devices, switch ports should be disabled through the switch management software.
Factors that determine the most effective security equipment to use to secure equipment and data include:
- How the equipment is used
- Where the computer equipment is located
- What type of user access to data is required
For instance, a computer in a busy public place, such as a library, requires additional protection from theft and vandalism. In a busy call center, a server may need to be secured in a locked equipment room. Server locks can provide physical chassis security by preventing access to power switches, removable drives, and USB ports. Where it is necessary to use a laptop computer in a public place, a security dongle and key fob ensure that the computer locks if the user and laptop are separated. Another tool for physical security is the USB lock which is locked into place in a USB port and requires a key to be removed.
Security policies can be applied to mobile devices in a corporate network through Mobile Device Management software. MDM software can manage corporate-owned devices and Bring Your Own Device (BYOD). The software logs use of devices on the network and determines if it should be allowed to connect, known as onboarding, or not based on administrative policies.
13.2.2.5 – Check Your Understanding – Locking Mechanisms
13.2.2.5 – Check Your Understanding – Locking Mechanisms
13.2.3.1 – Data – Your Greatest Asset
Data is likely to be an organization’s most valuable assets. Organizational data can include research and development data, sales data, financial data, human resource and legal data, employee data, contractor data, and customer data.
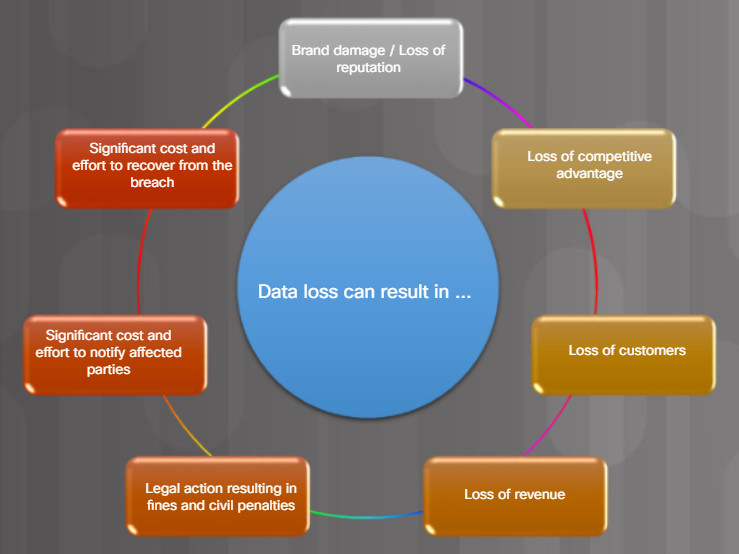
Data can be lost or damaged in circumstances such as theft, equipment failure, or a disaster. Data loss or data exfiltration are terms used to describe when data is intentionally or unintentionally lost, stolen, or leaked to the outside world.
Data loss can negatively affect an organization in multiple ways as listed in Figure 1. Losing data regardless of circumstances can be detrimental or even catastrophic to an organization.
Data Loss
Data can be protected from data loss using the methods listed in Figure 2.
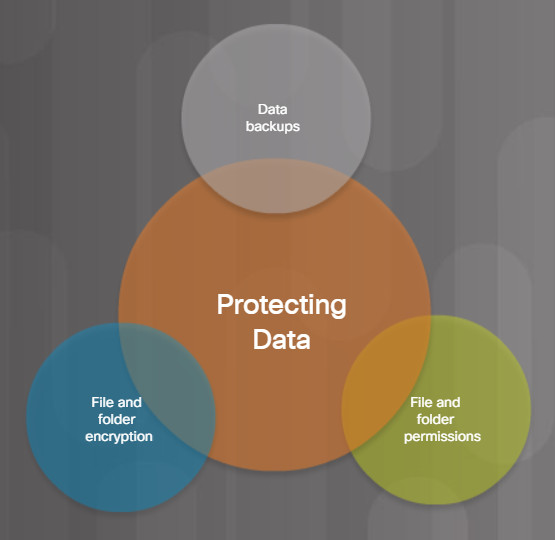
Mitigating Data Loss
Data loss prevention (DLP) is preventing data loss or leakage. DLP software uses a dictionary database or algorithm to identify confidential data and block the transfer of that data to removable media or email if it does not conform to predefined policy.
13.2.3.2 – Data Backups
Backing up data is one of the most effective ways of protecting against data loss. A data backup stores a copy of the information on a computer to removable backup media that can be kept in a safe place. If the computer hardware fails, the data can be restored from the backup to functional hardware.
Data backups should be performed on a regular basis as identified in the security policy. Data backups are usually stored offsite to protect the backup media if anything happens to the main facility. Windows hosts have a backup and restore utility. This is useful for users to backup their data to another drive or to a cloud-based storage provider. The macOS includes the Time Machine utility to perform backup and restore functions.
Click each + button in the figure to learn about backup consideration.
Frequency
- Perform backups on a regular basis as identified in the security policy.
- Full backups can be time-consuming, therefore perform monthly or weekly full backups with frequent partial backups of changed files.
Security
- Backups should be transported to an approved offsite storage location on a daily, weekly, or monthly rotation, as required by the security policy.
Validation
- Backups should be protected using strong passwords.
- The password is required to restore data.
Storage
- Always validate backups to ensure the integrity of the data and validate the file restoration procedures.
13.2.3.3 – File and Folder Permissions
Permissions are rules you configure to limit folder or file access for an individual or for a group of users. The figure lists the permissions that are available for files and folders.
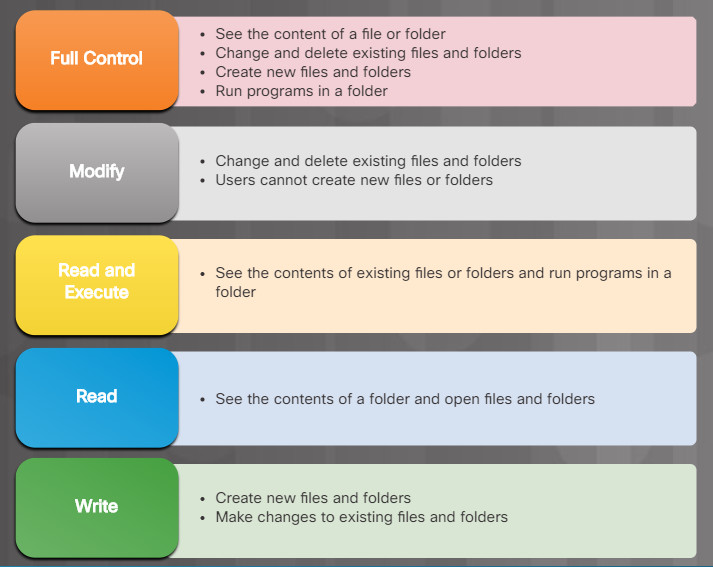
File and Folder Permissions
To configure file- or folder-level permissions in all versions of Windows, right-click the file or folder and select Properties > Security > Edit…
Users should be limited to only the resources they need in a computer or on a network. For example, they should not be able to access all files on a server if they only need access to a single folder. It may be easier to provide users access to the entire drive, but it is more secure to limit access to only the folder that is needed to perform their job. This is known as the principle of least privilege. Limiting access to resources also prevents malicious programs from accessing those resources if the user’s computer becomes infected.
Folder redirection allows a user with administrative privileges to redirect the path of a local folder to a folder on a network share. This makes the folder’s data available to the user when they log into any computer on the network where the network share is located. With user data redirected from local to network storage, administrators can back up the user data when the network data folders are backed up.
File and network share permissions can be granted to individuals or through membership within a group. These share permissions are much different than file and folder level NTFS permissions. If an individual or a group is denied permissions to a network share, this denial overrides any other permissions given. For example, if you deny someone permission to a network share, the user cannot access that share, even if the user is the administrator or part of the administrator group. The local security policy must outline which resources and the type of access allowed for each user and group.
When the permissions of a folder are changed, you are given the option to apply the same permissions to all sub-folders. This is known as permission propagation. Permission propagation is an easy way to apply permissions to many files and folders quickly. After parent folder permissions have been set, folders and files that are created inside the parent folder inherit the permissions of the parent folder.
Also, the location of the data and the action performed on the data determine how the permissions are propagated:
- Data is moved to the same volume – It will keep the original permissions
- Data is copied to the same volume – It will inherit new permissions
- Data is moved to a different volume – It will inherit new permissions
- Data is copied to a different volume – It will inherit new permissions
13.2.3.4 – File and Folder Encryption
Encryption is often used to protect data. Encryption is where data is transformed using a complicated algorithm to make it unreadable. A special key must be used to return the unreadable information back into readable data. Software programs are used to encrypt files, folders, and even entire drives.
Encrypting File System (EFS) is a Windows feature that can encrypt data. EFS is directly linked to a specific user account. Only the user that encrypted the data will be able to access it after it has been encrypted using EFS. To encrypt data using EFS in all Windows versions, follow these steps:
- Step 1. Select one or more files or folders.
- Step 2. Right-click the selected data >Properties.
- Step 3. Click Advanced…
- Step 4. Select the Encrypt contents to secure data check box and click OK. Windows will display an informational message stating that it is applying attributes.
- Step 5. Files and folders that have been encrypted with EFS are displayed in green, as shown in the figure.
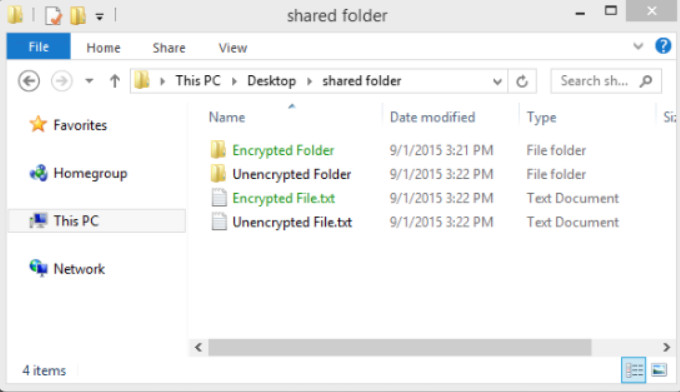
Encrypting a File System
13.2.3.5 – Windows BitLocker and BitLocker To Go
You can also choose to encrypt an entire hard drive using a feature called BitLocker. To use BitLocker, at least two volumes must be present on a hard disk. A system volume is left unencrypted and must be at least 100 MB. This volume holds the files required by Windows to boot.
Note: BitLocker is built into the Windows Enterprise editions, Windows 7 Ultimate, Windows 8 Pro, and Windows 10 Professional.
Before using BitLocker, the Trusted Platform Module (TPM) must be enabled in BIOS. The TPM is a specialized chip installed on the motherboard. The TPM stores information specific to the host computer, such as encryption keys, digital certificates, and passwords. Applications, like BitLocker, that use encryption can make use of the TPM chip. Figure 1 lists the steps to enable TPM on a Lenovo laptop.
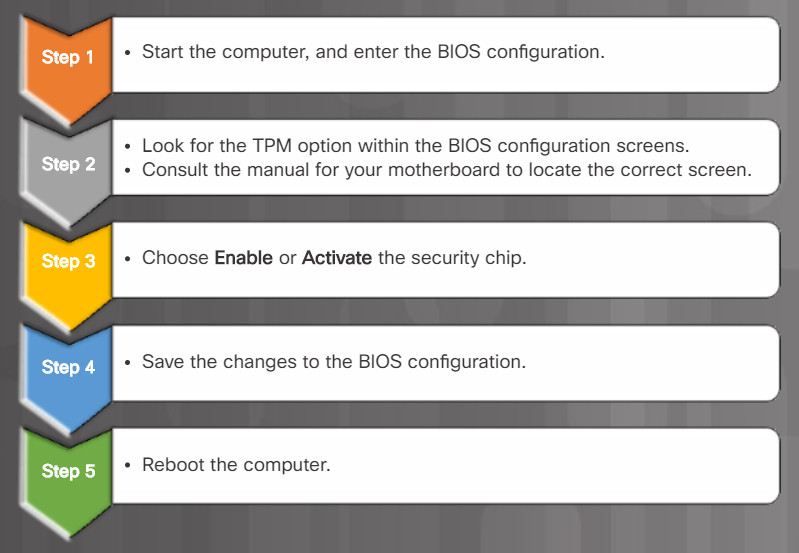
Steps to enabling TPM
To turn on BitLocker full disk encryption in all versions of Windows, follow the steps listed in Figure 2.
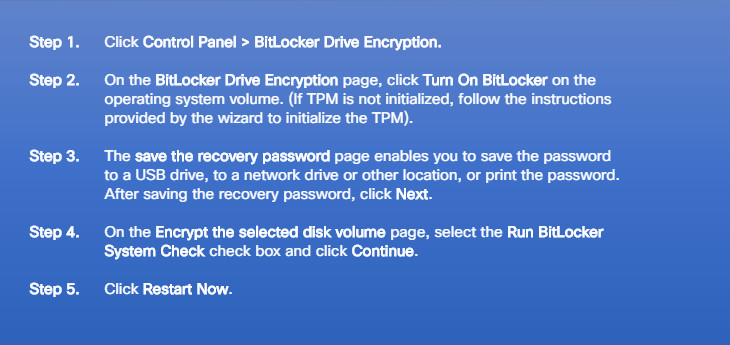
Steps to Enabling BitLocker
Once the steps are completed, the Encryption in Progress status bar is displayed. After the computer reboots, you can verify BitLocker is active as shown in Figure 3. You can click TPM Administration to view the TPM details, as shown in Figure 4.
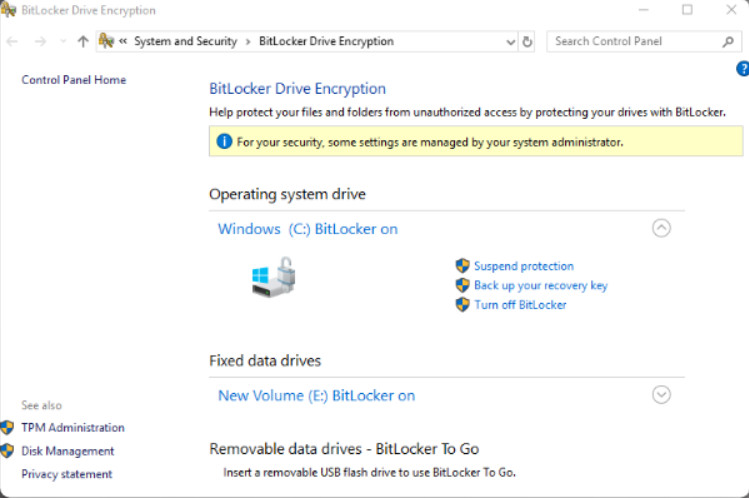
Verify BitLocker is Active
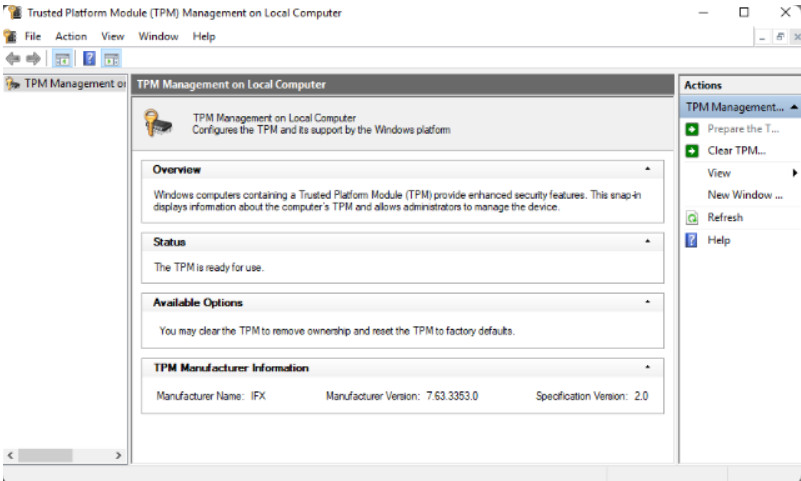
View TPM Details
BitLocker encryption can also be used with removable drives by using BitLocker To Go. BitLocker To Go does not use a TPM chip, but still provides encryption for the data and requires a password.
13.2.3.6 – Video Demonstration – Bitlocker and Bitlocker To Go
Click Play in the figure to view a demonstration of how to use Bitlocker and Bitlocker To Go.
Click here to read the transcript of this video.
13.2.3.7 – Lab – Bitlocker and Bitlocker To Go
In this lab, you will enable BitLocker encryption on a removable data drive and on the computer system drive.
13.2.3.7 – Lab- Bitlocker and Bitlocker To Go
13.2.4.1 – Data Wiping Magnetic Media
Protecting data also includes removing files from storage devices when they are no longer needed. Simply deleting files or reformatting the drive may not be enough to ensure your privacy.
For example, deleting files from a magnetic hard disk drive does not remove them completely. The operating system removes the file reference in the file allocation table but the actual data remains on the drive. This deleted data is only overwritten when the hard drive stores new data in the same location.
Software tools can be used to recover folders, files, and even entire partitions. This could be a blessing if the erasure was accidental. But it could also be disastrous if the data is recovered by a malicious user.
For this reason, storage media should be fully erased using one or more of the methods listed in the figure.
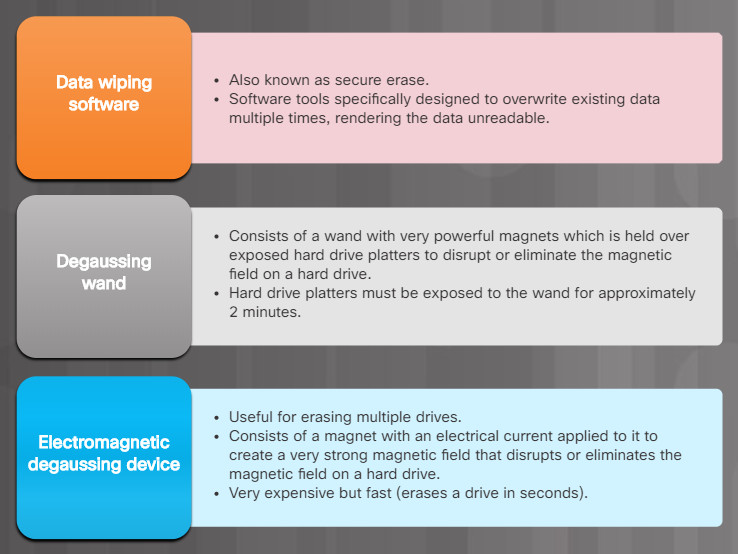
Wiping Data From A Hard Disk Drive
Note: Data wiping and degaussing techniques are irreversible, and the data can never be recovered.
13.2.4.2 – Data Wiping Other Media
SSDs are comprised of flash memory instead of magnetic platters. Common techniques used for erasing data such as degaussing are not effective with flash memory. Perform a secure erase to fully ensure that data cannot be recovered from an SSD and hybrid SSD.

Data Wiping Other Media
Other storage media and documents (e.g., optical disks, eMMC, USB sticks) must also be destroyed. Use a shredding machine or incinerator that is designed to destroy documents and each type of media. For sensitive documents that must be kept, such as those with classified information or passwords, always keep them locked in a secure location.
When thinking about what devices must be wiped or destroyed, remember that devices besides computers and mobile devices store data. Printers and multifunction devices may also contain a hard drive that caches printed or scanned documents. This caching feature can be turned off in some instances, or the device needs to be wiped on a regular basis to ensure data privacy. It is a good security practice to set up user authentication on the device, if possible, to prevent an unauthorized person from changing any settings that concern privacy.
13.2.4.3 – Hard Drive Recycling and Destruction
Companies with sensitive data should always establish clear policies for storage media disposal. There are two choices available when a storage media is no longer needed.
The media can either be:
-
- Recycled – Hard drives that have been wiped can be reused in other computers. The drive can be reformatted, and a new operating system installed. Two types of formatting can be performed as described in the figure.
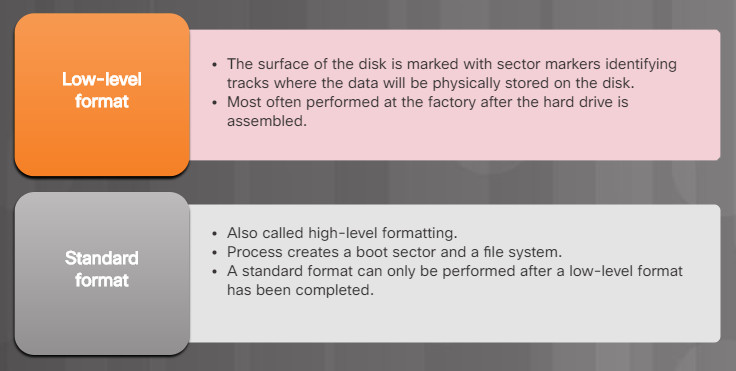
Hard Drive Recycling and Destruction
- Destroyed – Destroying the hard drive fully ensures that data cannot be recovered from a hard drive. Specifically designed devices such as hard drive crushers, hard drive shredders, incinerators, and more can be used for large volumes of drives. Otherwise physically damaging the drive with a hammer is effective.
A company may choose an outside contractor to destroy their storage media. These contractors are typically bonded and follow strict governmental regulations. They may also offer a certificate of destruction to provide evidence that the media has been completely destroyed.
13.2.4.4 – Check Your Understanding – Data Protection
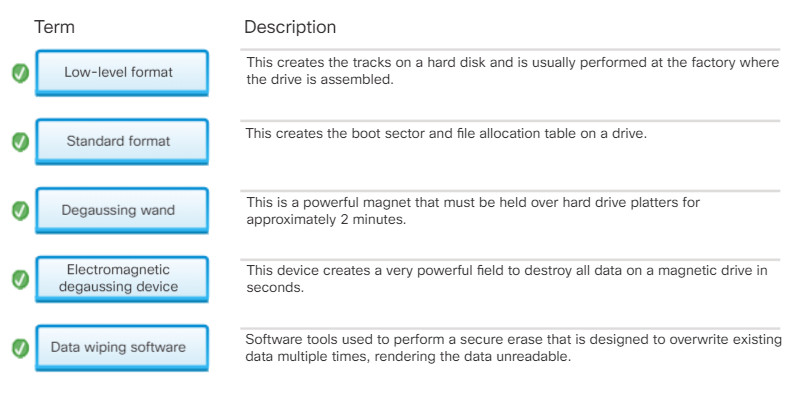
13.2.4.4 – Check Your Understanding – Data Protection
13.3 – Securing Windows Workstations
13.3.1 – Securing a Workstation
13.3.1.1 – Securing a Computer
Computers and workstations should be secured from theft. This is a standard practice in a company as computers are typically secured in locked rooms.
To prevent unauthorized users from stealing or accessing local computers and network resources, lock your workstation, laptop, or server when you are not present. This includes physical security as well as password security.
If you must leave a computer in an open public area, cable locks should be used to deter theft.
Data displayed on your computer screen should also be protected. This is especially true when using a laptop in a public location such as an airport, coffee house, or customer site. Use a privacy screen to protect the information displayed on your laptop screen from prying eyes. A privacy screen is a clear plastic panel attached to the computer screen that only permits the user in front of the screen to see the information displayed.
Access to your computer must also be protected. There are three levels of password protection that can be used on a computer as described in the figure.
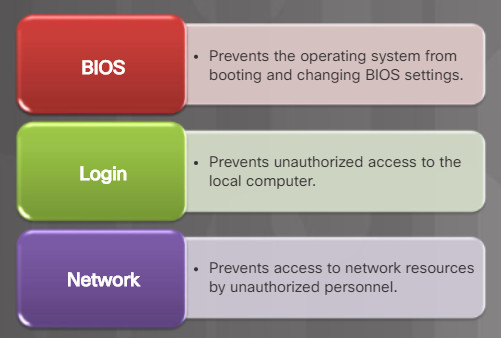
Three Types of Password Protection
13.3.1.2 – Securing BIOS
A Windows, Linux, or Mac login password can be bypassed. Your computer may be booted from a CD or flash drive with a different operating system. After it is booted, the malicious user could access or erase your files.
Setting a BIOS or UEFI password can prevent someone from booting the computer. It also prevents someone from altering the configured settings. In the figure, for example, a user would have to enter the configured BIOS password to access the BIOS configuration.
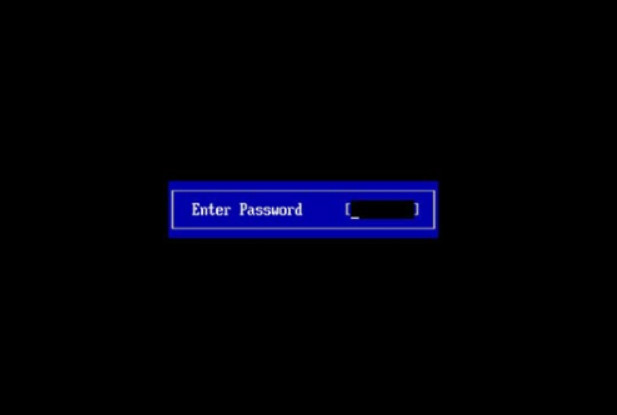
BIOS Authentication
All users, regardless of user account, share BIOS passwords. UEFI passwords can be set on a per-user basis. However, an authentication server is required.
CAUTION: A BIOS or UEFI password is relatively difficult to reset, therefore be sure you remember it.
13.3.1.3 – Securing Windows Login
The most common type of password protection is the computer login. This is typically where you enter a password and sometimes a username as shown in Figure 1.
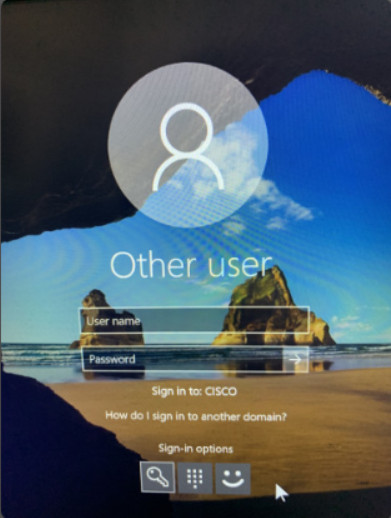
Windows 10 Login
Depending on your computer system, Windows 10 may also support other sign-in options. Specifically, Windows 10 supports the following sign-in options:
- Windows Hello – Feature that enables Window you to use facial recognition or use your fingerprint to access Windows.
- PIN – Enter a pre-configured PIN number to access Windows.
- Picture password – You choose a picture and gestures to use with the picture to create a unique password.
- Dynamic lock – Feature makes Windows lock when a pre-paired device such as a cell phone goes out of range of the PC.
Figure 2 displays a sample PIN authentication screen instead of the password login option. In this example, a user could change the sign-in option to either password, fingerprint, or facial recognition. If a user chose to authenticate using their fingerprint, they would then scan their finger as shown in Figure 3.
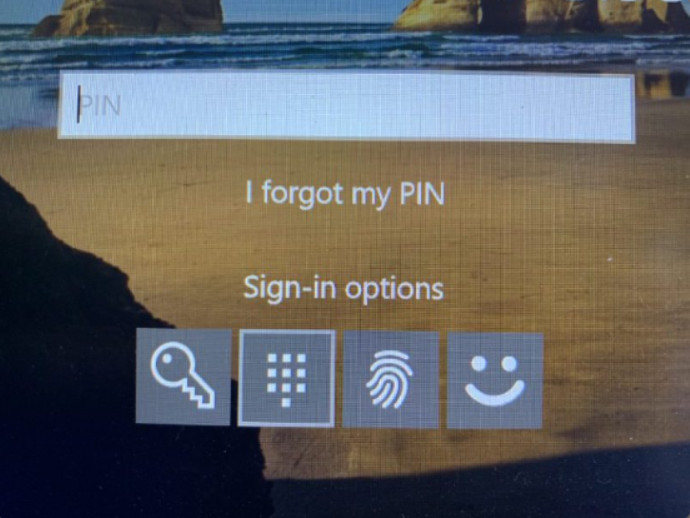
Windows 10 PIN Sign-in Option

Laptop Fingerprint Reader
To change sign-in options on a Windows 10 computer, use Start > Settings > Accounts > Sign-in options as shown in Figure 4. In this window, you could also change your password, set a PIN number, enable picture password, and dynamic lock.
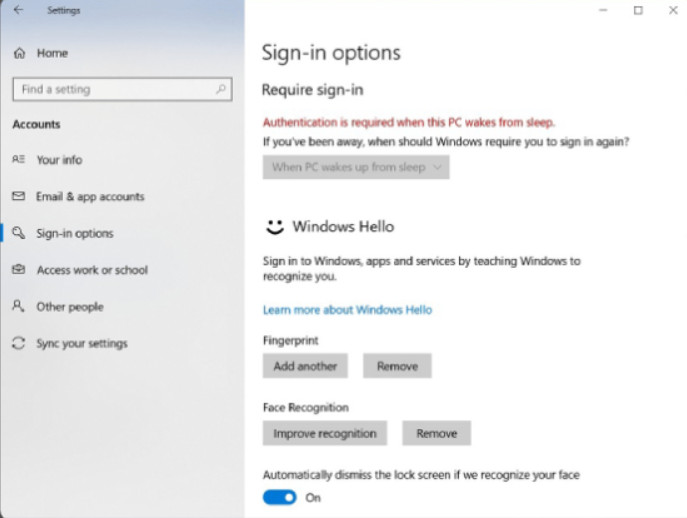
Windows 10 Sign-in Options
13.3.1.4 – Local Password Management
Password management for stand-alone Windows computers can be set locally using the Windows User Accounts tool. To create, remove, or modify a password in Windows, use Control Panel > User Accounts as shown in Figure 1.
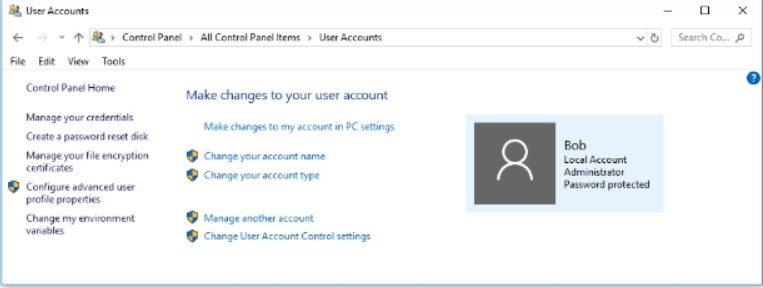
User Accounts Tool
It is also important to make sure that computers are secure when users are away. A security policy should contain a rule about requiring a computer to lock when the screensaver starts. This will ensure that after a short time away from the computer, the screen saver will start and then the computer cannot be used until the user logs in.
In all versions of Windows, use Control Panel > Personalization > Screen Saver as shown in Figure 2. Choose a screen saver and a wait time, and then select the On resume, display logon screen option.
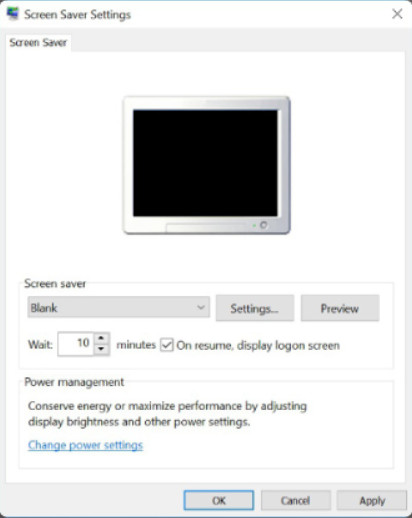
Set Screen Saver Lock
13.3.1.5 – Usernames and Passwords
The system administrator usually defines a naming convention for usernames when creating network logins. A common example of a username is the first letter of the person’s first name and then the entire last name. Keep the naming convention simple so that people do not have a hard time remembering it. Usernames, like passwords, are an important piece of information and should not be revealed.
Password guidelines are an important component of a security policy. Any user that must log on to a computer or connect to a network resource should be required to have a password. Passwords help prevent theft of data and malicious acts. Passwords also help to confirm that the logging of events is valid by ensuring that the user is the correct person.
The figure lists guidelines to create strong passwords.
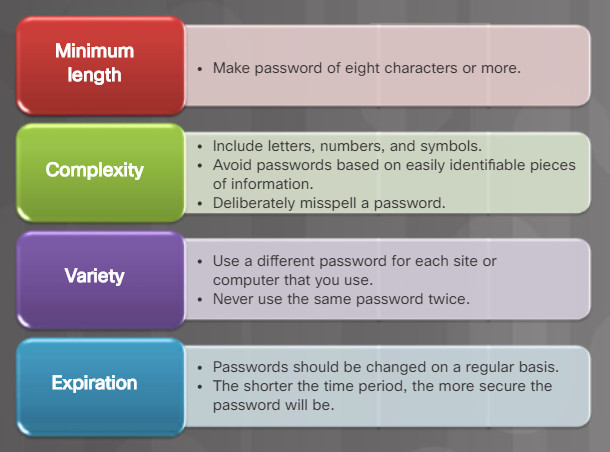
Strong Password Guidelines
13.3.1.6 – Check your Understanding – Secure a Workstation

13.3.1.6 – Check your Understanding – Secure a Workstation
13.3.2 – Windows Local Security Policy
13.3.2.1 – The Windows Local Security Policy
In most networks that use Windows computers, Active Directory is configured with Domains on a Windows Server. Windows computers are members of a domain. The administrator configures a Domain Security Policy that applies to all computers that join. Account policies are automatically set when a user logs in to Windows.
For stand-alone computers that are not part of an Active Directory domain, the Windows Local Security Policy can be used to enforce security settings.
To access Local Security Policy in Windows 7 and Vista, use Start > Control Panel > Administrative Tools > Local Security Policy.
In Windows 8, 8.1, and Windows 10, use Search > secpol.msc and then click secpol.
The Local Security Policy Tool opens, as shown in the figure.
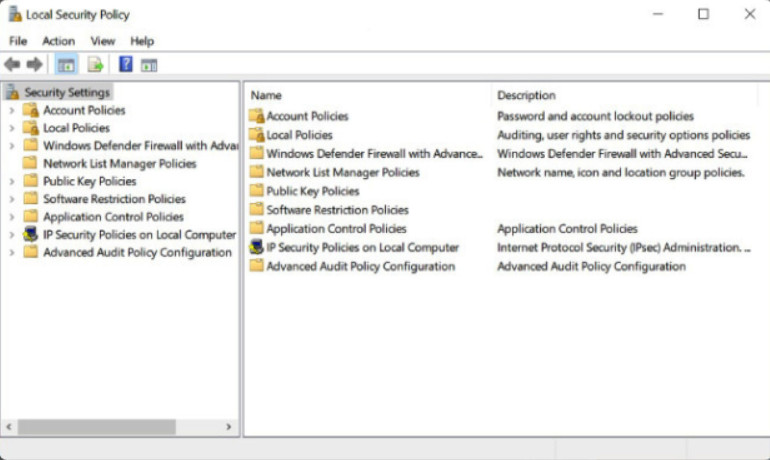
The Windows Local Security Policy
Note: In all versions of Windows, you can use the Run command secpol.msc to open the Local Security Policy tool.
13.3.2.2 – Account Policies Security Settings
The security policy will identify the password policies required. The Windows local security policy could be used to set implement the password policies. When assigning passwords, the level of password control should match the level of protection required.
Note: Use strong passwords whenever possible.
Use Account Policies > Password Policy to enforce password requirements as shown in Figure 1. Click on the hotspots to learn about the currently configured Password Policy settings.
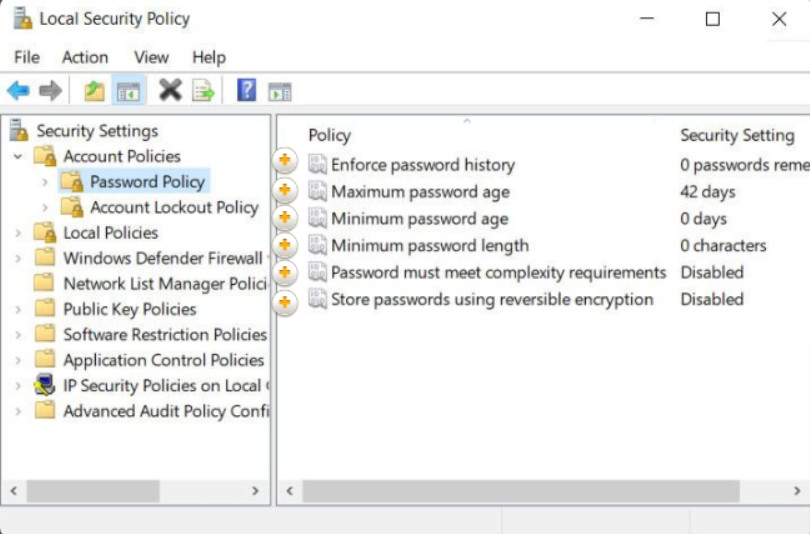
Enforce password history
Use Account Policies > Account Lockout Policy to prevent brute-force attacks as shown in Figure 2. In a brute force attack, software attempts to break a password by trying every possible combination of characters. Click on the hotspots to learn about the currently configured Account Lockout Policy settings. This Account Lockout Policy would also protect against a dictionary attack. This is a type of brute-force attack that attempts every word in a dictionary hoping to gain access. An attacker may also use a rainbow table. Rainbow tables are a refinement of the dictionary attack approach and involves a precomputed lookup table of all probably plaintext passwords and their matching hashes. The hash value of a stored password can be looked up in the table and the corresponding plaintext discovered.
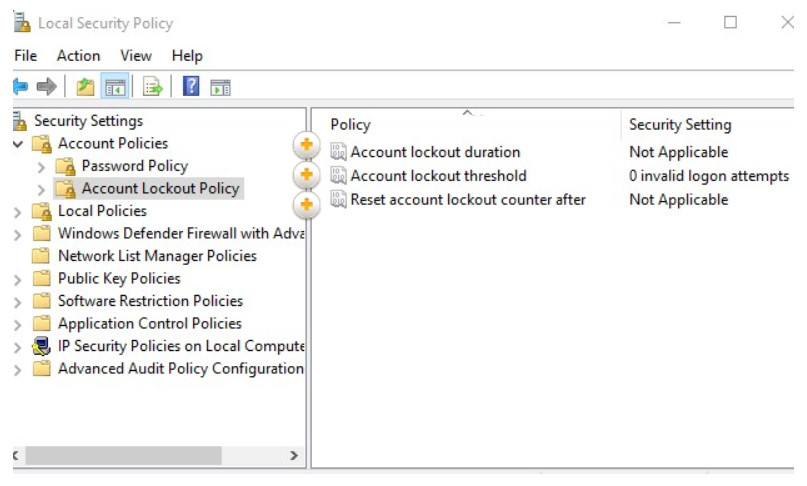
Configuring Account Lockout Policies
13.3.2.3 – Local Policies Security Settings
The Local Policy in the Local Security Policy is used to configure audit policies, user rights policies, and security policies.
It is useful to log successful and unsuccessful login attempts. Use the Local Policies > Audit Policy to enable auditing as shown in the figure. In this example, the Audit account login events auditing is being enabled for all logon events.
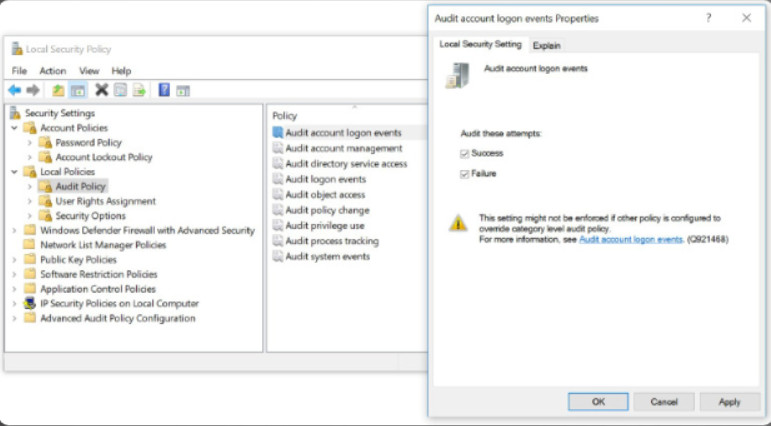
Local Policies Security Settings
The User Rights Assignment and Security Options provide a wide variety of security options beyond the scope of this course. However, some settings will be explored in the lab.
13.3.2.4 – Exporting the Local Security Policy
An administrator may need to implement an extensive local policy for user rights and security options. This policy most likely would need to be replicated on each system. To help simplify this process, the Local Security Policy can be exported and copied to other Windows hosts.
The steps to replicate a Local Security Policy on other computers are:
1. Use the Action > Export List… feature as shown in the figure to export the policy of a secure host.
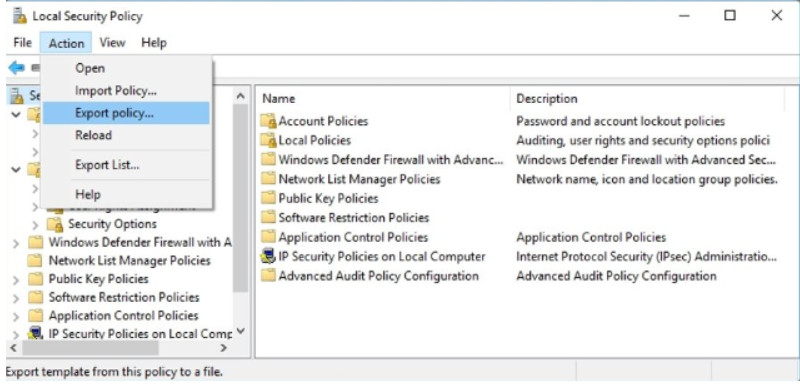
Exporting the Local Security Policy
2. Save the policy with a name, such as workstation.inf. to external media.
3. Then import the Local Security Policy file to other stand-alone computers.
13.3.2.5 – Lab – Configure Windows Local Security Policy
In this lab, you will configure Windows Local Security Policy. You will modify password requirements, enable auditing, configure some user rights, and set some security options. You will then use Event Manager to view logged information.
13.3.2.5 – Lab – Configure Windows Local Security Policy
13.3.2.6 – Check Your Understanding- Local Security Policy

13.3.2.6 – Check Your Understanding- Local Security Policy
13.3.3 – Managing Users and Groups
13.3.3.1 – Maintaining Accounts
Managing Users and Groups
Employees in an organization often require different levels of access to data. For example, a manager and an accountant might be the only employees in an organization with access to the payroll files.
Employees can be grouped by job requirements and given access to files according to group permissions. This process helps manage employee access to the network. Temporary accounts can be set up for employees who need short-term access. Close management of network access can help to limit areas of vulnerability that might allow a virus or malicious software to enter the network.
There are several tasks associated with managing users and groups.
Click each button to learn more about managing users and groups.
Terminating Employee Access
When an employee leaves an organization, immediately disable the account or change the login credentials to the account.
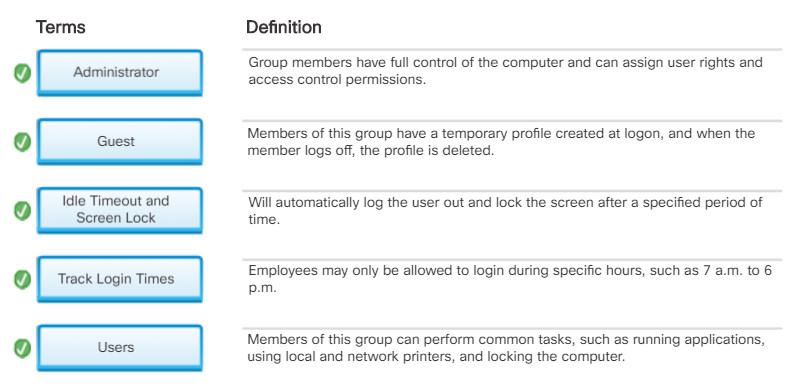
Guest Access
- Temporary employees and guests may need limited access to the network using a guest account.
- Special guest account with additional privileges can be created and disabled as required.
Track Login Times
- Employees may only be allowed to login during specific hours, such as 7 a.m. to 6 p.m.
- Logins would be blocked during other times of the day. This is known as logon time restrictions. The authenticating server periodically checks if a user has privileges to continue using the network. If the user does not, then an automatic logout procedure is activated.
Log Failed Login Attempts
- Configure a threshold for the number of times a user is allowed to attempt a login.
- By default, in Windows the number of failed login attempts is set to zero therefore a user will never be locked out until this setting is changed.
Idle Timeout and Screen Lock
- Configure an idle timer that will automatically log the user out and lock the screen after a specified period of time.
- The user must log back in to unlock the screen.
Change default admin user credentials
- Rename default accounts, such as the default admin user account, so that attackers cannot use the known account names to access the computer.
- Windows disables this account by default and replaces it with a named account which is created during the operating system setup process.
- Some devices ship with a default password such as “admin” or “password”. These should be changed during initial device setup.
13.3.3.2 – Managing Users Account Tools and User Account Tasks
A regular maintenance task for administrators is to create and remove users from the network, change account passwords, or change user permissions. You must have administrator privileges to manage users.
To accomplish these tasks, you can use either User Account Control (UAC) or Local Users and Group Manager. The figure shows how to access these.
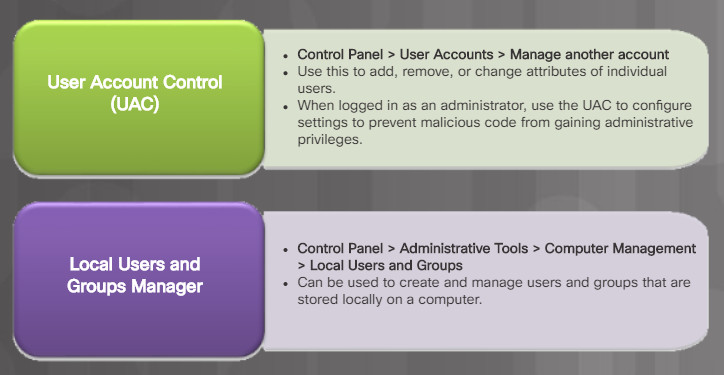
User Account Tools
Managing user account tasks allows you to create an account, reset the account password, disable or activate an account, delete an account, rename an account, assign a login script to an account, and assign a home folder to an account.
13.3.3.3 – Local Users and Groups Manager
The Local Users and Groups tool can limit the ability of users and groups to perform certain actions by assigning rights and permissions as described in Figure 1.
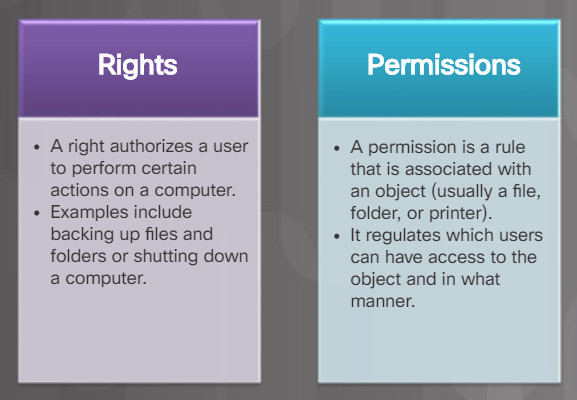
Right and Permissions
To configure all of the users and groups on a computer using the Local Users and Groups Manager tools type lusrmgr.msc in the Search box, or Run Line utility.
The Local Users and Groups > Users window displays current user accounts on the computer. It includes the built-in administrator and built-in guest accounts as described in Figure 2.
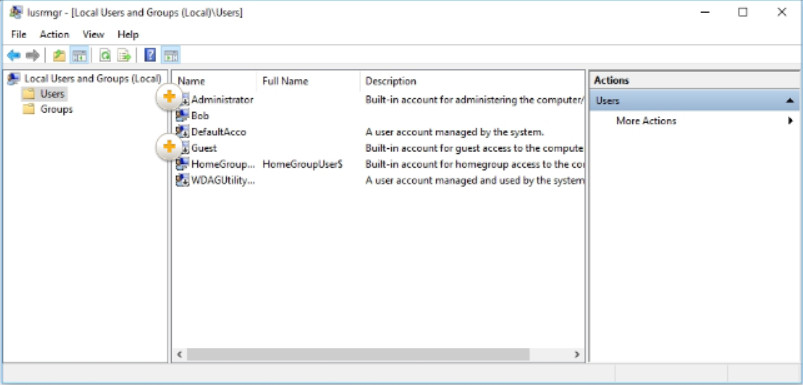
Local Users and Groups Manager Window
Double-clicking a user or right-clicking and choosing Properties opens the user properties window, as shown in Figure 3. This window allows you to change the user options defined when the user was created. Additionally, it permits you to lock an account. The window also lets you assign a user to a group using the Member of tab, or controlling which folders the user has access to using the Profile tab.
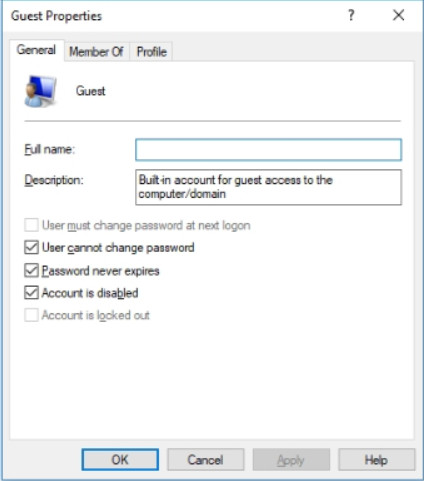
Account Properties
To add a user, click the Action menu and select New User. This opens the New User window, as shown in Figure 4. From here you can assign a username, full name, description, and account options.
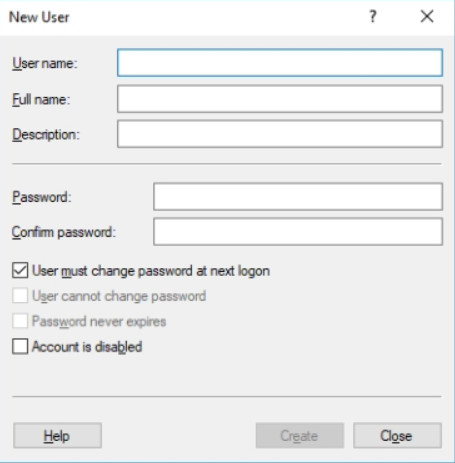
Creating a New User
Note: Some versions of Windows also include the built-in Power User account which possesses most of the power of an administrator but for security reasons, lacks some of the privileges of an administrator.
13.3.3.4 – Managing Groups
Users can be assigned to groups for easier management. Tasks used to manage local groups are listed in Figure 1.
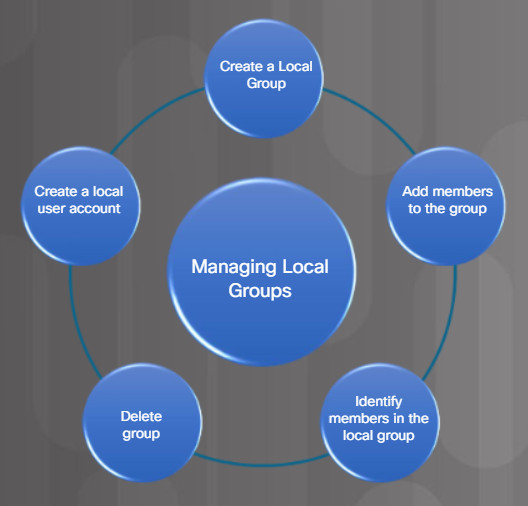
Managing Group Tasks
The Local Users and Groups Manager tool is used to manage local groups on a Windows computer. Use Control Panel > Administrative Tools > Computer Management > Local Users and Groups to open the Local Users and Groups Manager.
From the Local Users and Groups window, double-click Groups.to list all of the local groups on the computer. There are many built-in groups available, as shown in Figure 2. However, the three most commonly used groups are described in the figure.
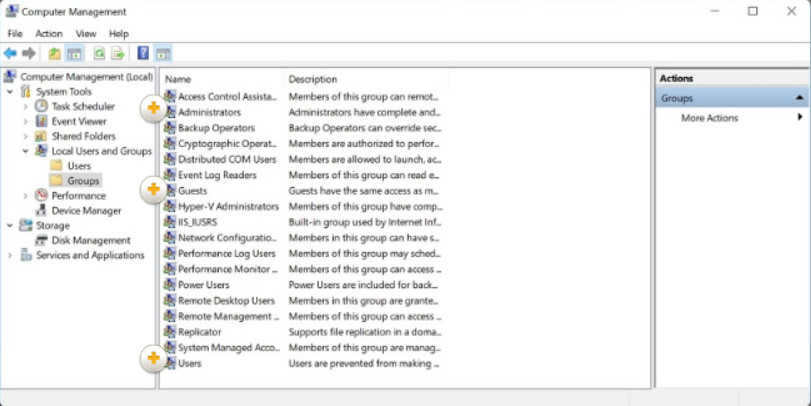
Built-in Local Groups
It is important to note that running your computer as a member of the Administrators group makes the system vulnerable to Trojan horses and other security risks. It is recommended that you add your domain user account only to the Users group (and not to the Administrators group) to perform routine tasks, including running programs and visiting internet sites. When it becomes necessary to perform administrative tasks on the local computer, use Run as Administrator to start a program using administrative credentials.
Double click a group to view its properties. Figure 3 for example, is displaying the properties of the Guest group.
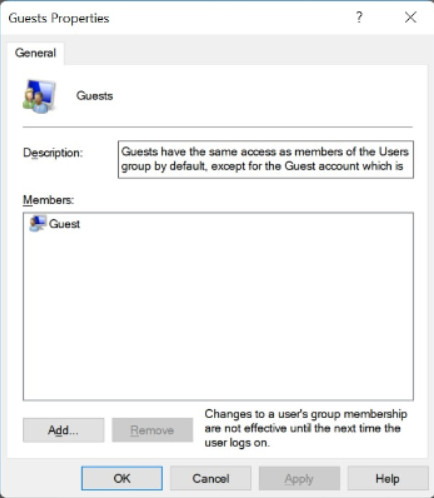
Built-in Local Guest Group Properties
To create a new group, click the Action > New Group to open the New Group window as shown in Figure 4. From here you can create new groups and assign users to them.
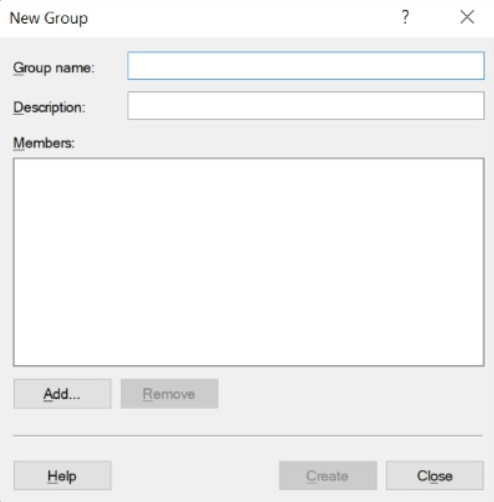
Creating a New Group
13.3.3.5 – Active Directory Users and Computers
While local accounts are stored in the in the Local Security Accounts database of a local machine, domains accounts are stored in the Active Directory on a Windows Server Domain Controller (DC) and are accessible from any computer joined to the domain. Only domain administrators can create domain accounts on a Domain Controller.
The Active Directory is a database of all computers, users, and services in an Active Directory domain. The Active Directory Users and Computers console on Windows server is used to manage Active Directory users, groups, and Organizational Units (OUs). Organizational units provide a way to subdivide a domain into smaller administrative units. The Active Directory Users and Computers, an administrator can create more OUs in which to place accounts or add accounts to existing OUs.
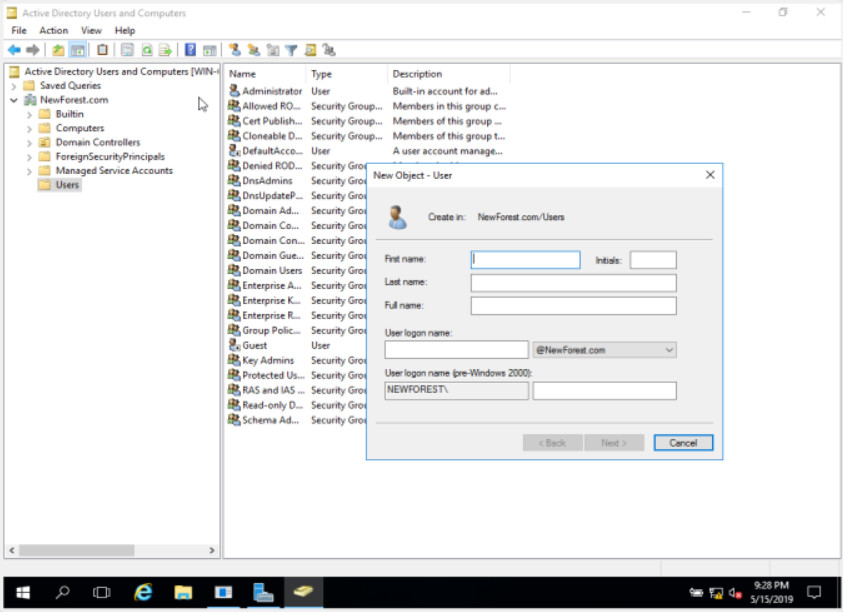
Active Directory Users and Computers
To create a new user account, right-click the container or OU which will contain the account and choose New User. Enter the user’s information such as name, last name and logon name, then click Next, and then set an initial password for the user. By default, the option to force the user to reset their password on first sign in is selected. If a user should lock themselves out of their account with too many password attempts, the administrator can open Active Directory Users and Computers, right-click on the user object, select Properties, and check Unlock account.
To delete a user account simply right-click the user object and select Delete. Note however that once an account is deleted it may not be retrievable. Another option is to disable an account rather than to delete it. Once an account is disabled, the user is denied access to the network until the administrator re-enables the account.
To create a new group account in active directory is similar to creating a new user. Open Active directory Users and Computers select the container that will house the group, click Action, click New and then click Group. Fill in the group details and click OK.
13.3.3.6 – Lab – Configure Users and Groups in Windows
In this lab, you will create users and groups and delete users using the Local Users and Groups Manager. You will also assign group and user permission to the folders.
13.3.3.6 – Lab – Configure Users and Groups in Windows
13.3.3.7 – Check your Understanding – User Account Tools and User Account Tasks
13.3.3.7
Check your Understanding – User Account Tools and User Account Tasks
13.3.4 – Windows Firewall
13.3.4.1 – Firewalls
A firewall protects computers and networks by preventing undesirable traffic from entering internal networks. For instance, the top topology in Figure 1 illustrates how the firewall enables traffic from an internal network host to exit the network and return to the inside network. The bottom topology illustrates how traffic initiated by the outside network (i.e., the internet) is denied access to the internal network.
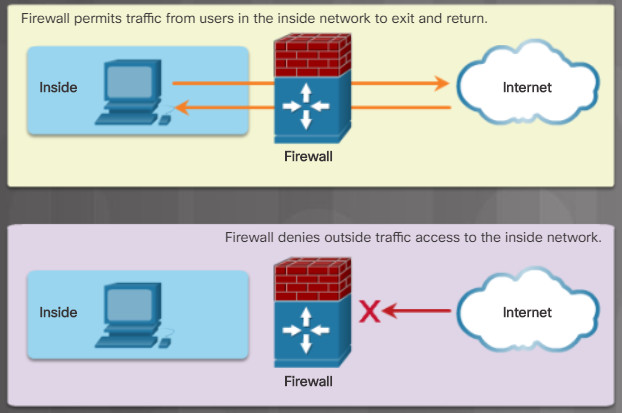
Firewall Controls Network Access
A firewall could allow outside users controlled access to specific services. For instance, servers accessible to outside users are usually located on a special network referred to as the demilitarized zone (DMZ) as shown in Figure 2. The DMZ zone enables a network administrator to apply specific policies for hosts connected to that network. For example, click play in Figure 3 to see how the DMZ server provides web, FTP, and email services (i.e, SMTP and IMAP) to external users. Notice how the firewall only permits access to those server services and denies all other outside requests.
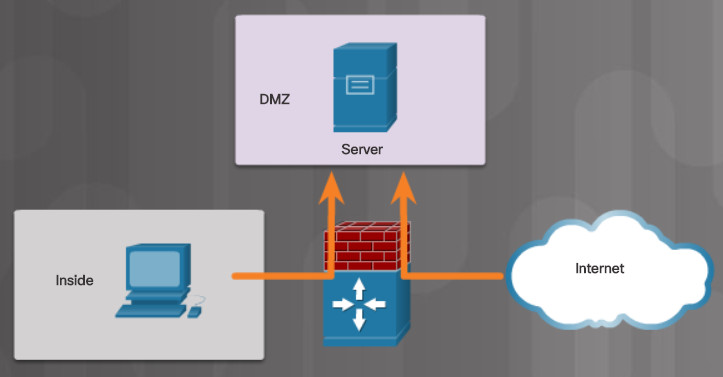
Access to the DMZ

Firewall Operation
Firewall services can be provided as follows:
-
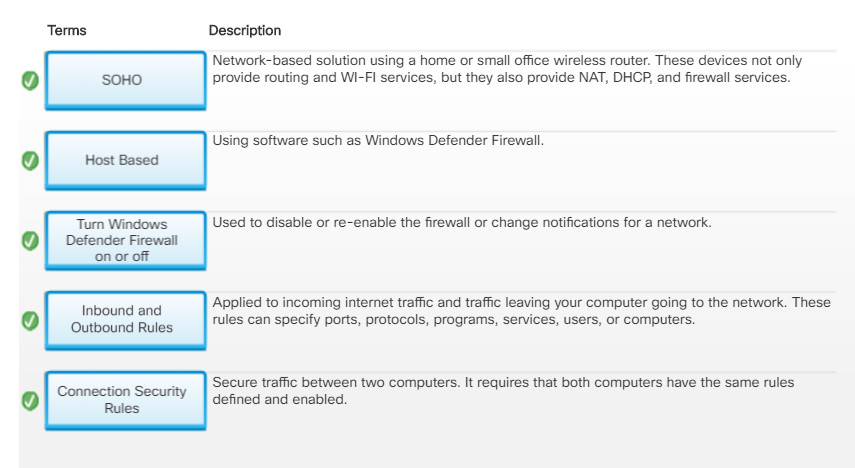
- Host-based firewall – Using software such as Windows Defender Firewall.
- Small office home office (SOHO) – Network-based solution using a home or small office wireless router. These devices not only provide routing and WI-FI services, but they also provide NAT, DHCP, and firewall services. Many routers also provide settings listed in Figure 4.
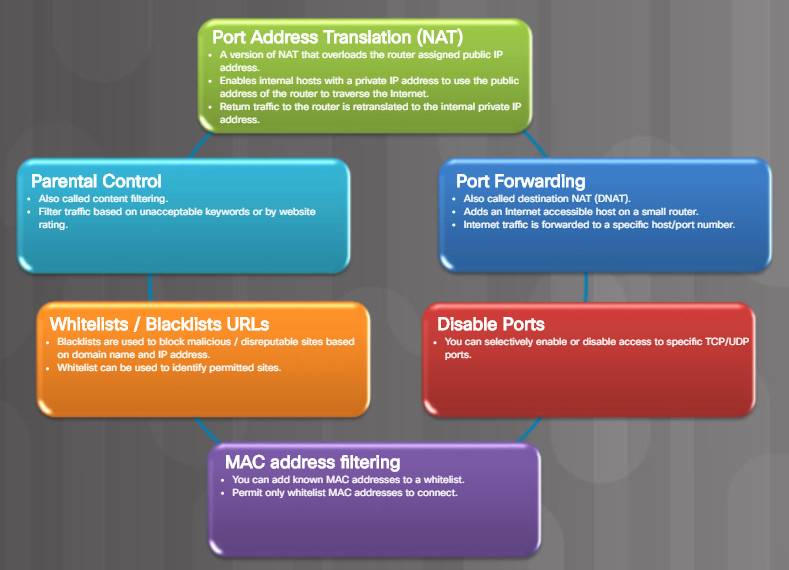
Firewall Settings
- Small to medium-sized organization – Network-based solution using a dedicated device such as a Cisco Adaptive Security Appliance (ASA) or enabled on a Cisco Integrated Services Router (ISR). These devices use access control lists (ACLs) and advanced features to filter packets based on their header information including source and destination IP address, protocol, source and destination TCP/UDP ports, and more.
The focus of this section is on the host-based firewall solution using Windows Firewall.
13.3.4.2 – Software Firewalls
A software firewall is a program that provides firewall services on a computer to allow or deny traffic to the computer. The software firewall applies a set of rules to data transmissions through inspection and filtering of data packets.
Windows Firewall is an example of a software firewall that helps prevent cybercriminals and malware from gaining access to your computer. It is installed by default when the Windows OS is installed.
Note: In Windows 10 the Windows Firewall was renamed to Windows Defender Firewall. In this section, Windows Firewall includes Windows Defender Firewall.
Windows Firewall settings are configured using the Windows Firewall window. To change Windows Firewall settings, you must have administrator privileges to open the Windows Firewall window.
To open the Windows Firewall window, use Control Panel > Windows Firewall. The example in the figure displays the Windows 10 Windows Defender Firewall window.
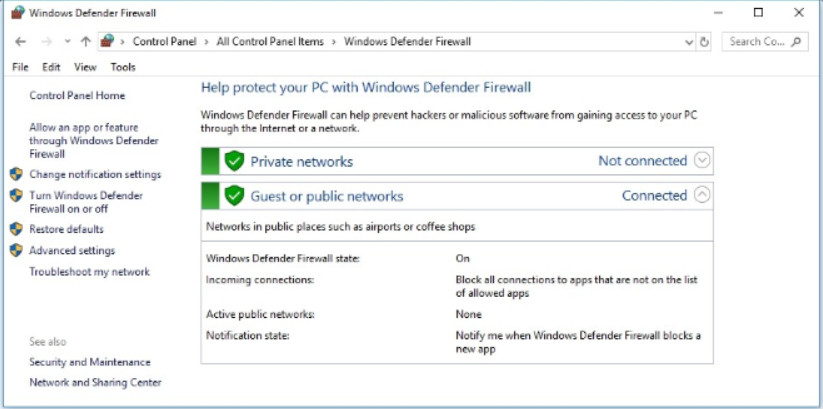
Windows Defender Firewall
13.3.4.3 – Windows Firewall
Software firewall features are applied to a network connection. Software firewalls have a standard set of inbound and outbound rules that are enabled depending on the location of the connected network.
In the example in Figure 1, firewall rules are enabled for a private network, a guest or public network, or a corporate domain network. The window displays the settings for the private network as it is the currently connected network. To display the settings for the domain or guest networks, click on the drop-down arrow beside the Not connected label.
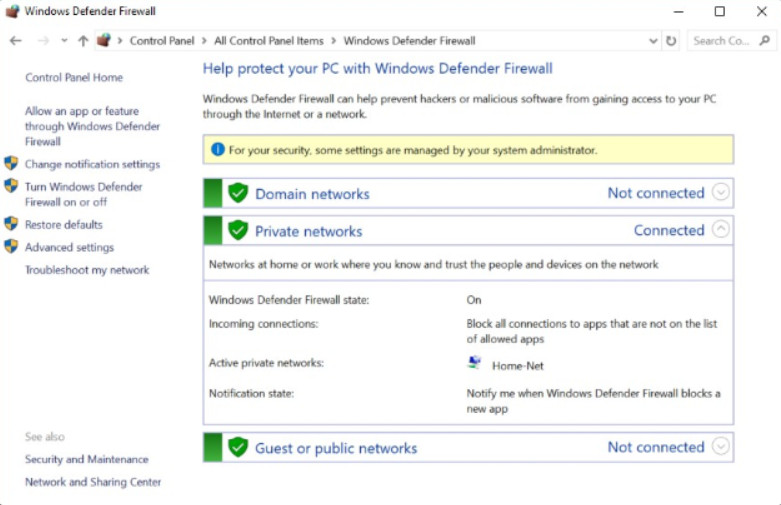
Windows Defender Firewall
From this Windows Firewall window, you can enable or disable Windows Firewall, change notification settings, allow apps through the firewall, configure advanced settings, or restore firewall defaults.
To disable or re-enable Windows Firewall or change notifications for a network, click on either Change notifications settings or Turn Windows Defender Firewall on or off to open the Customize Settings window shown in Figure 2.
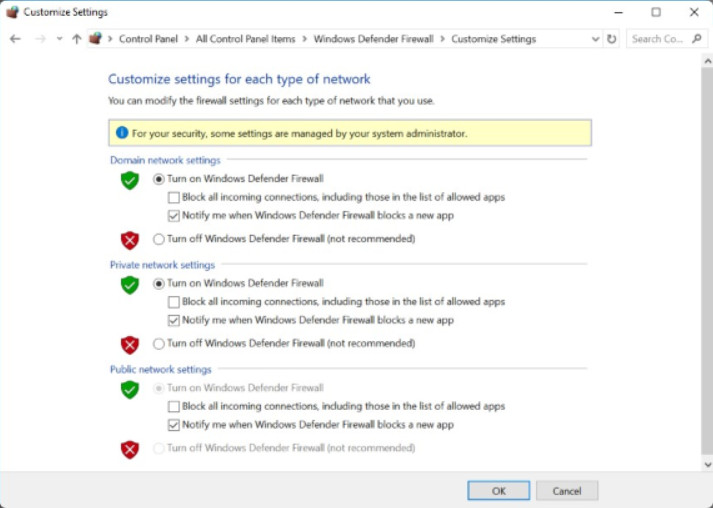
Customize Settings Window
If you wish to use a different software firewall, you will need to disable Windows Firewall. To disable the Windows Firewall in Windows 7 through Windows 10, follow the steps listed in Figure 3.
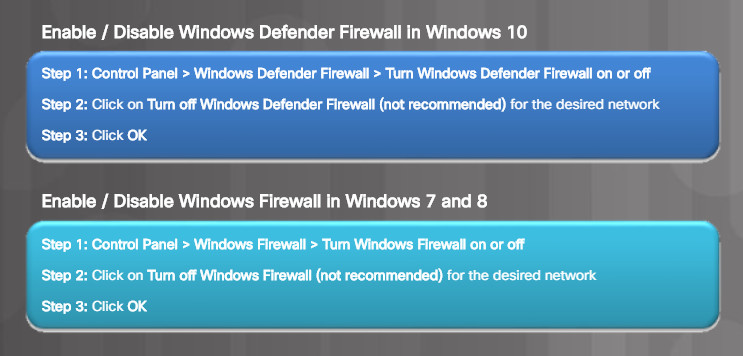
Enable / Disable Windows Firewall
Note: Windows Firewall is enabled by default. Do not disable Windows Firewall on a Windows host unless another firewall software is enabled.
13.3.4.4 – Configuring Exceptions in Windows Firewall
You can allow or deny access to specific programs or ports from the Windows Firewall window. To configure exceptions and allow or block applications or ports, click on Allow an app or feature through the Windows Firewall to open the Allowed apps window shown in Figure 1.
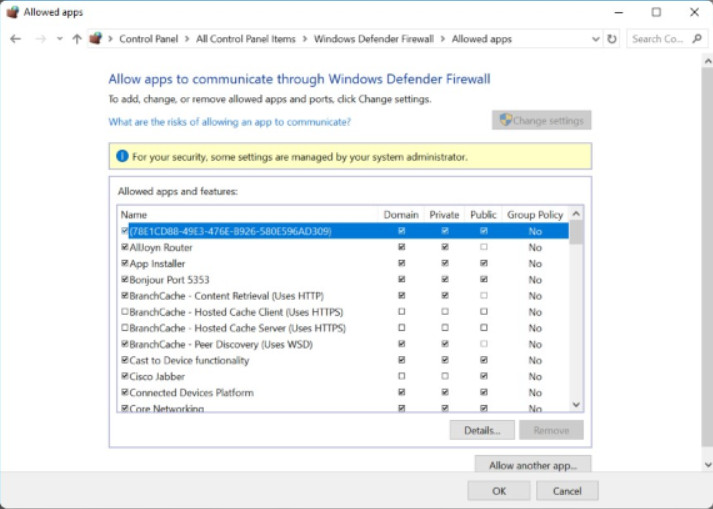
Configuring Exceptions
From this window, you can add, change, or remove the allowed programs and ports on the different networks. Figure 2 lists the steps required to add programs through the Windows Firewall.
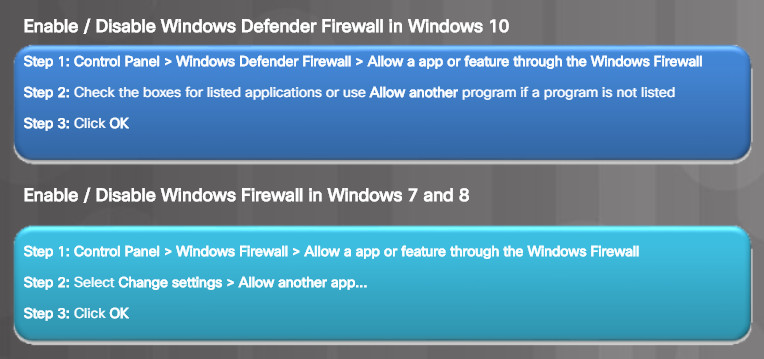
Allow or Deny Access to Programs and Ports
13.3.4.5 – Windows Firewall with Advanced Security
Another Windows tool that is available to provide even greater access control with Windows Firewall policies is the Windows Firewall with Advanced Security. It is called Windows Defender Firewall with Advanced Security in Windows 10.
To open it, from the Windows Firewall window, click on Advanced settings to open it as shown in the figure.
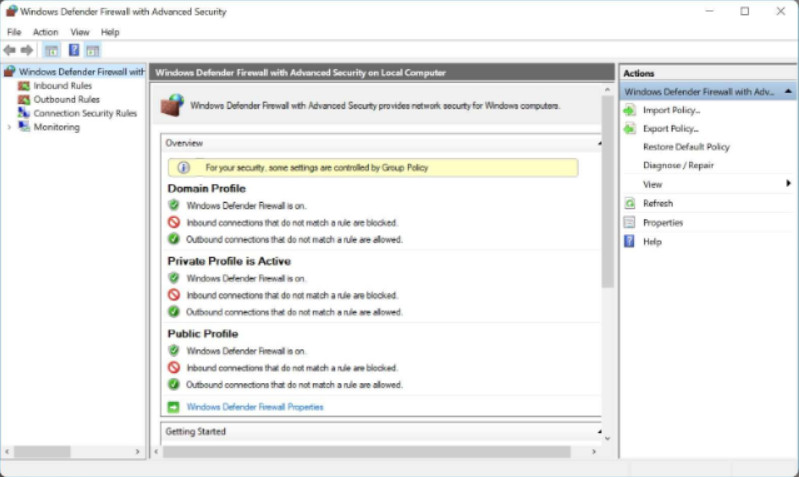
Windows Firewall With Advanced Security Window
Note: Alternatively, you can enter wf.msc in the search box and press enter.
Windows Defender Firewall with Advanced Security provides these features:
- Inbound and Outbound Rules – You can configure inbound rules that are applied to incoming internet traffic and outbound rules which are applied to traffic leaving your computer going to the network. These rules can specify ports, protocols, programs, services, users, or computers.
- Connection Security Rules – Connection security rules secure traffic between two computers. It requires that both computers have the same rules defined and enabled.
- Monitoring – You can display the firewall inbound or outbound active rules or any active connection security rules.
13.3.4.6 – Lab – Configure Windows Firewall
In this lab, you will explore the Windows Firewall and configure some advanced settings.
13.3.4.6 – Lab – Configure Windows Firewall
13.3.4.7 – Check your Understanding – Windows Firewall
13.3.4.7 – Check your Understanding – Windows Firewall
13.3.5 – Web Security
13.3.5.1 – Web Security
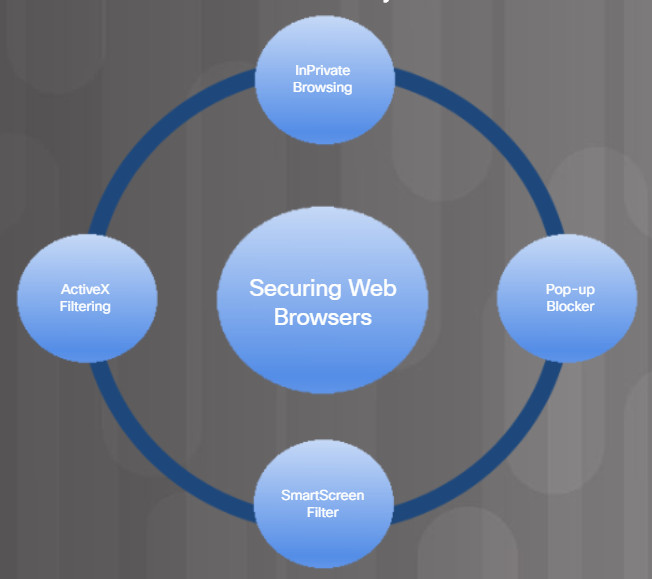
Web browsers are not only used for web browsing, they are also now used to run other applications including Microsoft 365, Google docs, interface for remote access SSL users, and more. To help support these additional features, browsers use plug-ins to support other content. However, some of these plug-ins may also introduce security problems.
Browsers are targets and should be secured. The figure lists some features to secure web browsers.
Web Browser Security Features
When browsing, many websites and services require the use of authentication for access. Recently, it has become common to require multifactor authentication over a traditional username and password. Multifactor authentication involves using a combination of different technologies, such as a password, a smart card, and biometrics, to authentication a user. For example, two-factor authentication combines something a user has, such as a smart card with something they know like a password or pin. Three-factor authentication combines all three, something a user knows, something they have, and some type of biometric component like a thumb or eye retina scan.
Recently, authenticator applications have become a popular method for multifactor authentication. For example, the service may require both a password and a registered phone or email address. To access the service an authenticator application sends a code called a one-time password (OTP) to the registered phone or email address. The user must supply their account username and password plus the OTP code to authenticate.
Once authenticated, the system may grant a software token to the application or device which was used to authenticate with. The software token allows the user to perform actions on the system without the need to repeatedly authenticate. If the token system is not secure, a third party may be able to capture it and act as the user. This is known as a replay attack. The token should be designed to prevent replay attacks, being time limited or being used only once.
13.3.5.2 – InPrivate Browsing
Web browsers retain information about the web pages that you visit, the searches that you perform, and other identifiable information including usernames, passwords, and more. Although convenient on a personal computer, this is a concern when using a public computer such as a computer in a library, hotel business center, or an internet café. The information retained by web browsers can be recovered and exploited to steal your identity, your money, or change your passwords on important accounts.
To improve security when using a public computer, always:
-
- Clear your browsing history – All web browser have a way to clear their browsing history, cookies, files, and more. Figure 1 lists the steps to clear the browsing history in Microsoft Edge. Notice that you also have the option to always clear the browsing data when the browser is closed.
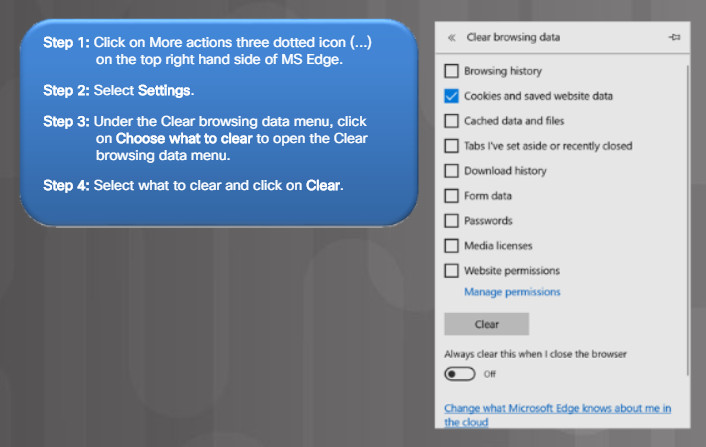
Clearing Browsing History in MS Edge
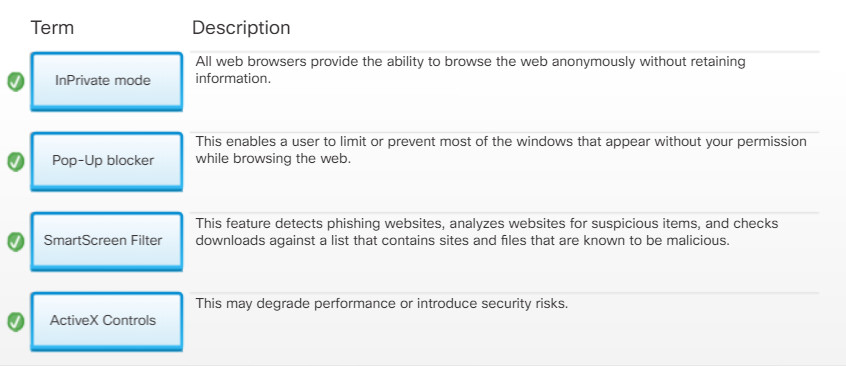
- Use the InPrivate mode – All web browsers provide the ability to browse the web anonymously without retaining information. Using an InPrivate browser temporarily stores files and cookies and deletes them when the InPrivate session is ended.
Figure 2 lists the steps to open an InPrivate window in Microsoft Edge. Notice that the new window is identified with an InPrivate label on the top left-hand corner of the browser. For Internet Explorer 11, use Tools > InPrivate Browsing as shown in Figure 3.

Opening an InPrivate Window in MS Edge
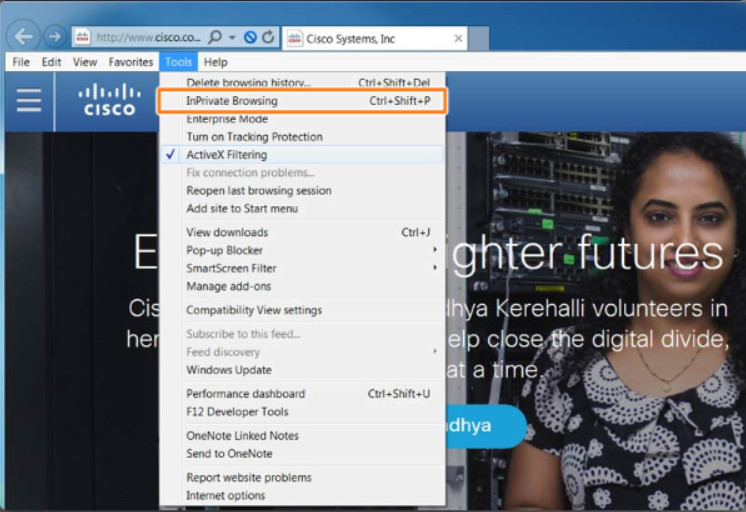
Starting InPrivate Browsing from Internet Explorer 11
Note: As an alternative, you could press Ctrl+Shift+P to open an InPrivate window.
13.3.5.3 – Pop-up Blocker
A pop-up is a web browser window that opens on top of another web browser window. Some pop-ups are initiated while browsing, such as a link on a page that opens a pop-up to deliver additional information or a close-up of a picture. Other pop-ups are initiated by a website or advertiser and are often unwanted or annoying, especially when multiple pop-ups are opened at the same time on a web page.
Most web browsers offer the ability to block pop-up windows. This enables a user to limit or block most of the pop-ups that occur while browsing the web.
The figure lists the steps to enable the Internet Edge Pop-up Blocker feature. Figure
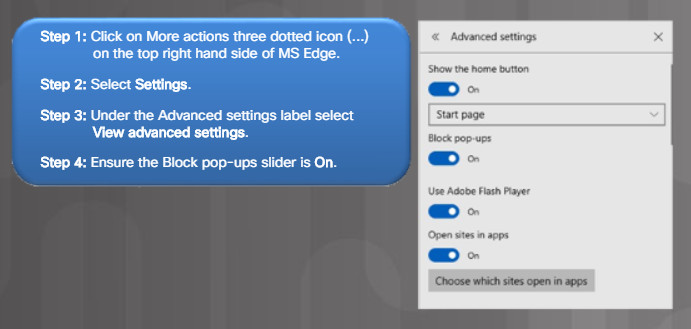
Blocking Pop-ups in MS Edge
To enable the Internet Explorer 11 Pop-up Blocker feature, use Tools > Pop-up Blocker > Turn on Pop-up Blocker.
13.3.5.4 – SmartScreen Filter
Web browsers may also offer additional web filtering capabilities. For instance, Internet Explorer 11 provides the SmartScreen Filter feature. This feature detects phishing websites, analyzes websites for suspicious items, and checks downloads against a list that contains sites and files that are known to be malicious.
The figure lists the steps to enable SmartScreen filter in Microsoft Edge.

Enabling SmartScreen Filter in MS Edge
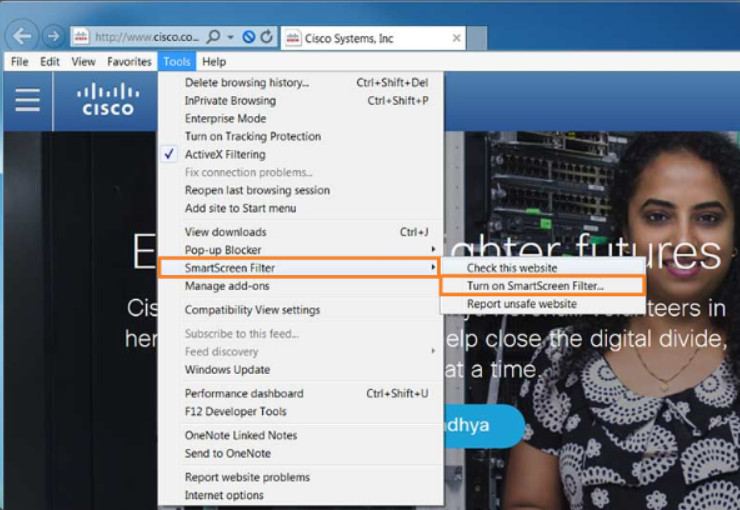
Enabling the SmartScreen Filter Feature
In Internet Explorer 11, use Tools > Smartscreen Filter > Turn on Smartscreen Filter.
13.3.5.5 – ActiveX Filtering
Some web browsers may require you to install an ActiveX control. The problem is that ActiveX controls can be used for malicious reasons.
ActiveX filtering allows for web browsing without running ActiveX controls. After an ActiveX control has been installed for a website, the control runs on other websites as well. This may degrade performance or introduce security risks. When ActiveX filtering is enabled, you can choose which websites are allowed to run ActiveX controls. Sites that are not approved cannot run these controls, and the browser does not show notifications for you to install or enable them.
To enable ActiveX filtering in Internet Explorer 11, use Tools > ActiveX Filtering. The example in the figure displays that ActiveX filtering is enabled. Clicking the ActiveX Filtering again would disable ActiveX.
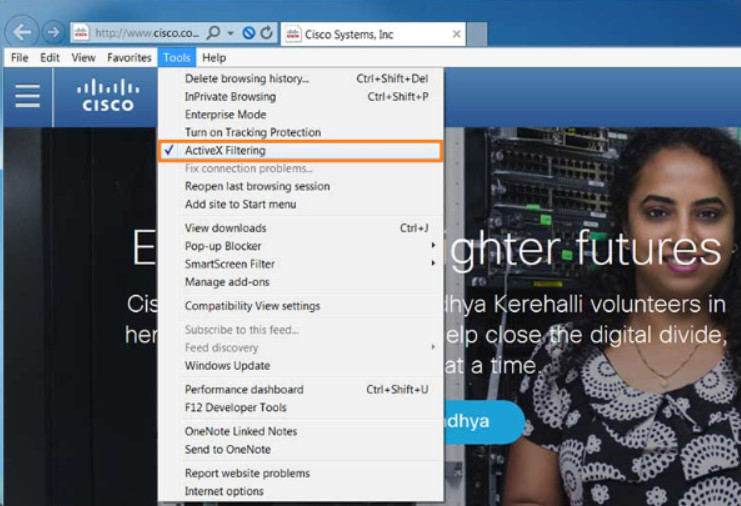
Enabling the ActiveX Filtering Feature
To view a website that contains ActiveX content when ActiveX filtering is enabled, click the blue ActiveX Filtering icon in the address bar, and click Turn off ActiveX Filtering.
After viewing the content, you can turn ActiveX filtering for the website back on by following the same steps.
Note: Microsoft Edge does not support ActiveX filtering.
13.3.5.6 – Check Your Understanding – Web Security
13.3.5.6 – Check Your Understanding – Web Security
13.3.6 – Security Maintenance
13.3.6.1 – Restrictive Settings
Devices often come with security features that are not enabled or the security features left to their defaults. For example, many home users leave the wireless routers with default passwords and open wireless authentication because it is “easier”.
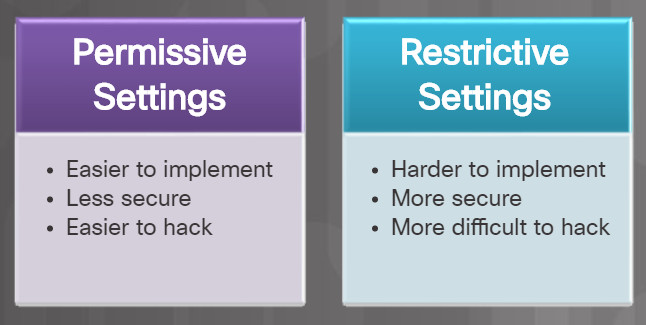
Permissive versus Restrictive Settings
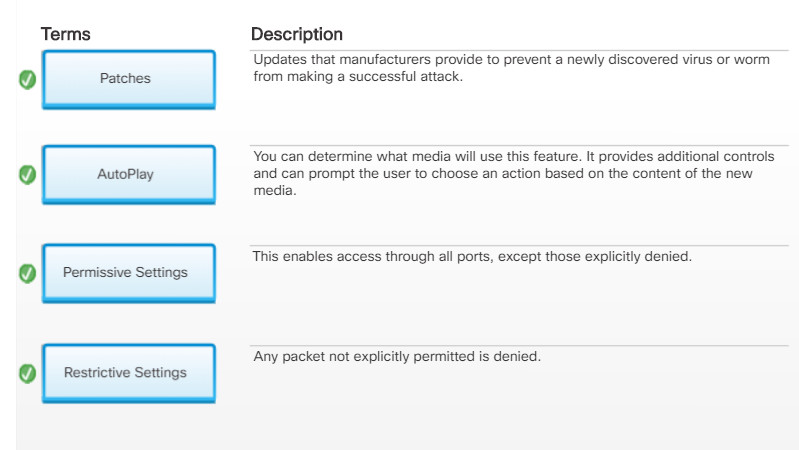
Some devices are shipped with permissive settings. This enables access through all ports, except those explicitly denied. The problem is that the default permissive settings leave many devices exposed to attackers.
Many devices now ship with restrictive settings. They must be configured to enable access. Any packet not explicitly permitted is denied.
It is your responsibility to secure devices and configure restrictive settings whenever possible.
13.3.6.2 – Disable Auto-Play
Older Windows hosts used AutoRun to simplify the user experience. When new media (e.g., flash drive, CD, or DVD drive) is inserted into the computer, AutoRun would automatically look for a special file called autorun.inf and execute it. Malicious users have taken advantage of this feature to quickly infect hosts.
Newer Windows hosts now use a similar feature called AutoPlay. With AutoPlay, you can determine which media will run automatically. AutoPlay provides additional controls and can prompt the user to choose an action based on the content of the new media.
Use the Control Panel > AutoPlay window, shown in Figure 1, to open the AutoPlay window and configure the actions associated with specific media. However, you are still just one click away from unknowingly running malware through the AutoPlay dialog.
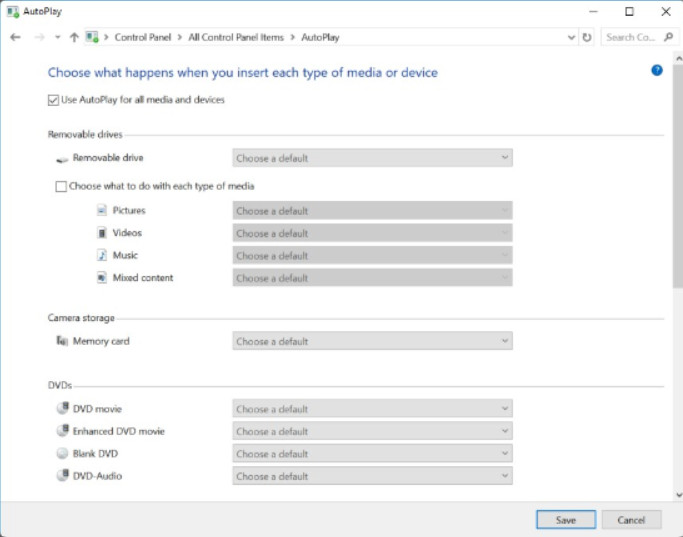
Configure AutoPlay Settings
Therefore, the most secure solution is to turn off AutoPlay. Figure 2 lists the steps to disable AutoPlay.

Disable AutoPlay
13.3.6.3 – Operating System Service Packs and Security Patches
Patches are code updates that manufacturers provide to prevent a newly discovered virus or worm from making a successful attack. From time to time, manufacturers combine patches and upgrades into a comprehensive update application called a service pack.
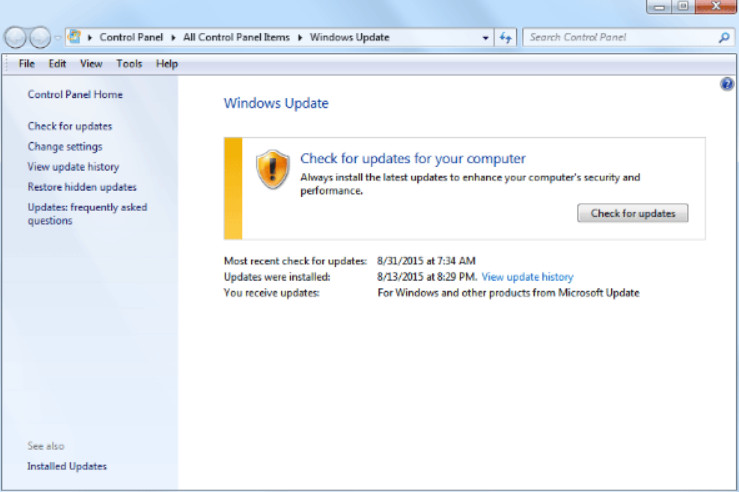
Windows Update
It is critical to apply security patches and OS updates whenever possible. Many devastating virus attacks could have been much less severe if more users had downloaded and installed the latest service pack.
Windows routinely checks the Windows Update website for high-priority updates that can help protect a computer from the latest security threats. These updates include security updates, critical updates, and service packs. Depending on the setting you choose, Windows automatically downloads and installs any high-priority updates that your computer needs or notifies you as these updates become available.
13.3.6.4 – Check your Understanding – Security Maintenance
13.3.6.4 – Check your Understanding – Security Maintenance
13.4 – Wireless Security
13.4.1 – Configure Wireless Security
13.4.1.1 – What Do You Already Know? – Wireless Security
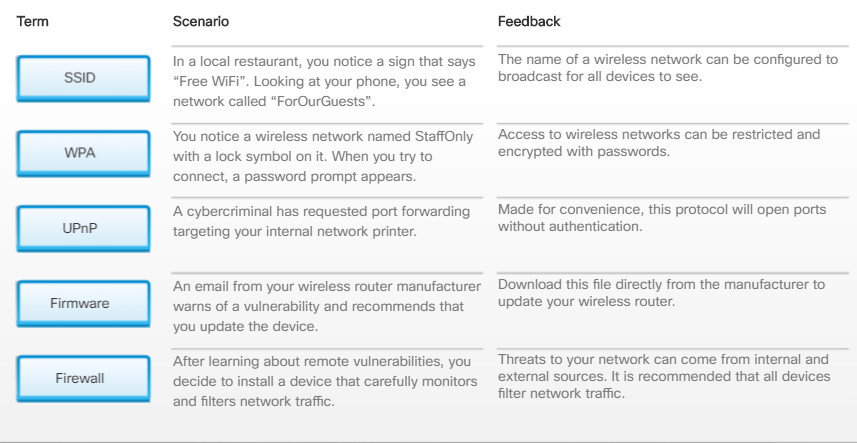
What Do You Already Know? – Wireless Security
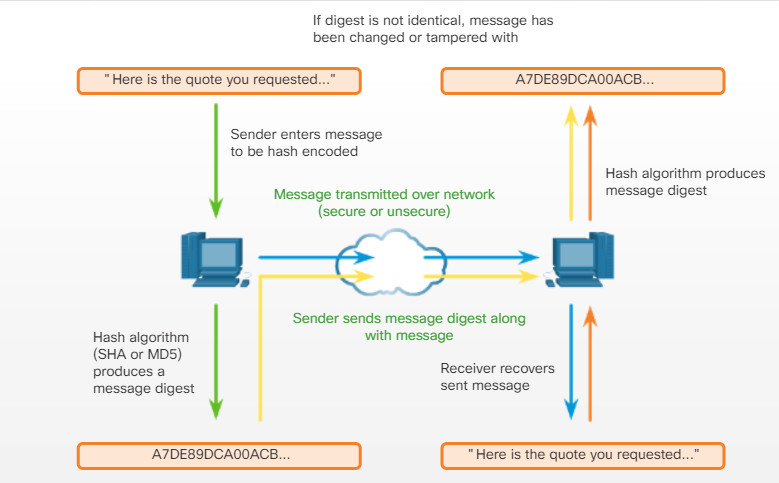
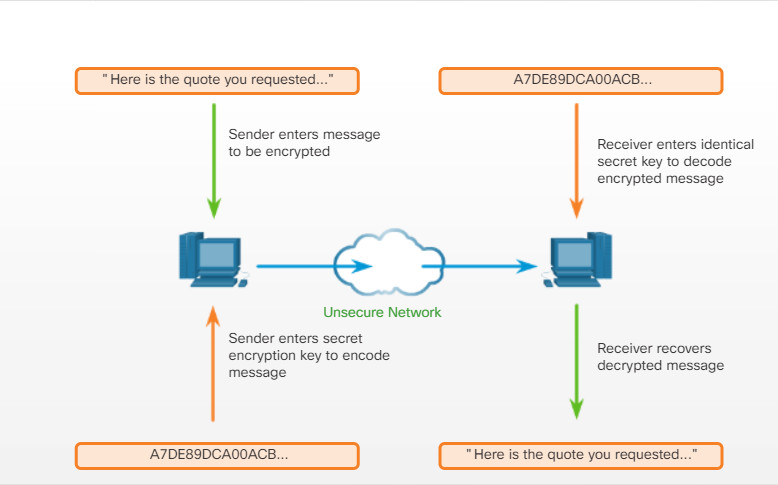
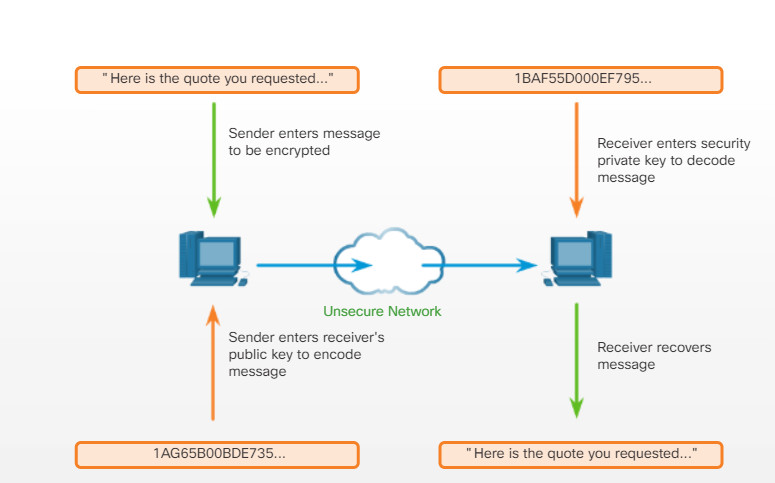
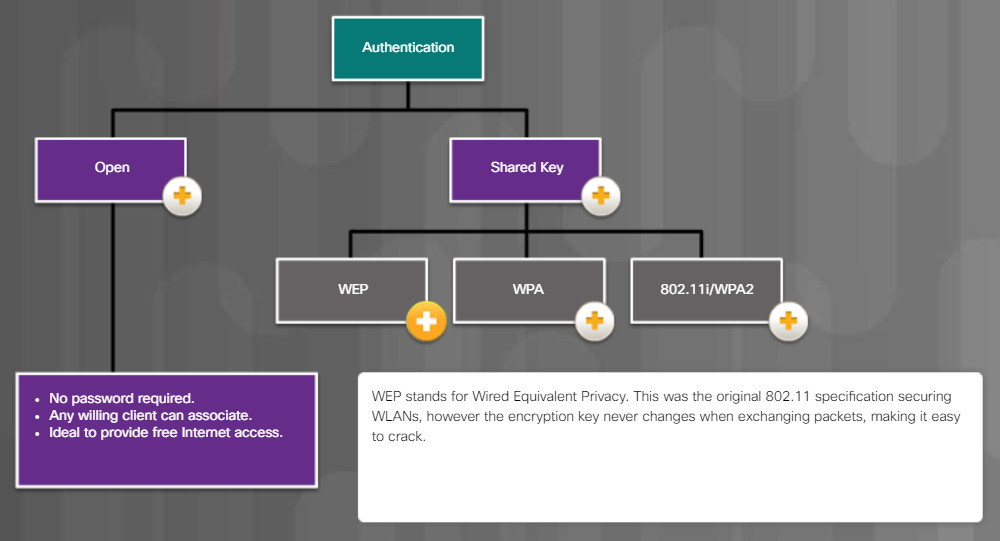
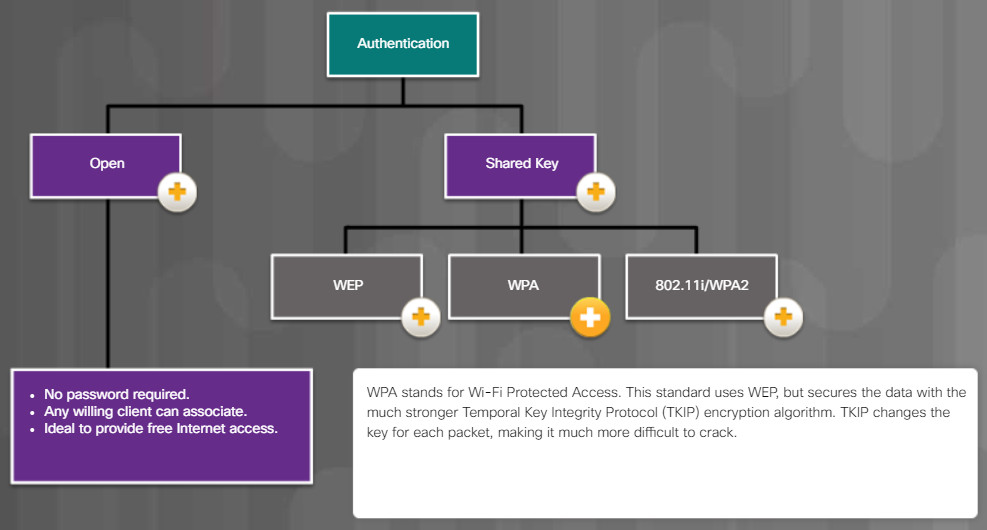
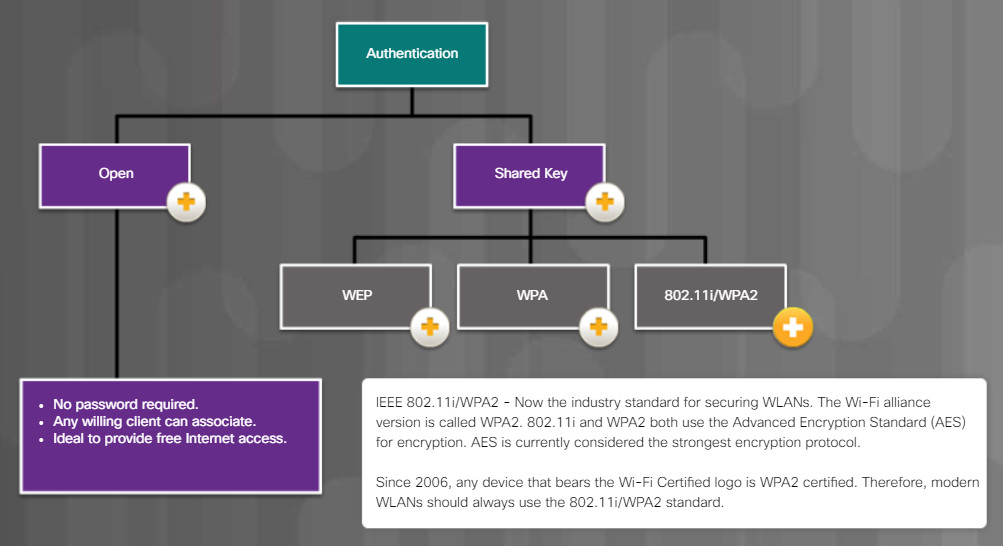
13.4.1.2 – Common Communication Encryption Types
13.4.1.3 – Wi-Fi Configuration Best Practices
Radio waves used to transmit data in wireless networks make it easy for attackers to monitor and collect data without physically connecting to a network. Attackers gain access to an unprotected wireless network simply by being within range of it. A technician needs to configure access points and wireless NICs with an appropriate level of security.
A robust wireless network with sufficient coverage for users in all locations requires the proper placement of antenna and access points. If placing the access point in proximity of the provider’s cabling does not provide enough coverage, then extenders and repeaters can be used to boost the wireless signals to locations where it is weak. A site survey can also be performed to identify signal dead zones.
Reducing the power output on an Access Point may help to prevent war driving, however it may also result in insufficient wireless coverage for legitimate users.
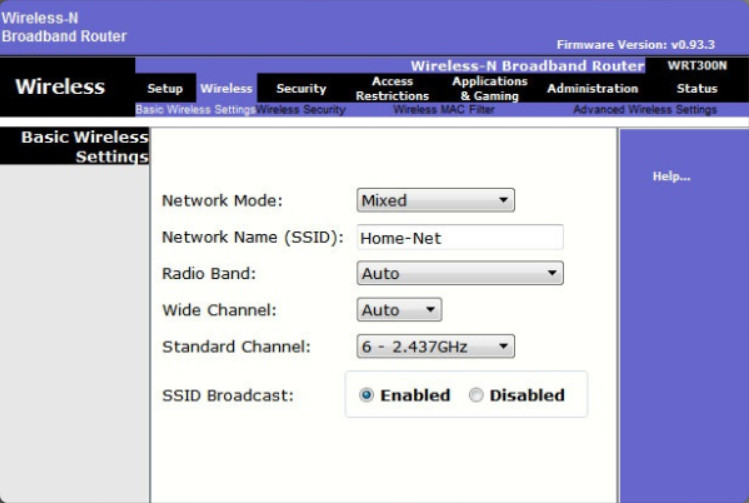
Enabled SSID Broadcast
Increasing the power output of an Access Point can increase coverage, however it can also increase the chance of signal bouncing and interference. There may also be legal restrictions on wireless power levels. Because of these potential issues it is usually best to set power levels to auto negotiate.
When installing wireless services, apply wireless security techniques immediately to prevent unwanted access to the network. Wireless access points should be configured with basic security settings that are compatible with the existing network security. When setting up the access point on a Wi-Fi network, the management software will prompt for a new administrator password. There may also be an option to change the default username of the administrator account, which is slightly more secure that using the default name configured. Also, on smaller networks, you can assign IP addresses statically instead of using DHCP. This prevents any computer from connecting to the access point unless it is configured with the correct IP address.
Additional security, such as parental controls or content filtering are services that may be available in a wireless router. Internet access times can be limited to certain hours or days, specific IP addresses can be blocked, and key words can be blocked. The location and depth of these features varies depending on the manufacturer and model of the router.
One way to provide a level of security on Wi-Fi networks is to change the default Service Set ID (SSID) and to disable broadcast of the SSID. Access point vendors use a default SSIDs for their devices based on the devices brand and model. These should be changed to something users will recognize and will not get confused with other nearby networks. Most access points broadcast the SSID by default. A level of privacy can be gained by disabling the broadcast of the SSID. This will prevent wireless network adapters form finding the network unless they are specifically configured with the name of the network SSID. Disabling the SSID broadcast provides very little security. Someone who knows the SSID of that network can simply enter it manually. A wireless network will also broadcast the SSID during a computer scan. The SSID can be easily intercepted in transit.
13.4.1.4 – Authentication Methods
13.4.1.5 – Wireless Security Modes
- WPA2
Use a wireless encryption system to encode the information being sent to prevent unwanted capture and use of data. Most wireless access points support several different security modes As discussed in a previous chapter, always implement the strongest security mode (WPA2) possible.
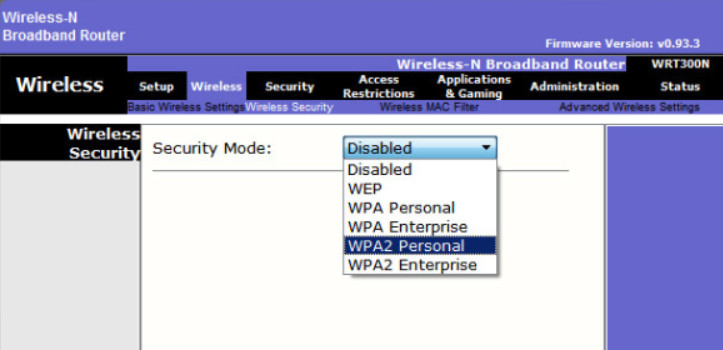
- WPS
Many routers offer Wi-Fi Protected Setup (WPS). With WPS, both the router and the wireless device will have a button that, when both are pressed, automatically configures Wi-Fi security between the devices. A software solution using a PIN is also common. It is important to know that WPS is not entirely secure. It is vulnerable to brute-force attack. WPS should be turned off as a security best practice.

13.4.1.6 – Firmware Updates
Most wireless routers offer upgradable firmware. Firmware releases may contain fixes for common problems reported by customers as well as security vulnerabilities. You should periodically check the manufacturer’s website for updated firmware. After it is downloaded, you can use the GUI to upload the firmware to the wireless router, as shown in the figure. Users will be disconnected from the WLAN and the Internet until the upgrade finishes. The wireless router may need to reboot several times before normal network operations are restored.
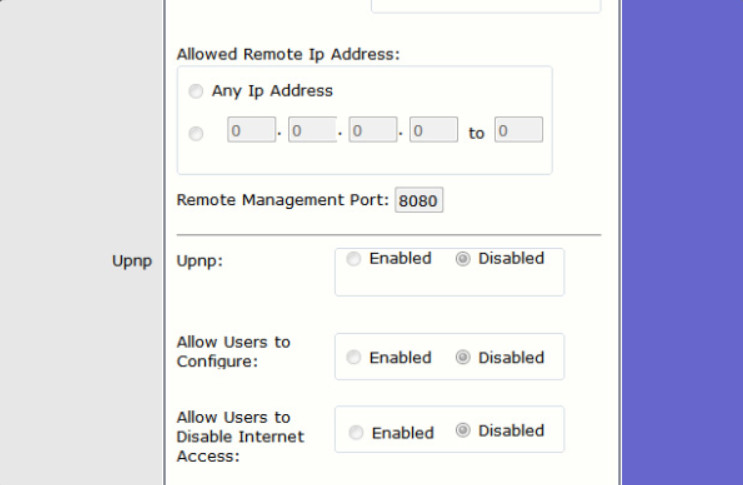
Disabled UPnP
13.4.1.7 – Firewalls
A hardware firewall is a physical filtering component that inspects data packets from the network before they reach computers and other devices on a network. A hardware firewall is a freestanding unit that does not use the resources of the computers it is protecting, so there is no impact on processing performance. The firewall can be configured to block multiple individual ports, a range of ports, or even traffic specific to an application. Most wireless routers also include an integrated hardware firewall.
A hardware firewall passes two different types of traffic into your network:
- Responses to traffic that originates from inside your network
- Traffic destined for a port that you have intentionally left open
Hardware and software firewalls protect data and equipment on a network from unauthorized access. A firewall should be used in addition to security software. Figure 2 compares hardware and software firewalls.
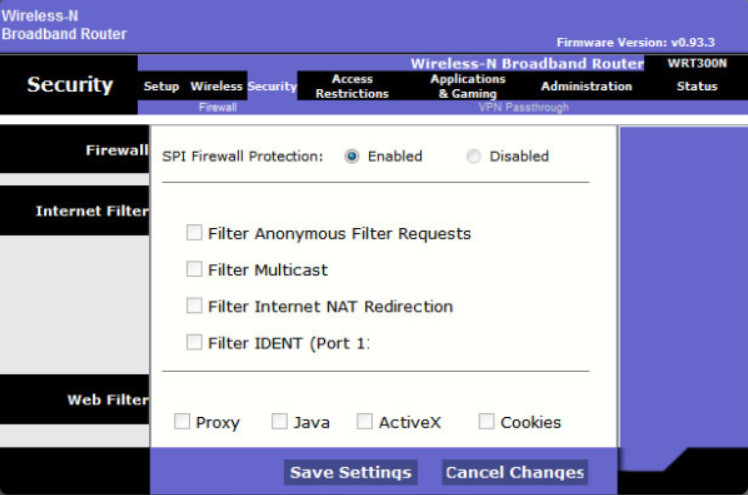
SPI Firewall Protection

Hardware and Software Firewall Comparison
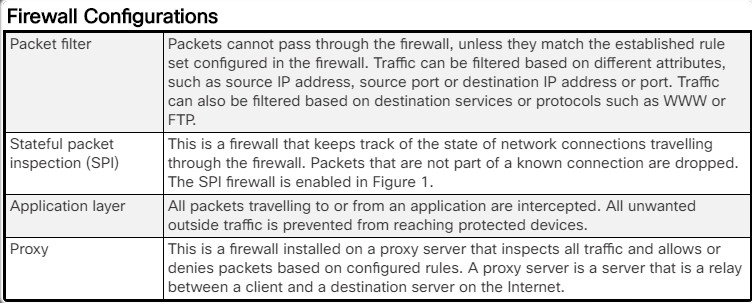
Firewall Configurations
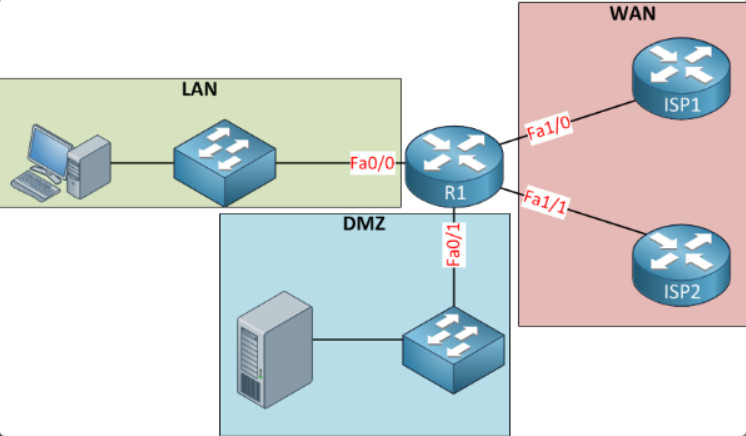
Demilitarized Zone
A DMZ is a subnetwork that provides services to untrusted networks. Email, web, and FTP servers are often placed into the DMZ so that the traffic using the server does not come inside the local network. This protects the internal network from attacks by this traffic, but does not protect the servers in the DMZ in any way. It is common for a firewall or proxy to manage traffic to and from the DMZ.
13.4.1.8 – Port Forwarding and Port Triggering
Hardware firewalls can be used to block ports to prevent unauthorized access in and out of a LAN. However, there are situations when specific ports must be opened so that certain programs and applications can communicate with devices on different networks. Port forwarding is a rule-based method of directing traffic between devices on separate networks.
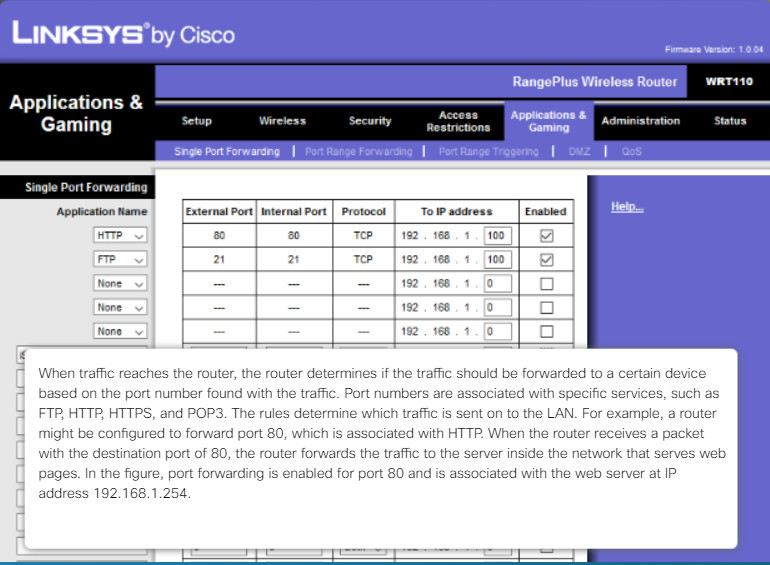
Port Forwarding and Port Triggering
When traffic reaches the router, the router determines if the traffic should be forwarded to a certain device based on the port number found with the traffic. Port numbers are associated with specific services, such as FTP, HTTP, HTTPS, and POP3. The rules determine which traffic is sent on to the LAN. For example, a router might be configured to forward port 80, which is associated with HTTP. When the router receives a packet with the destination port of 80, the router forwards the traffic to the server inside the network that serves web pages. In the figure, port forwarding is enabled for port 80 and is associated with the web server at IP address 192.168.1.254.
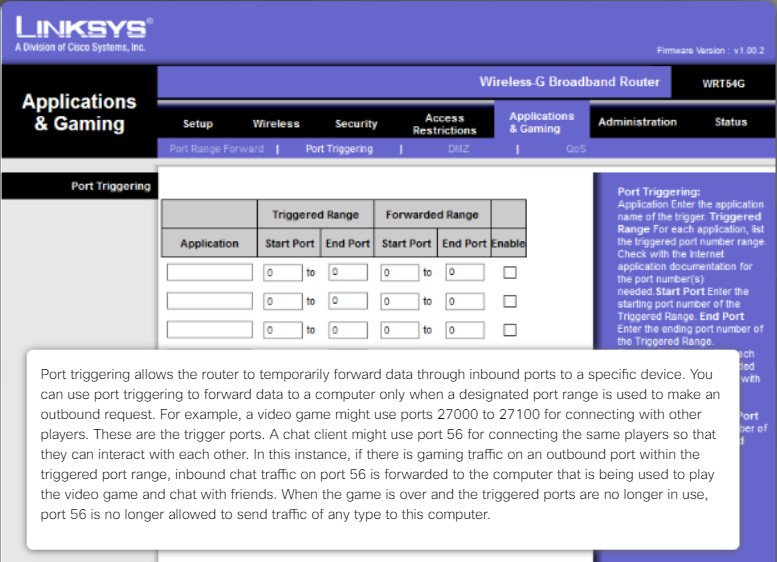
Port Forwarding and Port Triggering
Port triggering allows the router to temporarily forward data through inbound ports to a specific device. You can use port triggering to forward data to a computer only when a designated port range is used to make an outbound request. For example, a video game might use ports 27000 to 27100 for connecting with other players. These are the trigger ports. A chat client might use port 56 for connecting the same players so that they can interact with each other. In this instance, if there is gaming traffic on an outbound port within the triggered port range, inbound chat traffic on port 56 is forwarded to the computer that is being used to play the video game and chat with friends. When the game is over and the triggered ports are no longer in use, port 56 is no longer allowed to send traffic of any type to this computer.
13.4.1.9 – Universal Plug and Play
Universal Plug and Play (UPnP) is a protocol that enables devices to dynamically forward traffic through network ports without the need for user intervention or configuration. Port forwarding is often used for streaming media, hosting games, or providing services from home and small business computers to the internet.
Although convenient, UPnP is not secure. The UPnP protocol has no method for authenticating devices. Therefore, it considers every device trustworthy. In addition, the UPnP protocol has numerous security vulnerabilities. For example, malware can use the UPnP protocol to redirect traffic to different IP addresses outside your network, potentially sending sensitive information to a hacker.
Many websites host a variety of free browser-based vulnerability profiling tools. Search the internet for “UPnP router test” and scan your router to determine if yours is exposed to UPnP vulnerabilities.
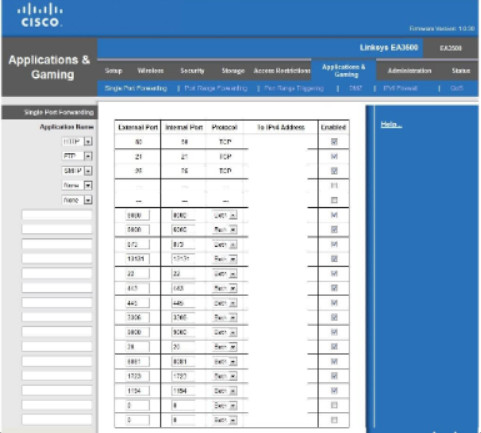
Port Forwarding
Many home and small office wireless routers have UPnP enabled by default. Therefore, check this configuration and disable it
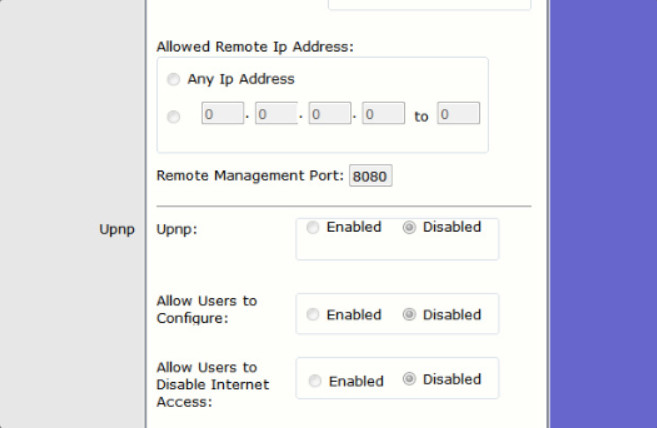
Disable UPnP
13.4.1.10 – Packet Tracer – Configure Wireless Security
In this Packet Tracer activity, you will configure a wireless router to use WPA2 personal as a security method, rely on MAC filtering to increase security, and support single port forwarding.
Packet Tracer – Configure Wireless Security – Instructions
Packet Tracer – Configure Wireless Security – Activity
13.5 – Basic Troubleshooting Process for Security
13.5.1 – Applying the Troubleshooting Process to Security
13.5.1.1 – The Six Steps of the Troubleshooting Process
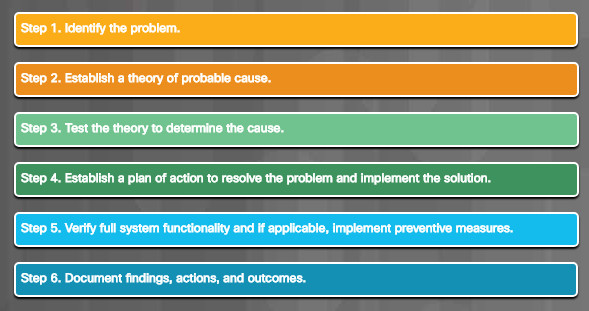
13.5.1.1 – The Six Steps of the Troubleshooting Process
13.5.1.2 – Identify the Problem
Security-related issues can be as simple as preventing shoulder surfing or it can be more complex, such as having to remove infected files from multiple networked computers. Use the troubleshooting steps in the figure as guidelines to help you diagnose and repair security related problems.

Identify the Problem
Computer technicians must be able to analyze a security threat and determine the appropriate method to protect assets and repair damage. The first step in the troubleshooting process is to identify the problem. The figure shows a list of open-ended and closed-ended questions to ask the customer.
13.5.1.3 – Establish a Theory of Probable Cause
After you have talked to the customer, you can begin to establish a theory of probable causes. You may need to conduct additional internal or external research based on the customer’s description of the symptoms. The figure shows a list of some common probable causes for security problems.

Establish a Theory of Probable Cause
13.5.1.4 – Test the Theory to Determine Cause
After you have developed some theories about what is wrong, test your theories to determine the cause of the problem. The figure shows a list of quick procedures that can determine the exact cause of the problem or even correct the problem. If a quick procedure corrects the problem, you can verify full system functionality. If a quick procedure does not correct the problem, you might need to research the problem further to establish the exact cause.

Test the Theory to Determine Cause
13.5.1.5 – Establish a Plan of Action to Resolve the Problem and Implement the Solution
After you have determined the exact cause of the problem, establish a plan of action to resolve the problem and implement the solution. The figure shows some sources you can use to gather additional information to resolve an issue.

Establish a Plan of Action to Resolve the Problem and Implement the Solution
13.5.1.6 – Verify Full System Functionality and, If Applicable Implement Preventive Measures
After you have corrected the problem, verify full functionality and, if applicable, implement preventive measures. The figure shows a list of the steps to verify the solution.
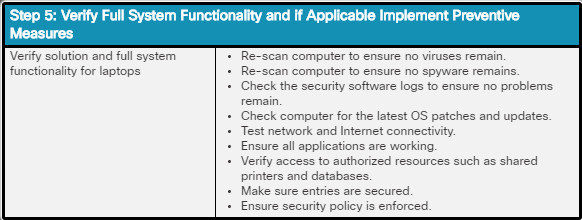
Verify Full System Functionality and, If Applicable Implement Preventive Measures
13.5.1.7 – Document Findings, Actions, and Outcomes
In the final step of the troubleshooting process, you must document your findings, actions, and outcomes. The figure shows a list of the tasks required to document the problem and the solution.

Document Findings, Actions, and Outcomes
13.5.2.1 – Common Problems and Solutions for Security
- A security alert is displayed.

- A user is receiving hundreds or thousands of junk emails each day.

- An unauthorized wireless access point is discovered on the network.

- An unknown printer repair person is observed looking under keyboards and on desktops.

- System files have been renamed, applications crash, files are disappearing, or file permissions have changed.

- Users with flash drives are infecting computers on the network with viruses.

- Your email contacts report spam coming from you.

- Your wireless network is compromised even though 128-bit WEP encryption is used.

- User receives Access Denied errors when attempting to open files.

- Browser opens page other than what the user is attempting to access.

- Users are being redirected to malicious websites.

13.5.2.2 – Lab – Document Customer Information in a Work Order
In this lab, you will document customer information in a work order.
13.5.2.2 – Lab – Document Customer Information in a Work Order
13.6 – Summary
13.6.1 – Conclusion
13.6.1.1 – Chapter 13: Security
In this chapter, you learned that there are many types of threats created to disrupt computers and networks, the greatest and most common being malware. Malware is software developed by cybercriminals to perform malicious acts. Malware is typically installed on a computer without user knowledge. You learned about common types of computer malware such as viruses, trojan horses, adware, ransomware, rootkits, spyware, and worms and mitigation techniques to project against them. You also learned about types of TCP/IP attacks like denial of service, spoofing, syn flood, and man-in-the-middle.
Organizations often deploy network security solutions and the latest anti-malware solutions to secure their networks. However, this does not address what is likely the single most serious threat to a well-configured and well-secured network, social engineering. You learned that Cybercriminals use social engineering techniques to deceive and trick unsuspecting individuals to reveal confidential information or account login credentials. Social engineering attacks take many forms such as phishing, pretexting, baiting, and dumpster diving.
You learned about the importance of a security policy in defining security objectives that ensure the security of the network, the data, and the computers in an organization. You learned that the policy should specify the persons authorized to access network resources, the minimum requirements for passwords, acceptable uses for network resources, how remote users can access the network, and how security incidents will be handled. Part of the security policy addresses protecting physical equipment. You learned about different types of secure locks and mantraps that can limit access to restricted areas and prevent tailgating.
can be easily lost or damaged in circumstances such as theft, equipment failure, or a disaster. The risk of data loss can be mitigated by using data backups, file and folder permissions, and file and folder encryption. You completed a lab using BitLocker encryption to encrypt the data on a removable USB data drive and on the OS drive of a Windows PC.
You learned how to secure a Windows workstation by setting passwords on the BIOS to prevent the operating system from booting and changing BIOS settings, setting login passwords to prevent access to the local computer, and setting network passwords to prevent access to network resources. You also learned how to set local security policies in Windows.
You completed a lab configuring a Windows Local Security Policy to modify password requirements, enable auditing, configure some user rights, and set security options. You also used Event Manager to view logged information in the lab.
You learned about the Windows Defender host-based firewall included with Windows 10 and how to configure Windows Defender to allow or deny access to specific programs or ports. You also learned about Windows Defender Firewall with Advanced Security that provides even greater access control with Windows Firewall policies such as inbound and outbound rules, connection security rules, and monitoring. You explored the Windows Firewall and configure advanced settings in the lab.
Wireless networks are particularly vulnerable to attack and must be properly secured. Radio waves used to transmit data in wireless networks make it easy for attackers to monitor and collect data without physically connecting to a network. One way to provide a level of security on Wi-Fi networks is to change the default SSID and to disable broadcast of the SSID. Further levels of security can be gained through authentication and encryption. You practiced configuring wireless security in a packet tracer activity.
Finally, you learned the six steps in the troubleshooting process as they are applied to security.

