Lab Objective:
The objective of this lab exercise is for you to learn and understand how to manually configure the OSPF router ID.
Lab Purpose:
Manually configuring the OSPF router ID is a fundamental skill. By default, if only physical interfaces are configured on a router, the highest IP address of those interfaces is used as the OSPF router ID. However, if both Loopback and physical interfaces are configured, then the Loopback interfaces are preferred when Cisco IOS selects the router ID for OSPF. However, the recommended method to select an OSPF router ID is to manually configure it. As a Cisco engineer, as well as in the Cisco CCNA exam, you will be expected to know how to manually configure an OSPF router ID.
Certification Level:
This lab is suitable for ICND2 and CCNA certification exam preparation.
Lab Difficulty:
This lab has a difficulty rating of 5/10.
Readiness Assessment:
When you are ready for your certification exam, you should complete this lab in no more than 10 minutes.
Lab Topology:
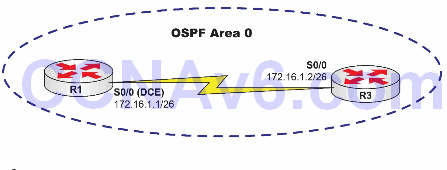
Please use the following topology to complete this lab exercise:

Task 1:
Configure hostnames on R1 and R3 as illustrated in the topology.
Task 2:
Configure R1 S0/0, which is a DCE, to provide a clock rate of 768 Kbps to R3. Configure the IP addresses on the Serial interfaces of R1 and R3 as illustrated in the topology.
Task 3:
Enable OSPF in area 0 between R1 and R3. For R1, use OSPF process ID 1. For R3, use OSPF process ID 3. Verify that your OSPF adjacency has formed between R1 and R3. Make a mental note of the OSPF router ID being used at this time after the adjacency between R1 and R3 has been established.
Task 4:
Manually configure OSPF router ID 1.1.1.1 on R1 and 3.3.3.3 on R3. Reset the OSPF process on R1 and R3 by issuing the clear ip ospf process command. Verify that the OSPF adjacency has been re-established between R1 and R3. Verify that the OSPF neighbor IP addresses are now showing as the manually configured router IDs instead of the physical interface IP addresses.
Configuration and Verification
Task 1:
For reference information on configuring hostnames, please refer to earlier labs.
Task 2:
For reference information on configuring IP addressing, please refer to earlier labs.
Task 3:
R1#config t
Enter configuration commands, one per line.  End with CTRL/Z.
R1(config)#router ospf 1
R1(config-router)#network 172.16.1.0 0.0.0.63 area 0
R1(config-router)#^Z
R1#

R3#conf t
Enter configuration commands, one per line.  End with CTRL/Z.
R3(config)#router ospf 3
R3(config-router)#network 172.16.1.0 0.0.0.63 area 0
R3(config-router)#end
*Mar  1 01:51:39.406: %OSPF-5-ADJCHG: Process 3, Nbr 192.168.1.1 on Serial0/0 from LOADING to FULL, Loading Done

R1#show ip ospf neighbor detail
Neighbor 172.16.3.3, interface address 172.16.1.2
  In the area 0 via interface Serial0/0
  Neighbor priority is 0, State is FULL, 12 state changes
  DR is 0.0.0.0 BDR is 0.0.0.0
  Options is 0x52
  LLS Options is 0x1 (LR)
  Dead timer due in 00:00:35
  Neighbor is up for 00:01:04
  Index 1/1,retransmission queue length 0,number of retransmission 1
  First 0x0(0)/0x0(0) Next 0x0(0)/0x0(0)
  Last retransmission scan length is 1, maximum is 1
  Last retransmission scan time is 0 msec, maximum is 0 msec

R3#show ip ospf neighbor detail
Neighbor 192.168.1.1, interface address 172.16.1.1
  In the area 0 via interface Serial0/0
  Neighbor priority is 0, State is FULL, 6 state changes
  DR is 0.0.0.0 BDR is 0.0.0.0
  Options is 0x52
  LLS Options is 0x1 (LR)
  Dead timer due in 00:00:39
  Neighbor is up for 00:00:48
  Index 1/1,retransmission queue length 0,number of retransmission 1
  First 0x0(0)/0x0(0) Next 0x0(0)/0x0(0)
  Last retransmission scan length is 1, maximum is 1
  Last retransmission scan time is 0 msec, maximum is 0 msec
NOTE: The show ip ospf neighbor [detail] command provides detailed information on OSPF neighbors. It provides the neighbor router ID as well as the interface on which the neighbor was discovered, among other things. In addition, it will also provide the IP address of the routers that are DR and BDR, respectively, on broadcast or NBMA network types. Familiarize yourself with the information provided by this command.
Task 4:
R1#conf t
Enter configuration commands, one per line.  End with CTRL/Z.
R1(config)#router ospf 1
R1(config-router)#router-id 1.1.1.1
Reload or use “clear ip ospf process” command, for this to take effect
R1(config-router)#end
R1#

R3#conf t
Enter configuration commands, one per line.  End with CTRL/Z.
R3(config)#router ospf 3
R3(config-router)#router-id 3.3.3.3
Reload or use “clear ip ospf process” command, for this to take effect
R3(config-router)#end
R3#
R3#clear ip ospf process
Reset ALL OSPF processes? [no]: yes
*Mar  1 01:58:27.875: %OSPF-5-ADJCHG: Process 3, Nbr 1.1.1.1 on Serial0/0 from FULL to DOWN, Neighbor Down: Interface down or detached
*Mar  1 01:58:27.959: %OSPF-5-ADJCHG: Process 3, Nbr 1.1.1.1 on Serial0/0 from LOADING to FULL, Loading Done
NOTE: Whenever you manually change the OSPF router ID for an established OSPF adjacency, the change is not immediate and you either have to reboot the router or reset the OSPF process as indicated in the message that is printed on the console when you configured the router ID on R3:
Reload or use “clear ip ospf process” command, for this to take effect
After resetting the OSPF process, a new adjacency is re-established and both routers use the configured router IDs.
R1#show ip ospf neighbor
Neighbor ID     Pri   State      Dead Time   Address         Interface
3.3.3.3           0   FULL/  -   00:00:37    172.16.1.2      Serial0/0

R3#show ip ospf neighbor

Neighbor ID     Pri   State      Dead Time   Address         Interface
1.1.1.1           0   FULL/  -   00:00:39    172.16.1.1      Serial0/0
