Instructor Planning Guide
Activities
What activities are associated with this chapter?
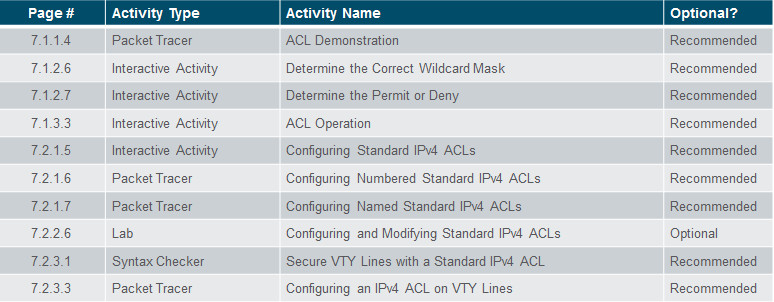

Assessment
Students should complete Chapter 7, “Assessment” after completing Chapter 7.
Quizzes, labs, Packet Tracers and other activities can be used to informally assess student progress.
Sections & Objectives
7.1 ACL Operation
Explain the purpose and operation of ACLs in small to medium-sized business networks.
Explain how ACLs filter traffic.
Explain how ACLs use wildcard masks.
Explain how to create ACLs.
Explain how to place ACLs.
7.2 Standard IPv4 ACLs
Configure standard IPv4 ACLs to filter traffic in a small to medium-sized business network.
Configure standard IPv4 ACLs to filter traffic to meet networking requirements.
Use sequence numbers to edit existing standard IPv4 ACLs.
Configure a standard ACL to secure VTY access.
7.3 Troubleshoot ACLs
Troubleshoot IPv4 ACL issues.
Explain how a router processes packets when an ACL is applied.
Troubleshoot common standard IPv4 ACL errors using CLI commands.
Chapter 7: Access Control Lists
7.1 – ACL Operation
7.1.1 – Purpose of ACLs
7.1.1.1 – What is an ACL?
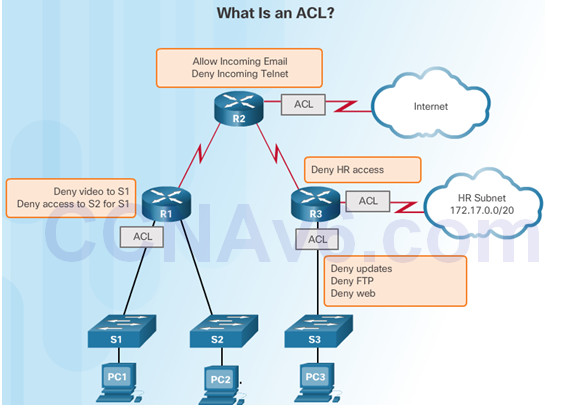
An ACL is a series of IOS commands that control whether a router forwards or drops packets based on information found in the packet header. ACLs are not configured by default on a router.
ACL’s can perform the following tasks:
- Limit network traffic to increase network performance. For example, video traffic could be blocked if it’s not permitted.
- Provide traffic flow control. ACLs can help verify routing updates are from a known source.
- ACLs provide security for network access and can block a host or a network.
- Filter traffic based on traffic type such as Telnet traffic.
- Screen hosts to permit or deny access to network services such as FTP or HTTP.
7.1.1.2 – Packet Filtering
An ACL is a sequential list of permit or deny statements, known as access control entries (ACEs).
- ACEs are commonly called ACL statements.
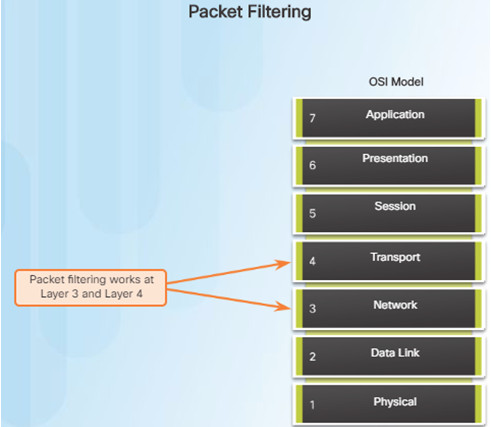
When network traffic passes through an interface configured with an ACL, the router compares the information within the packet against each ACE, in sequential order, to determine if the packet matches one of the ACEs. This is referred to as packet filtering.
Packet Filtering:
- Can analyze incoming and/or outgoing packets.
- Can occur at Layer 3 or Layer 4.
The last statement of an ACL is always an implicit deny. This is automatically inserted at the end of each ACL and blocks all traffic. Because of this, all ACLs should have at least one permit statement.
7.1.1.3 – ACL Operation
ACLs do not act on packets that originate from the router itself.
- ACLs define the set of rules that give added control for packets that enter inbound interfaces, packets that relay through the router, and packets that exit outbound interfaces of the router.
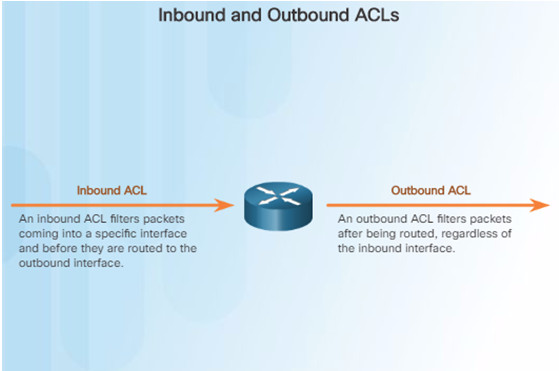
ACLs can be configured to apply to inbound traffic and outbound traffic:
- Inbound ACLs – Incoming packets are processed before they are routed to the outbound interface.
- Outbound ACLs – Incoming packets are routed to the outbound interface, and then they are processed through the outbound ACL.
7.1.1.4 – Packet Tracer – ACL Demonstration
In this Packet Tracer activity, you will observe how an ACL can be used to prevent a ping from reaching hosts on a network.
After removing the ACL from the configuration, the pings will be successful.
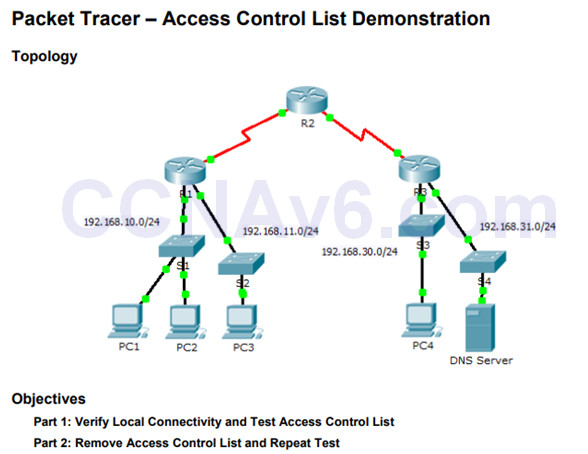
7.1.1.4 Packet Tracer – ACL Demonstration
7.1.2 – Wildcard Masks in ACLs
7.1.2.1 – Introducing ACL Wildcard Masking
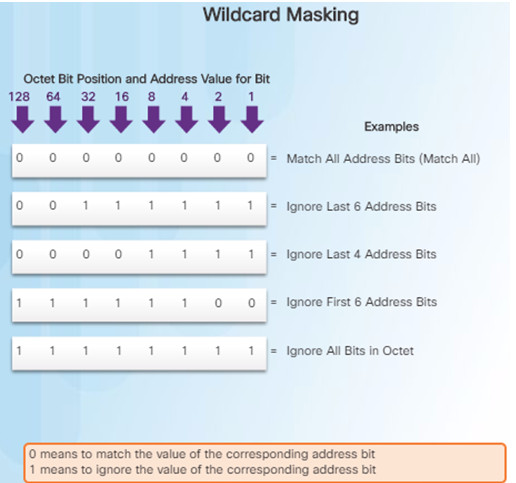
IPv4 ACEs require the use of wildcard masks.
A wildcard mask is a string of 32 binary digits (1s and 0s) used by the router to determine which bits of the address to examine for a match.
Wildcard masks are often referred to as an inverse mask since unlike a subnet mask where a binary 1 is a match, a binary 0 is a match with wildcard masks. For example:

7.1.2.2 – Wildcard Mask Examples
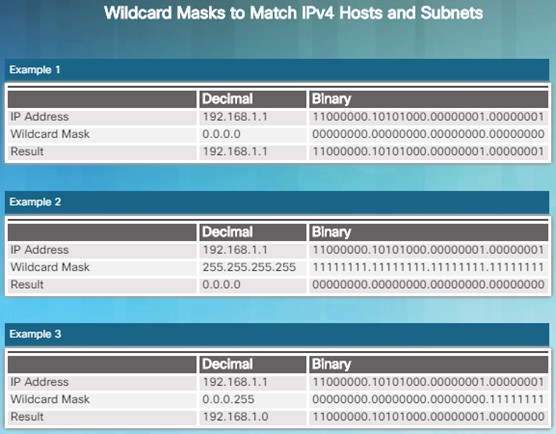
Calculating the wildcard mask to match IPV4 subnets takes practice. In the first to the left:
- Example 1: The wildcard mask stipulates that every bit in the IPv4 192.168.1.1 address must match exactly.
- Example 2: The wildcard mask stipulates that anything will match.
- Example 3: The wildcard mask stipulates that any host within the 192.168.1.0/24 network will match.
7.1.2.3 – Calculating the Wildcard Mask
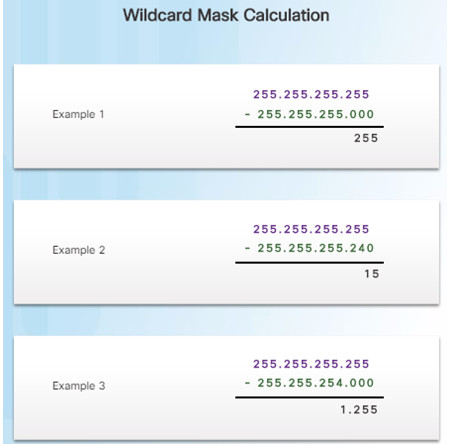
Calculating wildcard mask examples:
- Example 1: Assume you want to permit access to all users in the 192.168.3.0 network with the subnet mask of 255.255.255.0. Subtract the subnet from 255.255.255.255 and the result is: 0.0.0.255.
- Example 2: Assume you want to permit network access for the 14 users in the subnet 192.168.3.32/28 with the subnet mask of 255.255.255.240. After subtracting the subnet maks from 255.255.255.255, the result is 0.0.0.15.
- Example 3: Assume you want to match only networks 192.168.10.0 and 192.168.11.0 with the subnet mask of 255.255.254.0. After subtracting the subnet mask from 255.255.255.255, the result is 0.0.1.255.
7.1.2.4 – Wildcard Mask Keywords
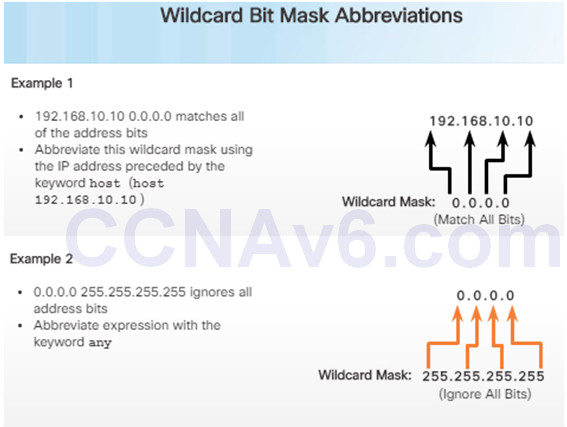
To make wildcard masks easier to read, the keywords host and any can help identify the most common uses of wildcard masking.
- host substitutes for the 0.0.0.0 mask
- any substitutes for the 255.255.255.255 mask
If you would like to match the 192.169.10.10 address, you could use 192.168.10.10 0.0.0.0 or, you can use: host 192.168.10.10
In Example 2, instead of entering 0.0.0.0 255.255.255.255, you can use the keyword any by itself.
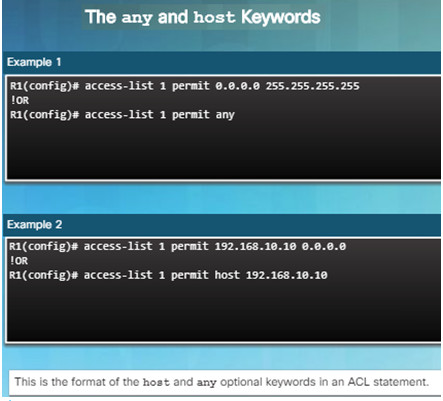
7.1.2.5 – Wildcard Mask Keyword Examples
Example 1 in the figure demonstrates how to use the any keyword to substitute the IPv4 address 0.0.0.0 with a wildcard mask of 255.255.255.255.
Example 2 demonstrates how to use the host keyword to substitute for the wildcard mask when identifying a single host.
7.1.3 – Guidelines for ACL Creation
7.1.3.1 – General guidelines for Creating ACLs
Use ACLs in firewall routers positioned between your internal network and an external network such as the Internet.
Use ACLs on a router positioned between two parts of your network to control traffic entering or exiting a specific part of your internal network.
Configure ACLs on border routers such as those situated at the edge of your network. This will provide a basic buffer from the outside network that is less controlled.
Configure ACLs for each network protocol configured on the border router interfaces.
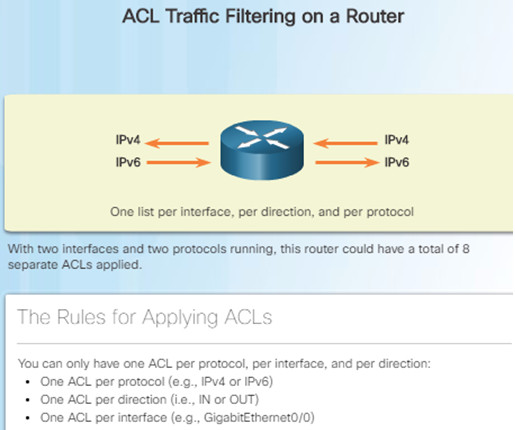
7.1.3.2 – ACL Best Practices
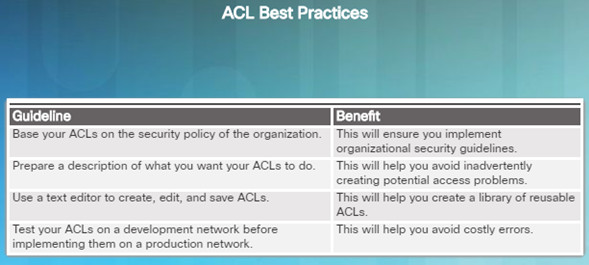
Using ACLs requires significant attention to detail. Mistakes can be very costly in terms of downtime, troubleshooting efforts, and poor network performance.
7.1.4 – Guidelines for ACL Placement
7.1.4.1 – Where to Place ACLs
The proper placement of an ACL can make the network operate more efficiently. For example, and ACL can be placed to reduce unnecessary traffic.
Every ACL should be placed where it has the greatest impact on efficiency.
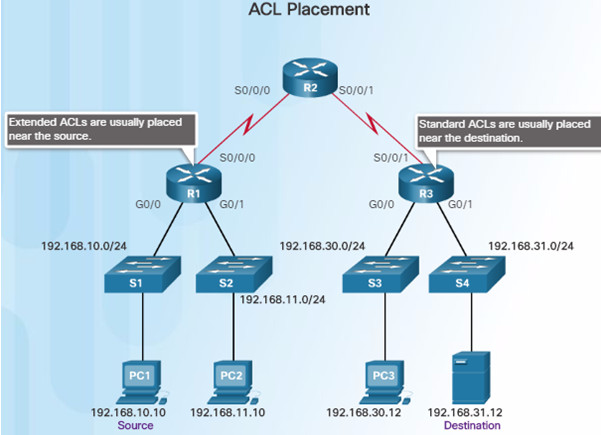
- Extended ACLs – Configure extended ACLs as close as possible to the source of the traffic to be filtered. This will prevent undesirable traffic as close to the source without it crossing the network infrastructure.
- Standard ACLs – Since standard ACLs do not specify destination addresses, they should be configured as close to the destination as possible.
7.1.4.2 – Standard ACL Placement
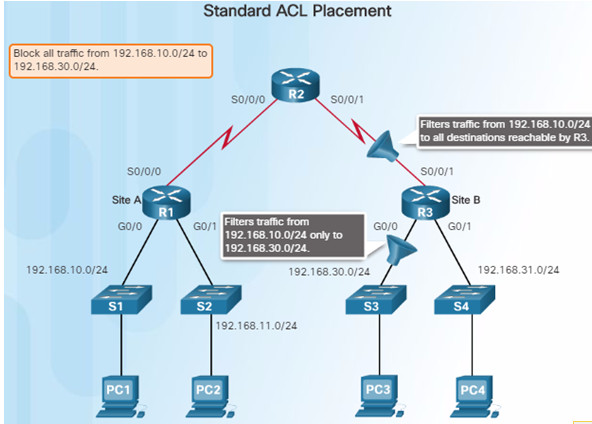
This example demonstrates the proper placement of the standard ACL that is configured to block traffic from the 192.168.10.0/24 network to the 192.168.30.0/24 network.
There are two possible places to configure the access-list on R3.
If the access-list is applied to the S0/0/1 interface, it will block traffic to the 192.168.30.0/24 network, but also, going to the 192.168.31.0/24 network.
The best place to apply the access list is on R3’s G0/0 interface. The access-list list should be applied to traffic exiting the G0/0 interface. Packets from 192.168.10.0/24 can still reach 192.168.31.0/24.
7.2 – Standard IPv4 ACLs
7.2.1 – Configure Standard IPv4 ACLs
7.2.1.1 – Numbered Standard IPv4 ACL Examples
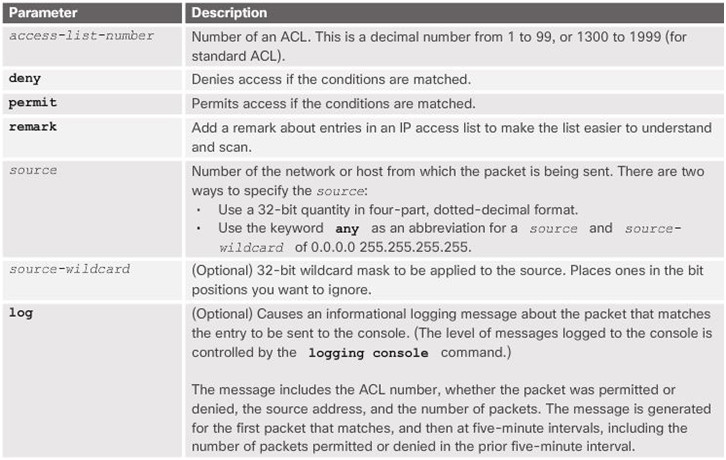
The access-list global configuration command defines a standard ACL with a number in the range of 1 through 99.
The full syntax of the standard ACL command is as follows:
Router(config)# access-list access-list-number { deny | permit | remark } source [ source-wildcard ][ log ]
To remove the ACL, the global configuration no access-list command is used. Use the show access-list command to verify the removal of the ACL.
7.2.1.2 – Applying Standard IPv4 ACLs to Interfaces
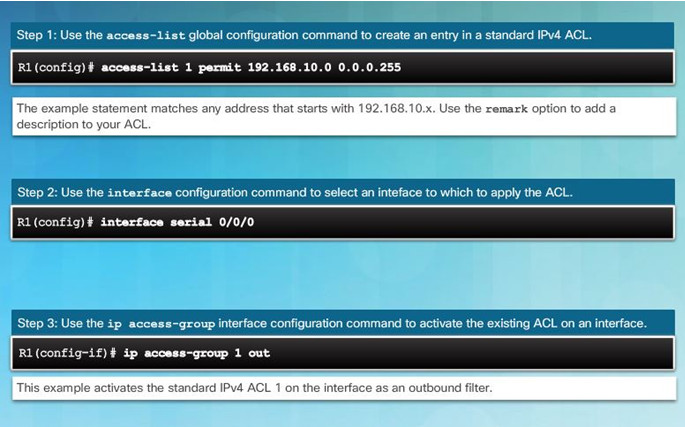
After a standard IPv4 ACL is configured, it is linked to an interface using the ip access-group command in interface configuration mode:
Router(config-if)# ip access-group { access-list-number | access-list-name } { in | out }
To remove an ACL from an interface, first enter the no ip access-group command on the interface, and then enter the global no access-list command to remove the entire ACL.
7.2.1.3 – Numbered Standard IPv4 ACL Examples
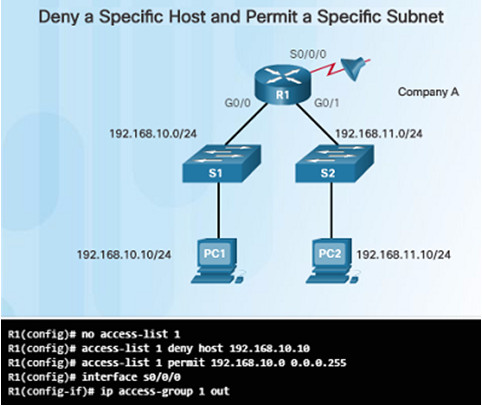
The figure to the left shows an example of an ACL that permits traffic from a specific subnet but denies traffic from a specific host on that subnet.
- The no access-list 1 command deletes the previous version of ACL 1.
- The next ACL statement denies the host 192.168.10.10.
- What is another way to write this command without using host?
- All other hosts on the 192.168.10.0/24 network are then permitted.
- There is an implicit deny statement that matches every other network.
- Next, the ACL is reapplied to the interface in an outbound direction.
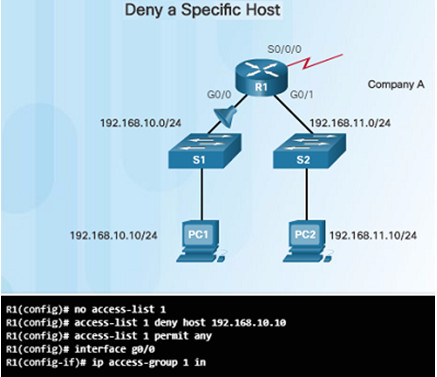
This next example demonstrates an ACL that denies a specific host but will permit all other traffic.
- The first ACL statement deletes the previous version of ACL 1.
- The next command, with the deny keyword, will deny traffic from the PC1 host that is located at 192.168.10.10.
- The access-list 1 permit any statement will permit all other hosts.
- This ACL is applied to interface G0/0 in the inbound direction since it only affects the 192.168.10.0/24 LAN.
7.2.1.4 – Named Standard IPv4 ACL Syntax
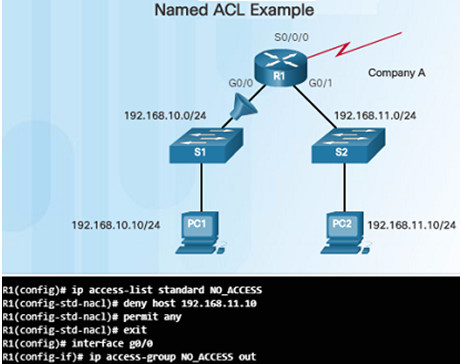
Identifying an ACL with a name rather than with a number makes it easier to understand its function.
The example to the left shows how to configured a named standard access list. Notice how the commands are slightly different:
- Use the ip access-list command to create a named ACL. Names are alphanumeric, case sensitive, and must be unique.
- Use permit or deny statements as needed. You can also use the remark command to add comments.
- Apply the ACL to an interface using the ip access-group name command.
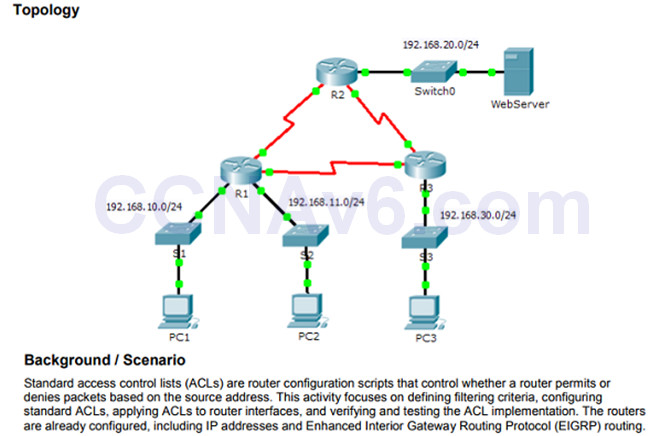
7.2.1.6 – Packet Tracer – Configuring Numbered Standard IPv4 ACLs
This Packet Tracer Activity will allow you to practice defining filtering criteria and configuring standard ACLs in a preconfigured network.
Verification of the configured and applied ACLs will also be required.
7.2.1.6 Packet Tracer Configuring Numbered Standard IPv4 ACLs
7.2.1.7 – Packet Tracer – Configuring Named Standard IPv4 ACLs
This Packet Tracer activity will require you to configure a standard named ACL.
You will be required to test the ACL after applying it to the appropriate interface.
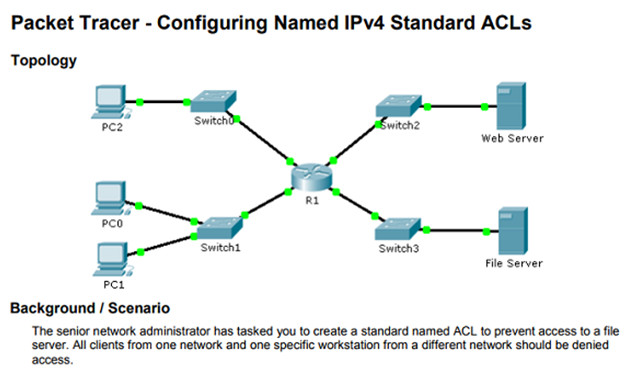
7.2.1.7 Packet Tracer – Configuring Named Standard IPv4 ACLs
7.2.2 – Modify IPv4 ACLs
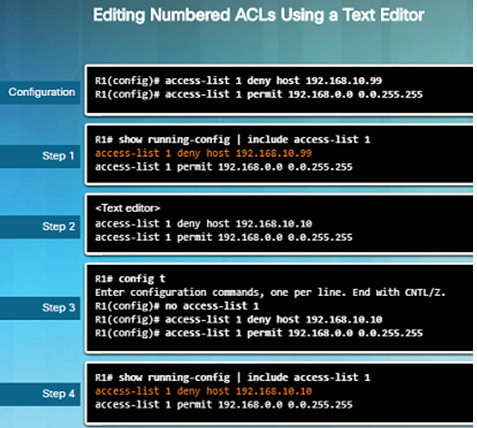
7.2.2.1 – Method 1 – Use a Text Editor
It is sometimes easier to create and edit ACLs in a text editor such as Microsoft Notepad rather making changes directly on the router.
For an existing ACL, use the show running-config command to display the ACL, copy and paste it into the text editor, make the necessary changes, and then paste it back in to the router interface.
It is important to note that when using the no access-list command, different IOS software releases act differently.
- If the ACL that has been deleted is still applied to the interface, some IOS versions act as if no ACL is protecting your network while others deny all traffic.
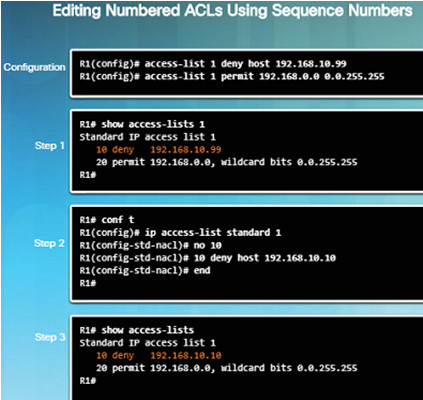
7.2.2.2 – Method 2 – Use Sequence Numbers
The figure to the left demonstrates the steps used to make changes to a numbered ACL using sequence numbers.
Step 1 identifies the problem. The deny 192.168.10.99 statement is incorrect. The host to deny should be 192.168.10.10
To make the edit, Step 2 shows how to go into standard access-list 1 and make the change. The misconfigured statement had to be deleted with the no command: no 10
Once it was deleted, the new statement with the correct host was added: 10 deny host 192.168.10.10
7.2.2.3 – Editing Standard Named ACLs
By referring to statement sequence numbers, individual statements can be easily inserted or deleted.
The figure to the left shows an example of how to insert a line into a named ACL.
By numbering it 15, it will place the command in between statement 10 and 20.
Please notice that when the ACL was originally created, the network administrator spaced each command by 10 which left room for edits and additions.
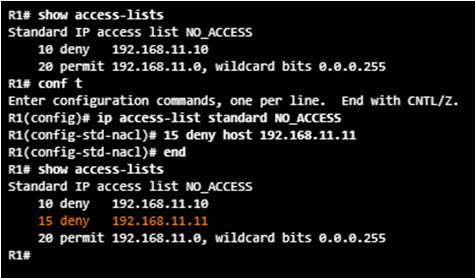
The no sequence-number named ACL command is used to delete individual statements.
7.2.2.4 – Verifying ACLs
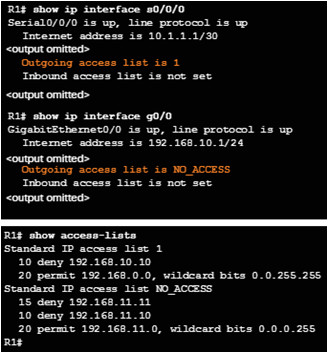
Use the show ip interface command to verify that the ACL is applied to the correct interface.
The output will display the name of the access list and the direction in which it was applied to the interface.
Use the show access-lists command to display the access-lists configured on the router.
Notice how the sequence is displayed out of order for the NO_ACCESS access list. This will be discussed later in this section.
7.2.2.5 – ACL Statistics
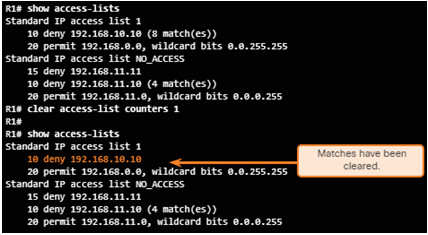
The show access-lists command can be used to display matched statistics after an ACL has been applied to an interface and some testing has occurred.
When traffic is generated that should match an ACL statement, the matches shown in the show access-lists command output should increase.
Recall that every ACL has an implicit deny any as the last statement. The statistics for this implicit command will not be displayed. However, if this command is configured manually, the results will be displayed.
The clear access-list counters command can be used to clear the counters for testing purposes.
7.2.2.6 – Lab – Configuring and Modifying Standard IPv4 ACLs
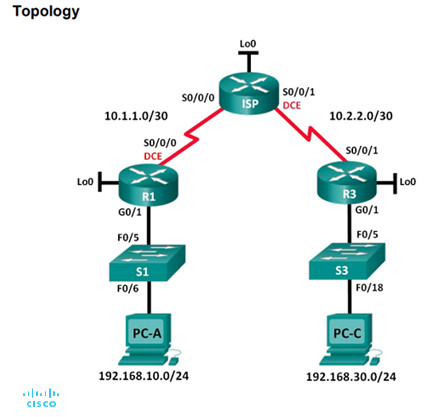
This lab will require you to set up and configure devices to match the topology provided in the lab.
Configuration, modification, and testing of standard and named ACLs is also required.
7.2.2.6 Lab – Configuring and Verifying Standard IPv4 ACLs
7.2.3 – Securing VTY ports with a Standard IPv4 ACL
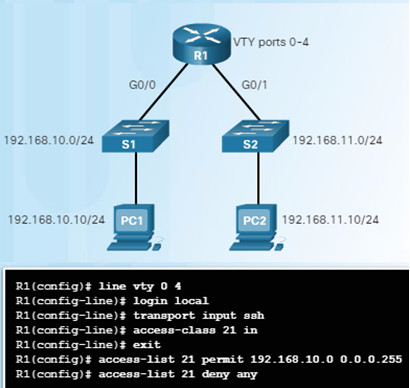
7.2.3.1 – The access-class Command
Administrative VTY access to Cisco devices should be restricted to help improve security.
Restricting VTY access is a technique that allows you define which IP addresses are allowed remote access to the router EXEC process.
The access-class command configured in line configuration mode will restrict incoming and outgoing connections between a particular VTY (into a Cisco device) and the addresses in an access list.
Router(config-line)# access-class access-list-number {in [vrf-also ] | out }
7.2.3.2 – Verifying the VTY Port is Secured
Verification of the ACL configuration used to restrict VTY access is important.
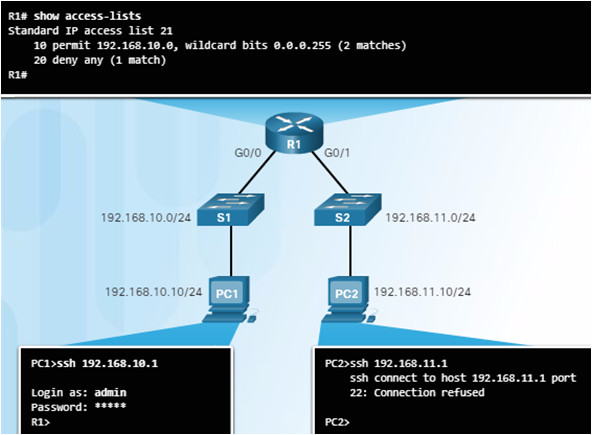
The figure to the left shows two devices trying to ssh into two different devices.
The show access-lists command output shows the results after the SSH attempts by PC1 and PC2.
Notice the match results in the permit and the deny statements.
7.2.3.3 – Packet Tracer – Configuring an IPv4 ACL on VTY Lines
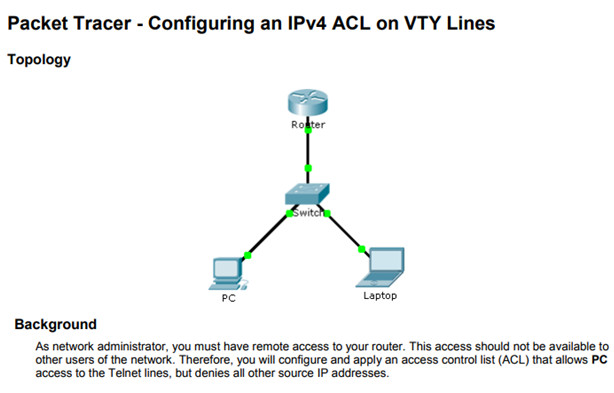
This Packet Tracer activity will require you to configure and apply an ACL that allows PC access to the Telnet lines on the router, but will deny all other source IP addresses.
7.2.3.3 Packet Tracer – Configuring an ACL on VTY Lines
7.2.3.4 – Lab – Configuring and Verifying VTY Restrictions
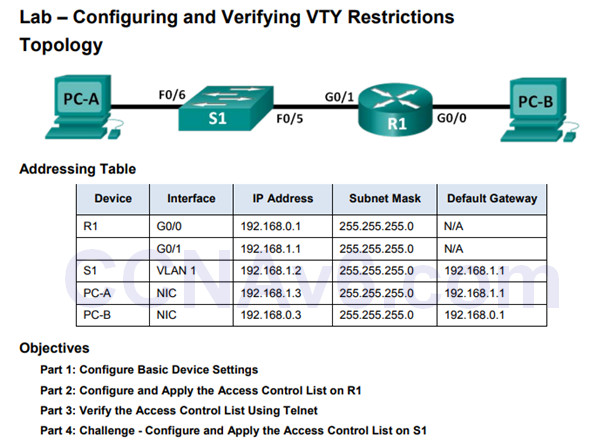
This Lab will require the configuring and verification of VTY restrictions.
Only certain IP addresses will be allowed access to the vty lines on the router.
It is important to ensure that only administrator PCs have permission to telnet or SSH into the router.
7.2.3.4 Lab – Configuring and Verifying VTY Restrictions
7.3 – Troubleshoot ACLs
7.3.1 – Processing Packets with ACLs
7.3.1.1 – The Implicit Deny Any
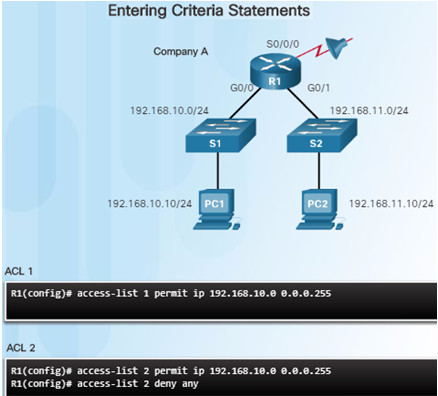
A single-entry ACL with only one deny entry has the effect of denying all traffic.
At least one permit ACE must be configured in an ACL or all traffic will be blocked.
Study the two ACLs in the figure to the left.
Will the results be the same or different?
7.3.1.2 – The Order of ACEs in an ACL
The order in which ACEs are configured are important since ACEs are processed sequentially.
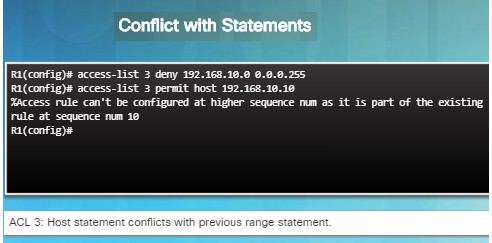
The figure to the left demonstrates a conflict between two statements since they are in the wrong order.
- The first deny statement blocks everything in the 192.168.10.0/24 network.
- However, the second permit statement is attempting to allow host 192.168.10.10 through.
- This statement is rejected since it is a subset of the previous statement.
- Reversing the order of these two statements will solve the problem.
7.3.1.3 – Cisco IOS Reorders Standard ACLs
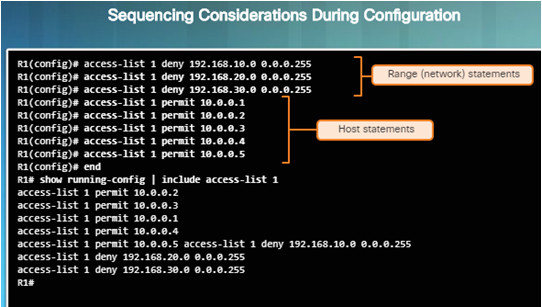
Note the order in which the access-list statements were entered during configuration.
Notice how the order was changed when you enter the show running-config command.
The host statements are listed first, however, not in the order they were entered.
The IOS puts host statements in an order using a special hashing function. The resulting order optimizes the search for a host ACL entry.
The range statements are displayed in the order they were entered. The hashing function is applied to host statements.
7.3.1.4 – Routing Processes and ACLs
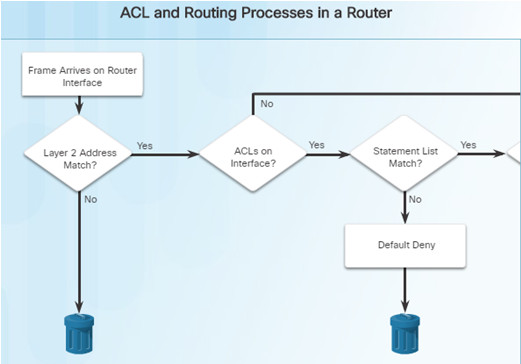
The figure shows the logic of routing and ACL processes.
When a packet arrives at a router interface, the router process is the same, whether ACLs are configured or not.
After the frame information is stripped off, the router checks for an ACL on the inbound interface. If an ACL exists, the packet is tested against the statements.
If the packet matches a statement, the packet is either permitted or denied.
If the packet is permitted, and after the router processes the packet, the outgoing interface will also be checked for an ACL.
7.3.2 – Common IPv4 Standard ACL Errors
7.3.2.1 – Troubleshooting Standard IPv4 ACLs – Example 1
The most common errors involving ACLs:
- Entering ACEs in the wrong order
- Not specifying adequate ACL rules
- Applying the ACL using the wrong direction, wrong interface, or wrong source address
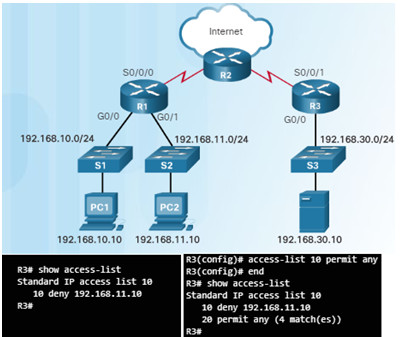
In the figure to the left, PC2 should not be able to access the File Server. However, PC1 can not access it either.
The output of the show access-list command shows the one deny statement in the ACL.
The set of commands on the right shows the solution. The permit statement allows other devices to access since the implicit deny was blocking other traffic.
7.3.2.2 – Troubleshooting Standard IPv4 ACLs – Example 2
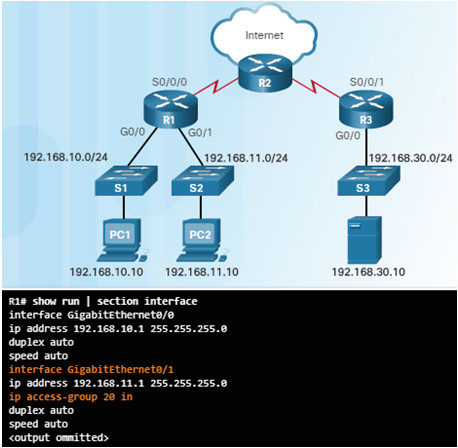
The 192.168.11.0/24 network should not be able to access the 192.168.10.0/24 network.
PC2 cannot access PC1 as planned, however, it also cannot access the Internet through R2.
Problem: access-list 20 was applied to G0/1 on an inbound direction
Where should ACL 20 be applied and in which direction?
In order for PC2 to access the Internet, ACL 20 needs to be removed from the G0/1 interface and applied outbound on the G0/0 interface.
7.3.2.3 – Troubleshooting Standard IPv4 ACLs – Example 3
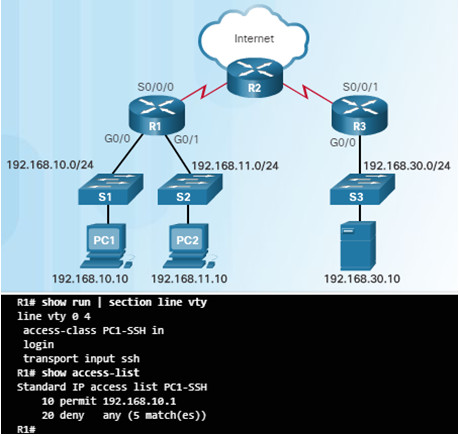
Only PC1 should be allowed to SSH to R1.
There is a problem with the config in the figure to the left since PC1 is unable to SSH to R1.
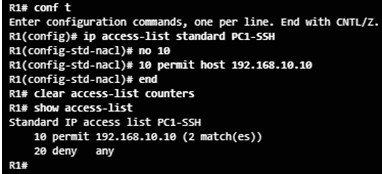
The ACL is permitting the 192.168.10.1 address which is the G0/0 interface. However, the address that should be permitted is the PC1 host address of 192.168.10.10.
The solution is provided below:
7.3.2.4 – Packet Tracer – Troubleshooting Standard IPv4 ACLs
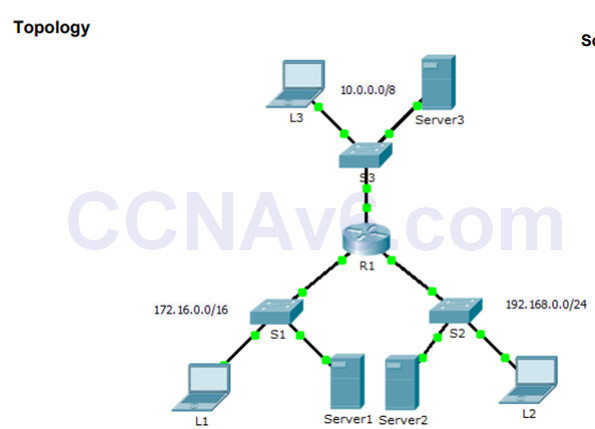
This Packet Tracer activity will require the troubleshooting of various IPv4 ACL issues.

7.3.2.4 Packet Tracer – Troubleshooting Standard IPv4 ACLs
7.4 – Summary
7.4.1 – Conclusion
7.4.1.1 FTP Denied Instructions
7.4.1.1 FTP Denied Instructions
7.4.1.2 – Packet Tracer – Skills Integration Challenge
This Packet Tracer activity will require you to finish the IP addressing scheme, configure routing, and implement named access control lists.
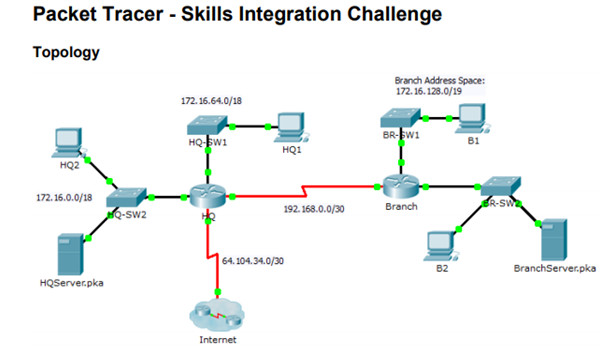
7.4.1.2 Packet Tracer – Skills Integration Challenge
New Terms and Commands
| •access control lists (ACLs)
•firewalls •access control entries (ACEs) •packet filtering •Standard ACLs •Extended ACLs •implicit deny •Inbound ACLs •Outbound ACLs •wildcard masks •named ACLs •inverse mask |
