Instructor Planning Guide
Activities
What activities are associated with this chapter?
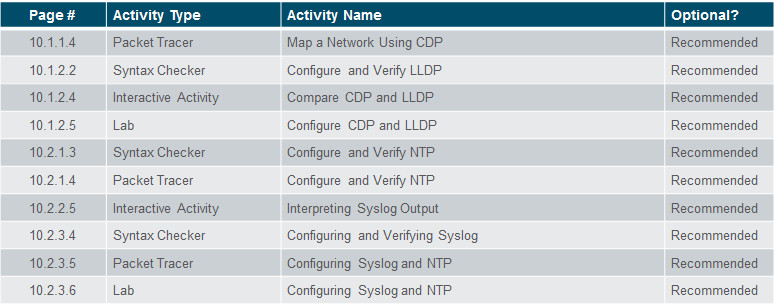


Assessment
Students should complete Chapter 10, “Assessment” after completing Chapter 10.
Quizzes, labs, Packet Tracers and other activities can be us ed to informally assess student progress.
Sections & Objectives
10.1 Device Discovery
Use discovery protocols to map a network topology.
Use CDP to map a network topology.
Use LLDP to map a network topology.
10.2 Device Management
Configure NTP and Syslog in a small to medium-sized business network.
Implement NTP between a NTP client and NTP server.
Explain syslog operation.
Configure syslog servers and clients.
10.3 Device Maintenance
Maintain router and switch configuration and IOS files.
Use commands to back up and restore an IOS configuration file.
Explain the IOS image naming conventions implemented by Cisco.
Upgrade an IOS system image.
Explain the licensing process for Cisco IOS software in a small- to medium-sized business network.
Configure a router to install an IOS software image license.
Chapter 10: Device Discovery, Management, and Maintenance
10.1 – Device Discovery
10.1.1 – Device Discovery with CDP
10.1.1.1 – CDP Overview
Cisco Discovery Protocol (CDP)
- Cisco proprietary Layer 2 protocol used to gather information about Cisco devices sharing a link
- Periodic CDP advertisements sent to connected devices
- Share type of device discovered, name of devices, and number and type of interfaces
- Determine information about neighboring devices to build a logical topology when documentation is missing

10.1.1.2 – Configure and Verify CDP

Verify status and display information

Enables CDP on interface (no CDP enable disables)

no cdp run globally disables (cdp run enables)

No neighbors detected
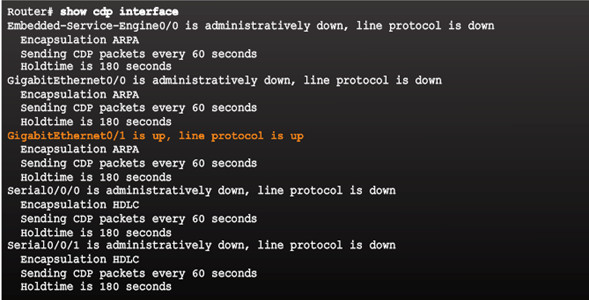
Indicates the interfaces with CDP enabled
10.1.1.3 – Discover Devices Using CDP
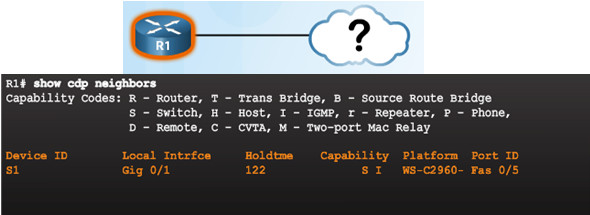
show cdp neighbors discovers:
- S1 (Device ID)
- Gig 0/1 (local port identifier)
- Fas 0/5 (remote port identified)
- S for switch (R for router)
- WS-C2960 (hardware platform)
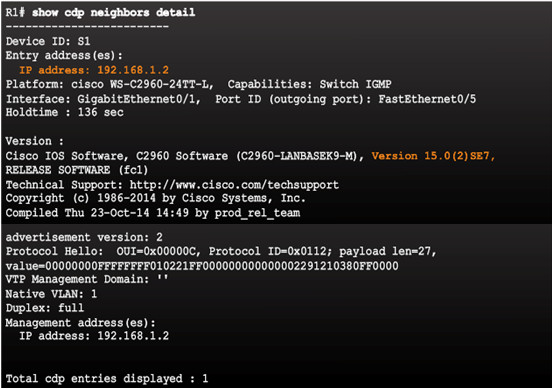
show cdp neighbors detail command provides additional information:
- IPv4 address
- IOS version
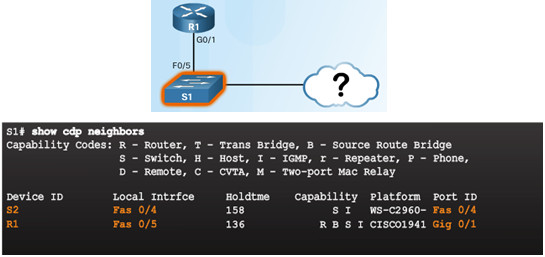
- Other devices connected to S1 can be determined
- S2 is revealed in the output!
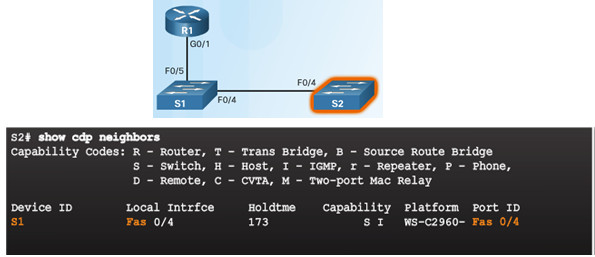
- No more devices to discover!
10.1.1.4 – Packet Tracer – Map a Network Using CDP
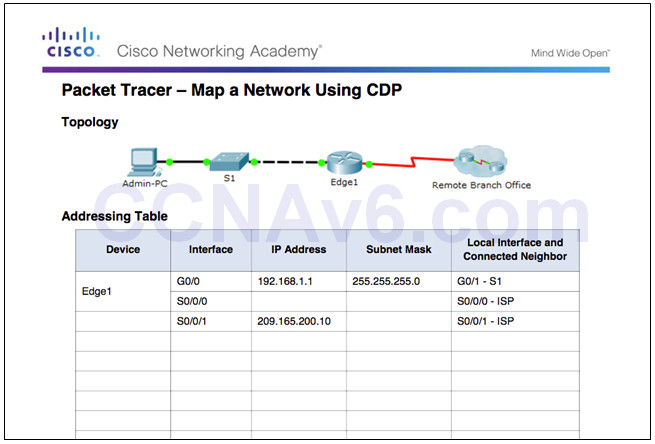
10.1.1.4 Packet Tracer – Map a Network Using CDP
10.1.2 –Device Discovery with LLDP
10.1.2.1 – LLDP Overview
Link Layer Discovery Protocol
- Vendor-neutral neighbor discovery similar to CDP
- Works with routers, switches, and wireless LAN access points
- Advertises its identity and capabilities to other devices and information from a connected Layer 2 device

10.1.2.2 – Configure and Verify LLDP
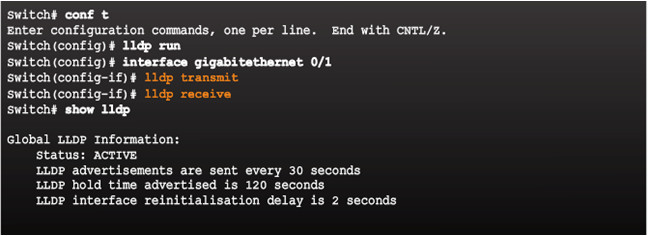
- lldp run enables globally
- LLDP can be configured on separate interfaces, configured separately to transmit and receive
- To disable LLDP globally – no lldp run
10.1.2.3 – Discover Devices Using LLDP
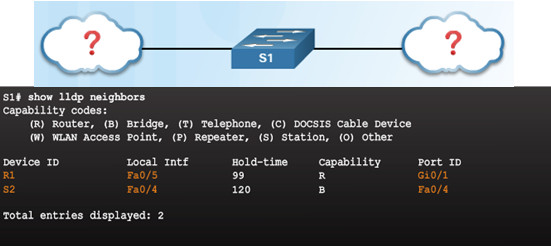
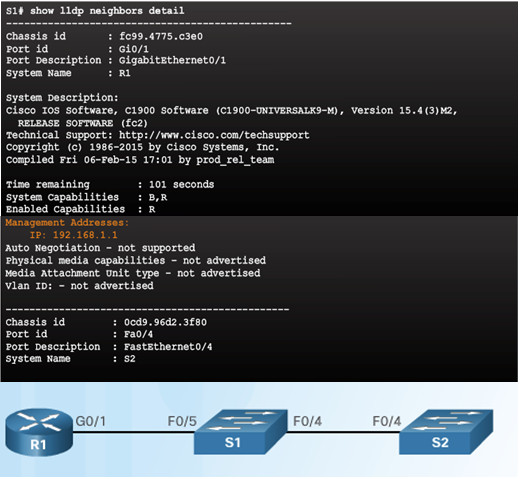
10.1.2.5 – Lab – Configure CDP and LLDP
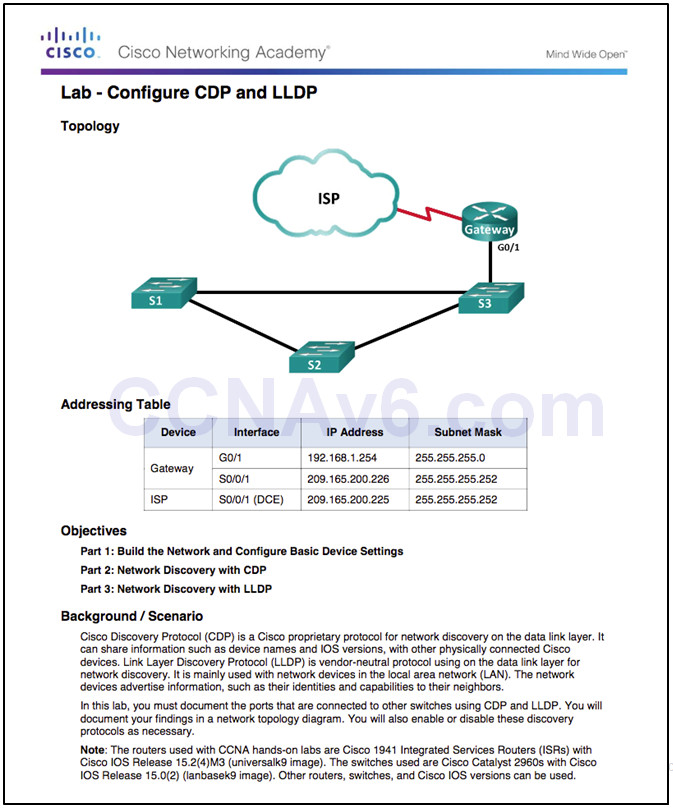
10.1.2.5 Lab – Configure CDP and LLDP
10.2 – Device Management
10.2.1 – NTP
10.2.1.1 –Setting the System Clock

Managing, securing, troubleshooting, and planning networks requires accurate timestamping
Date and time settings on a router or switch can be set using one of two methods:
- Manually configure the date and time, as shown in the figure
- Configure the Network Time Protocol (NTP)
- NTP uses UDP port 123
- NTP clients obtain time and date from a single source
10.2.1.2 – NTP Operation
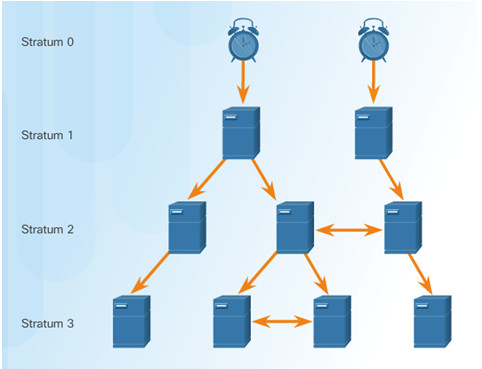
Stratum 0 – top level of hierarchical system, authoritative time sources, assumed to be accurate
Stratum 1 – directly connected to authoritative sources and act as primary network time standard
Stratum 2 and Lower – connected to stratum 1 devices via network connections, act as servers for stratum 3 devices
Smaller stratum numbers closer to authoritative time source
Larger the stratum number, the lower the stratum level (max hop is 15)
Stratum 16, lowest stratum level, indicates device is unsynchronized
10.2.1.3 – Configure and Verify NTP
- Configure Stratum 2 NTP Server

- Verify NTP Server Configuration
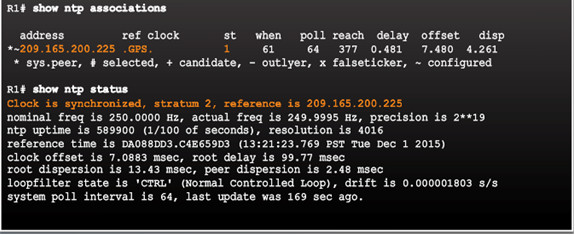
- R1 is synchronized with a stratum 1 NTP server at 209.165.200.225 which is synchronized with a GPS clock

10.2.1.4 – Packet Tracer – Configure and Verify NTP
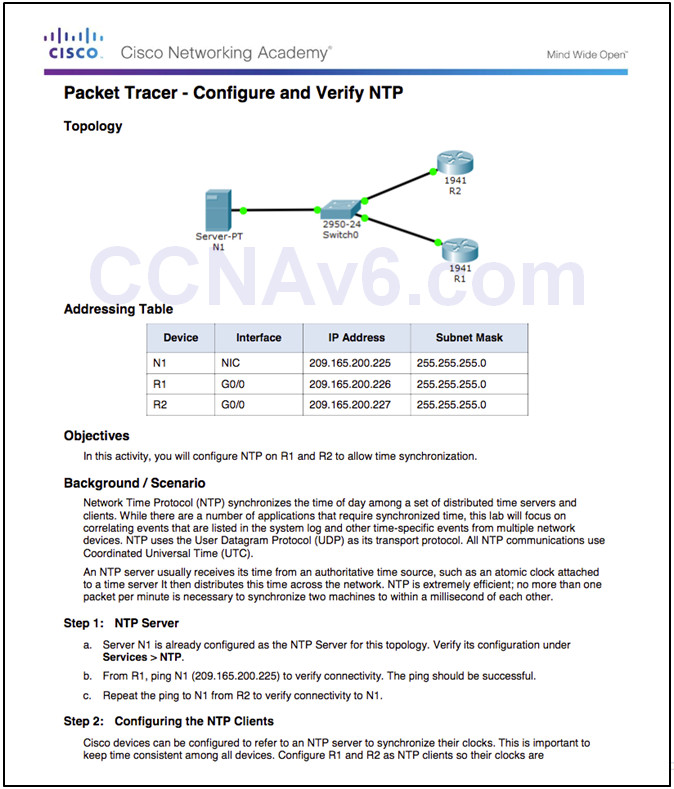
10.2.1.4 Packet Tracer – Configure and Verify NTP
10.2.2 – Syslog Operation
10.2.2.1 – Introduction to Syslog
Syslog
- Describes a standard and protocol
- Uses UDP port 514
- Send event notification messages across IP networks to event message collectors
- Routers, switches, servers, firewalls support syslog
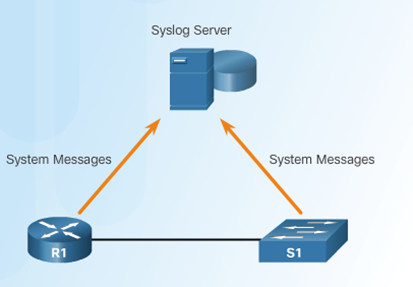
Syslog logging service provides three primary functions:
- Ability to gather logging information for monitoring and troubleshooting
- Ability to select the type of logging information that is captured
- Ability to specify the destinations of captured syslog messages
10.2.2.2 – Syslog Operation
Syslog protocol starts by sending system messages and debug output to a local logging process internal to the device.
How the logging process manages these messages and outputs is based on device configurations.
Syslog messages may be sent across the network to an external syslog server. Can be pulled into various reports.
Syslog messages may be sent to an internal buffer. Only viewable through the CLI of the device.
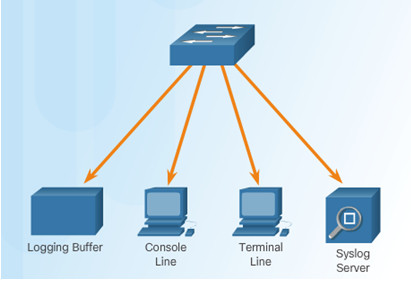
Destinations for syslog messages include:
- Logging buffer (RAM inside a router or switch)
- Console line
- Terminal line
- Syslog server
10.2.2.3 – Syslog Message Format
Cisco devices produce syslog messages as a result of network events
Every syslog message contains a severity level and a facility.
- Smaller are more critical

Each syslog level has its own meaning:
- Warning Level 4 – Emergency Level 0: Error messages about software or hardware malfunctions; functionality of the device is affected.
- Notification Level 5: The notifications level is for normal events. Interface up or down transitions, and system restart messages are displayed at the notifications level.
- Informational Level 6: A normal information message that does not affect device functionality. For example, when a Cisco device is booting, you might see the following informational message: %LICENSE-6-EULA_ACCEPT_ALL: The Right to Use End User License Agreement is accepted.
- Debugging Level 7: This level indicates that the messages are output generated from issuing variousdebug commands.
- By default, the format of syslog messages on the Cisco IOS Software is:
- Sample output on a Cisco switch for an EtherChannel link changing state to up is:
- Facility is LINK and the severity level is 3, with a MNEMONIC of UPDOWN.


10.2.2.4 – Service Timestamp
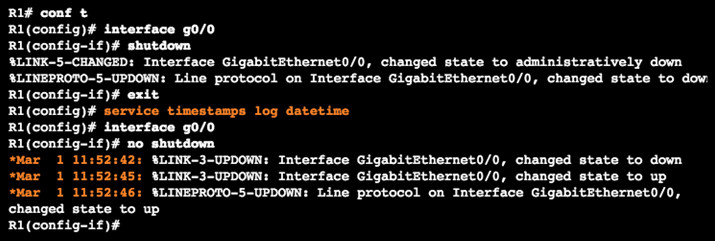
By default, log messages are not timestamped
Log messages should be timestamped so when sent to destination (syslog server) there is a record of when the message was generated
Notice date below once timestamp is activated
10.2.3 – Syslog Configuration
10.2.3.1 – Syslog Server
To view syslog messages, a syslog server must be installed on a networked PC

10.2.3.2 – Default Logging
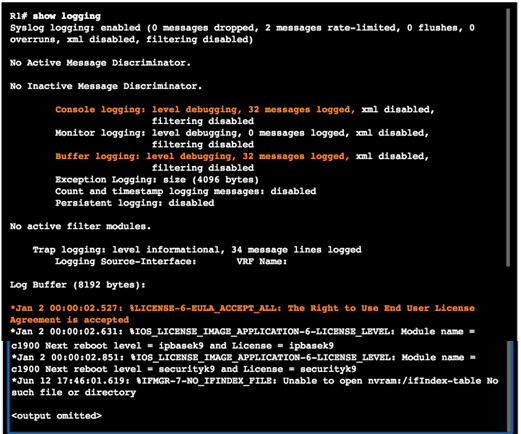
By default, log messages sent to the console.
Some IOS versions buffer log messages by default too.
First highlighted line states that this router logs to the console and includes debug messages.
- all debug level messages, as well as any lower level messages are logged to the console
Second highlighted line states that this router logs to an internal buffer.
System messages that have been logged are at the end of the output.
10.2.3.3 – Router and Switch Commands for Syslog Clients
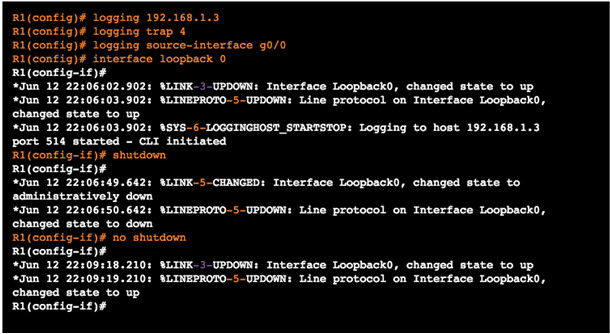
R1 is configured to send log messages of levels 4 and lower to the syslog server at 192.168.1.3
Source interface is set as the G0/0 interface
Loopback interface is created, then shut down, and then brought back up
Console output reflects these actions

10.2.3.4 – Verifying Syslog
10.2.3.5 – Packet Tracer – Configuring Syslog and NTP
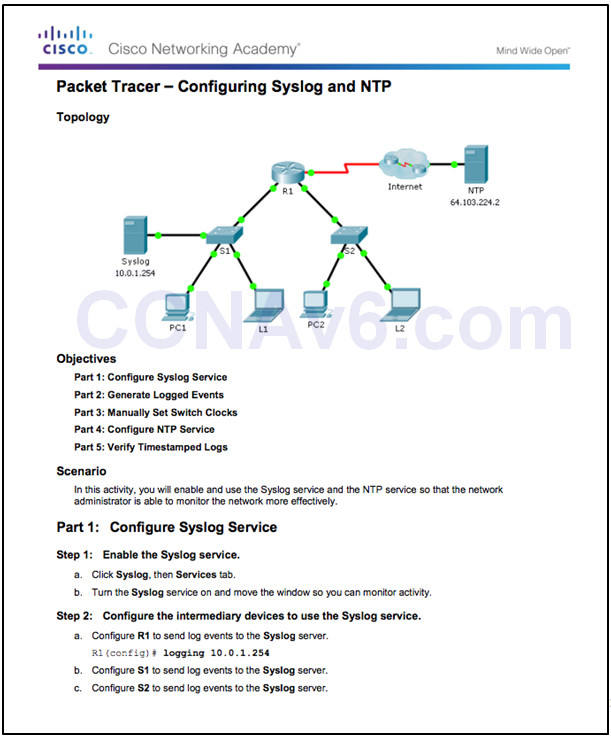
10.2.3.5 Packet Tracer – Configuring Syslog and NTP
10.2.3.6 – Lab – Configuring Syslog and NTP
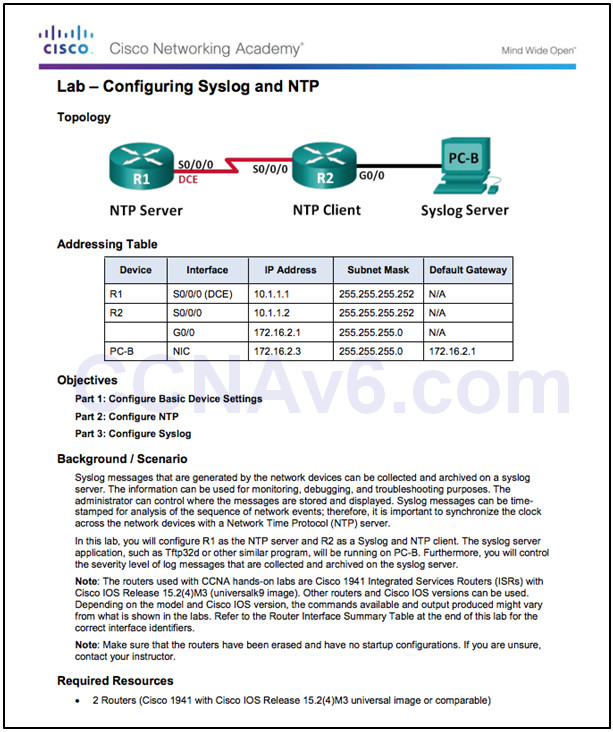
10.2.3.6 Lab – Configuring Syslog and NTP
10.3 – Device Maintenance
10.3.1 – Router and Switch File Maintenance
10.3.1.1 – Router File Systems
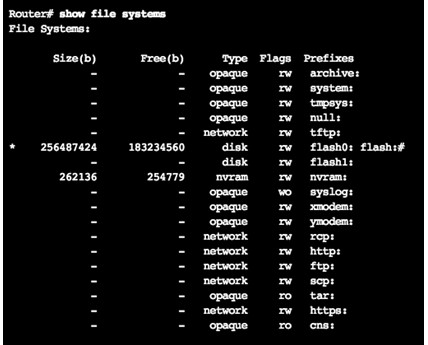
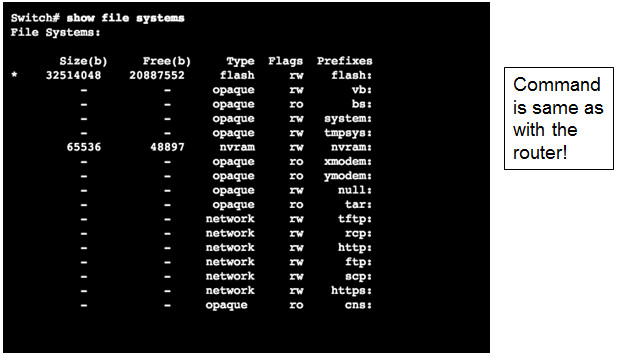
- show file systems lists all the available file systems
- Provides information such as memory, type of file system, and permissions (read only (ro), read and write (rw))
- Interested in tftp, flash, and nvram file systems
- Bootable IOS is located in flash so has a *
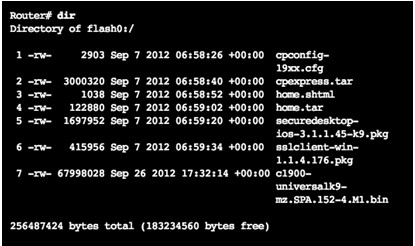
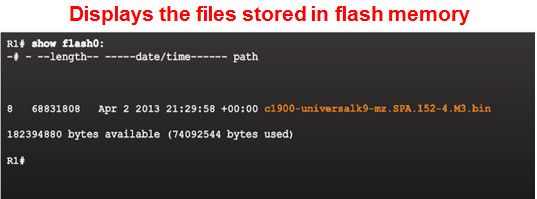
- dir lists the contents of flash
- Last listing is the name of the current Cisco IOS file that is running in RAM
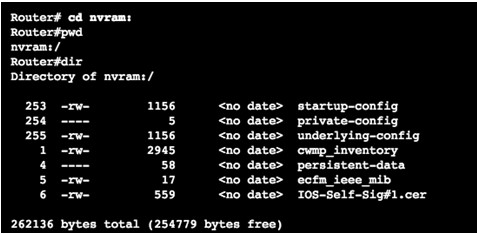
- To view the contents of NVRAM, change the current default file system using the cd(change directory) command
- pwd(present working directory) command verifies that we are viewing the NVRAM directory
- dir lists the contents of NVRAM, included is the startup-configuration file
10.3.1.2 – Switch File Systems
10.3.1.3 – Backing up and Restoring using Text Files
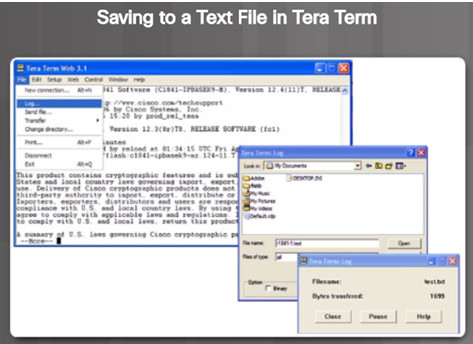
1.On the File menu, click Log.
2.Choose the location to save the file. Tera Term will begin capturing text.
3.After capture has been started, execute the show running-config or show startup-config command at the privileged EXEC prompt. Text displayed in the terminal window will be directed to the chosen file.
4.When the capture is complete, select Close in the Tera Term Log window.
5.View the file to verify that it was not corrupted.
Restoring Text Configurations
- A configuration can be copied from a file to a device.
- When copied from a text file and pasted into a terminal window, the IOS executes each line of the configuration text as a command.
- At the CLI, the device must be set at the global configuration mode to receive the commands from the text file being pasted into the terminal window.
When using Tera Term, the steps are:
- Step 1. On the File menu, click Send file.
- Step 2. Locate the file to be copied into the device and click Open.
- Step 3. Tera Term will paste the file into the device.
- Note: The text in the file will be applied as commands in the CLI and become the running configuration on the device.
10.3.1.4– Backing up and Restoring using TFTP
- Configuration files should be backed up and included in network documentation
- Commands – copy running-config tftp (see figure) or copy startup-config tftp
- To restore the running configuration or the startup configuration from a TFTP server, use copy tftp running-config or copy tftp startup-config command

10.3.1.5 – Using USB Ports on a Cisco Router
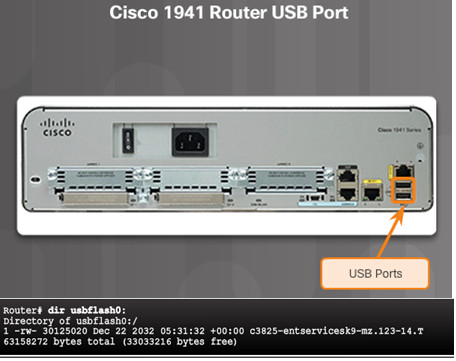
Certain models of Cisco routers support USB flash drives.
USB can be used for storage and booting.
USB flash can hold multiple copies of the Cisco IOS and multiple router configurations.
Use the dir command to view the contents of the USB flash drive.
10.3.1.6 – Backing up and Restoring Using USB
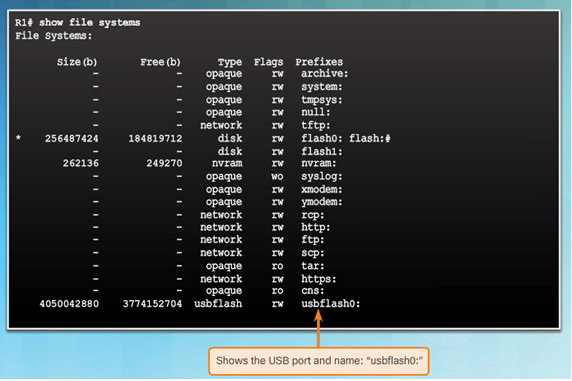
- show file systems verifies USB drive and name
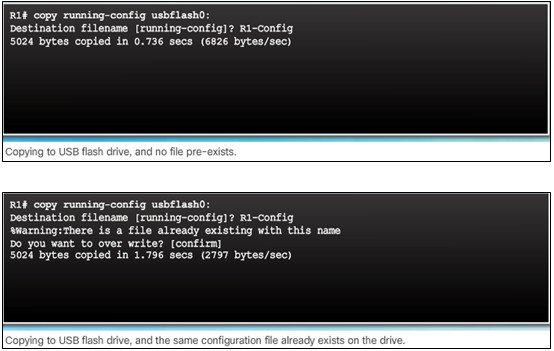
- copy run usbflash0:/ command copies the running-config file to the USB flash drive (slash is optional but indicates the root directory of the USB flash drive)
- IOS will prompt for the filename
- If the file already exists on the USB flash drive, the router will prompt to overwrite
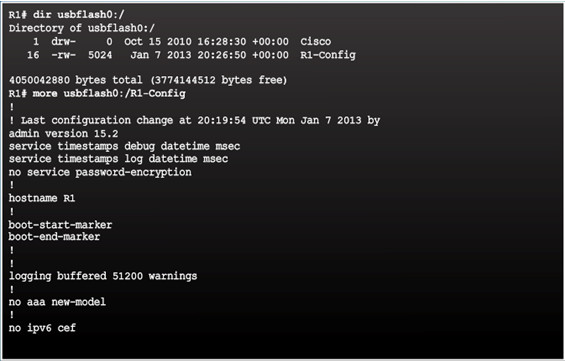
- Use the dir command to see the file on the USB drive
- Use the more command to see the contents
- Use copy usbflash0:/R1-Config running-config to restore running config
10.3.1.7 – Password Recovery
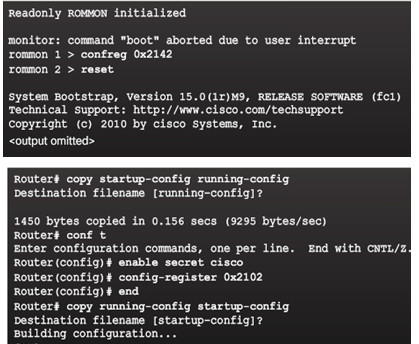
Step 1. Enter the ROMMON mode.
With console access, a user can access the ROMMON mode by using a break sequence during the boot up process or removing the external flash memory when the device is powered off.
Step 2. Change the configuration register to 0x2142 to ignore the startup config file.
Use the confreg 0x2142 command
Type reset at the prompt to restart the device
Step 3. Make necessary changes to the original startup config file.
Copy the startup config to the running config
Configure all necessary passwords
Change the configuration register back to 0X2102
Step 4. Save the new configuration.
10.3.1.8 – Packet Tracer – Backing Up Configuration Files
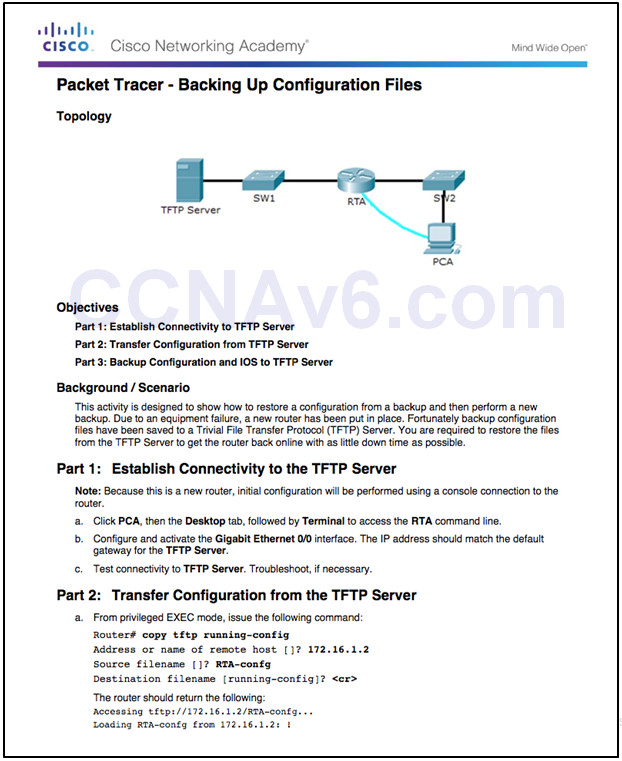
10.3.1.8 Packet Tracer – Backing Up Configuration Files
10.3.1.9 – Lab – Managing Router Configuration Files with Tera Term
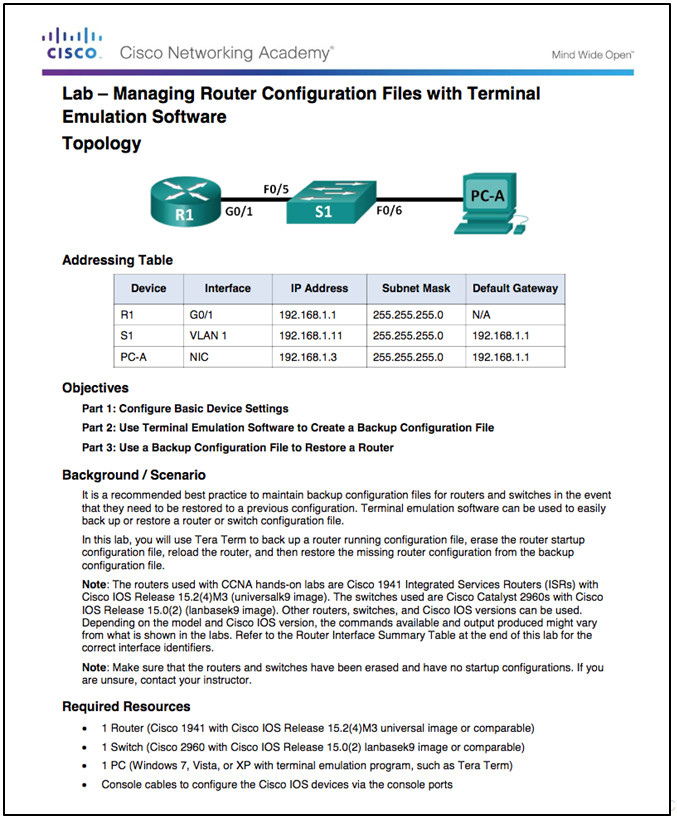
10.3.1.9 Lab – Managing Router Configuration Files with Terminal Emulation Software
10.3.1.10 – Lab – Managing Device Configuration Files Using TFTP, Flash, and USB
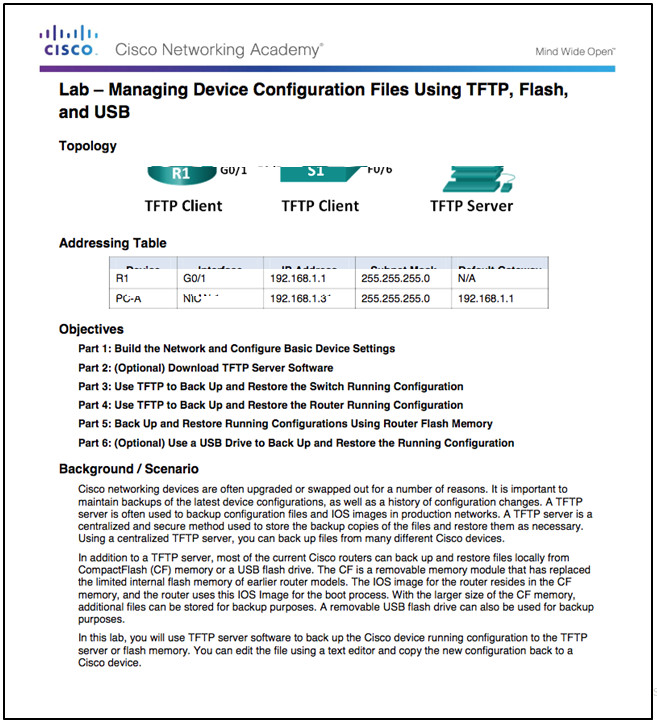
10.3.1.10 Lab – Managing Device Configuration Files Using TFTP, Flash, and USB
10.3.1.11 – Lab – Researching Password Recovery Procedures
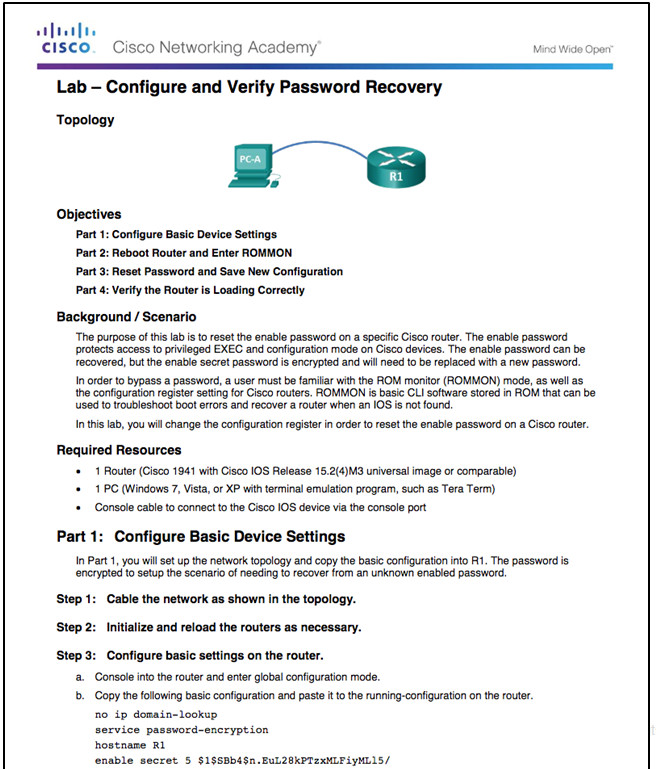
10.3.1.11 Lab – Configure and Verify Password Recovery
10.3.2 – IOS System Files
10.3.2.1 – IOS 15 System Image Packaging
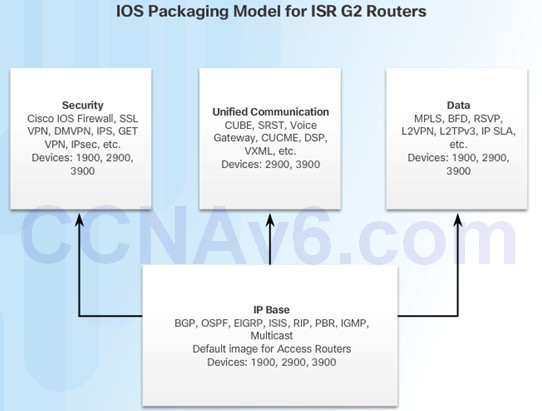
Each router ships with one of two types of universal images in ISR G2:
- “universalk9” – offers all of the Cisco IOS software features, including strong payload cryptography features, such as IPsec VPN, SSL VPN, and Secure Unified Communications
- “universalk9_npe” – some countries have import requirements that require that the platform does not support any strong cryptography functionality, this image does not support any strong payload encryption
Features are activated through licensing.
Other technology packages enabled using Cisco Software Activation licensing keys.
10.3.2.2 – IOS Image Filenames
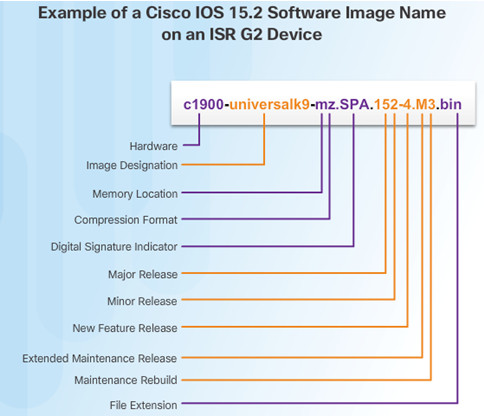
The most common designation for memory location and compression format is mz. The first letter indicates the location where the image is executed on the router. The locations can include:
- f – flash
- m – RAM
- r – ROM
- l – relocatable
The compression format can be z for zip or x for mzip.
10.3.3 – IOS Image Management
10.3.3.1 – TFTP Servers as a Backup Location
- Cisco IOS Software images and configuration files can be stored on a central TFTP server.
- It is good practice to keep a backup copy of the Cisco IOS Software image in case the system image in the router becomes corrupted or accidentally erased.
- Using a network TFTP server allows image and configuration uploads and downloads over the network. The network TFTP server can be another router, a workstation, or a host system.
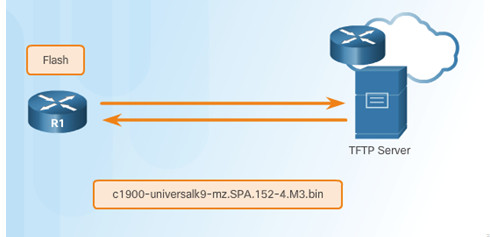
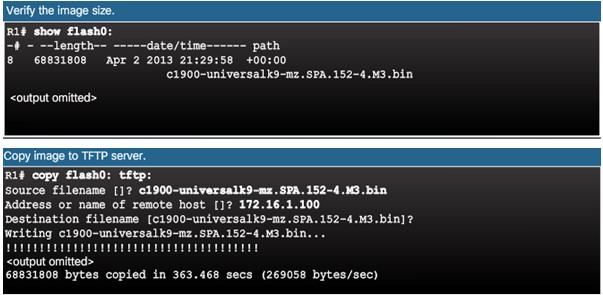
10.3.3.2 – Steps to Backup IOS Image to TFTP Server
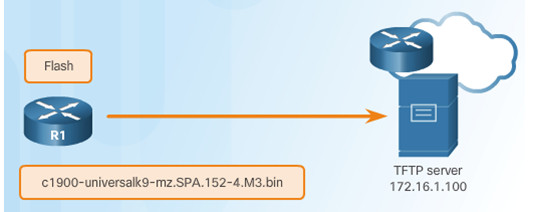
The network administrator wants to create a backup of the current image file on the router (c1900-universalk9-mz.SPA.152-4.M3.bin) to the TFTP server at 172.16.1.100.

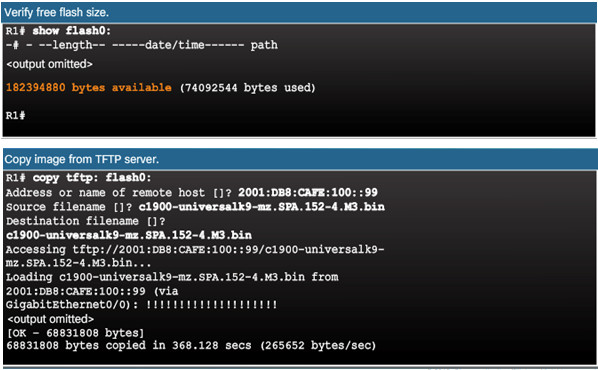
10.3.3.3 – Steps to Copy an IOS Image to a Device
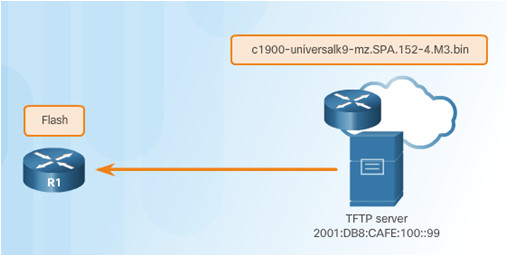
A new image file (c1900-universalk9-mz.SPA.152-4.M3.bin) will be copied from the TFTP server at 2001:DB8:CAFE:100::99 to the router.

10.3.3.4 – The boot system Command
- To upgrade to the copied IOS image after that image is saved on the router’s flash memory, configure the router to load the new image during boot up using the boot system command.
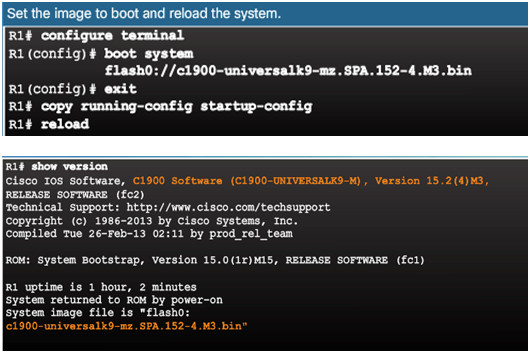
- To verify the new image has loaded, use the show version command.
- Several boot system commands can be entered to provide a fault-tolerant boot plan.
- If there is no boot system commands, the router defaults to loading the first valid Cisco IOS image in flash memory.
10.3.3.5 – Packet Tracer – Using a TFTP Server to Upgrade a Cisco IOS Image
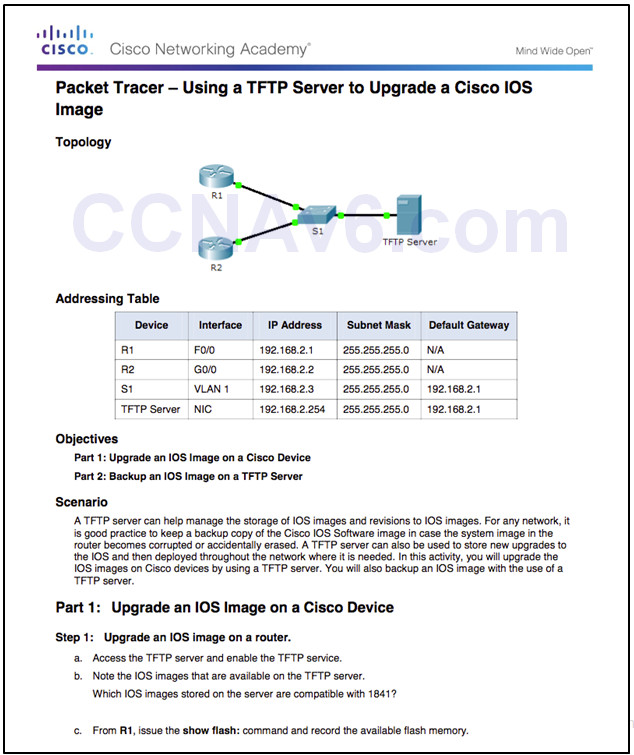
10.3.3.5 Packet Tracer – Using a TFTP Server to Upgrade a Cisco IOS Image
10.3.3.6 – Video Demonstration – Managing Cisco IOS Images
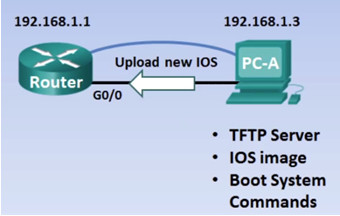
Objective:
- Use a TFTP server to upload an updated IOS image file to a Cisco Router.
- Use the boot system command to boot the router to the new IOS image file.
- Reload the router and successfully boot to the new IOS image file.
10.3.4 – Software Licensing
10.3.4.1 – Licensing Overview
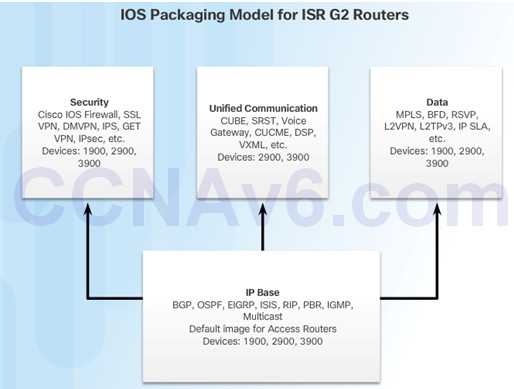
Each device ships with the same universal image.
Technology packages are enabled in the universal image via Cisco Software Activation licensing keys.
The Cisco IOS Software Activation feature allows the user to enable licensed features and register licenses.
Technology packages that are available:
- IP Base
- Data
- Unified Communications (UC)
- Security (SEC)
10.3.4.2 – Licensing Process
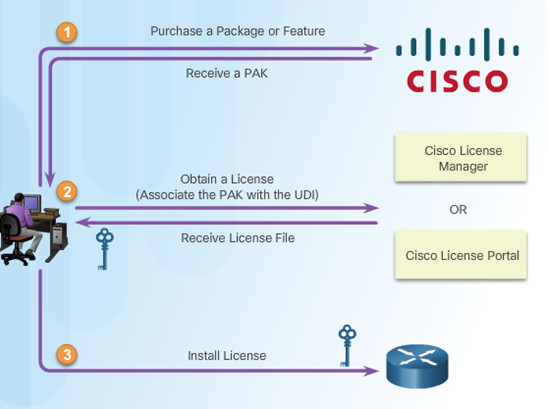
The figure shows the three steps to permanently activate a new software package or feature on a router.
PAK – Product Activation Key
UDI – Unique Device Identifier
10.3.4.3 – Step 1. Purchase the Software Package or Feature to Install
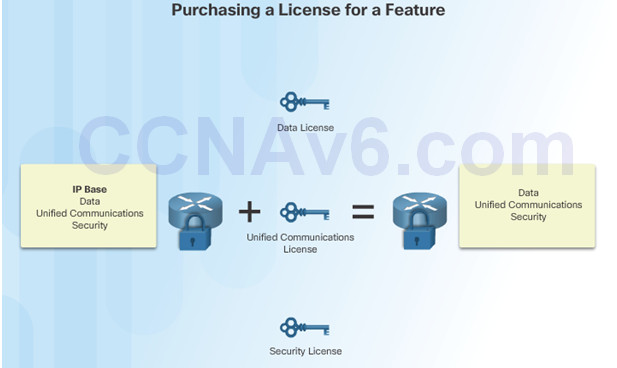
Customers receive a PAK with purchase that serves as a receipt and is used to obtain a license.
A PAK is an 11 digit alpha numeric key created by Cisco manufacturing. It defines the Feature Set associated with the PAK.
As shown in the figure, a separate license is required for each package, IP Base, Data, UC, and SEC.
10.3.4.4 – Step 2. Obtain a License
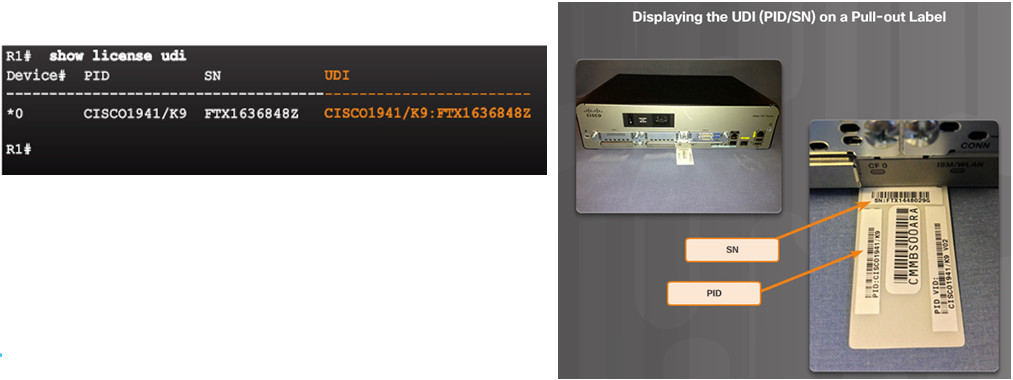
- The UDI is a combination of the Product ID (PID), the Serial Number (SN), and the hardware version. The SN is an 11 digit number which uniquely identifies a device. The PID identifies the type of device. Only the PID and SN are used for license creation.
- This UDI can be displayed using the show license udi command shown.
10.3.4.5 – Step 3. Install the License
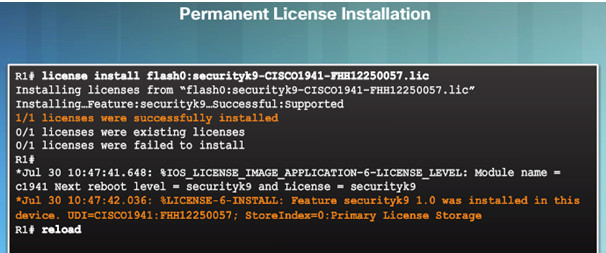
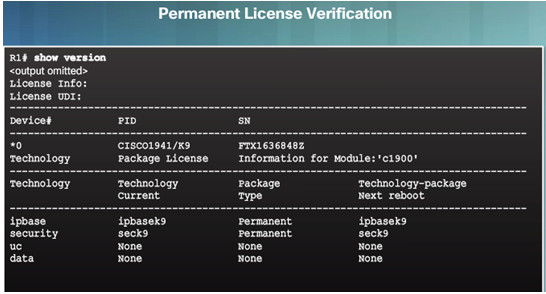
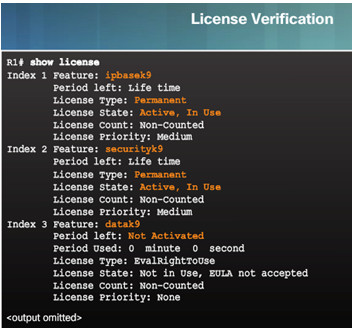
A permanent license is a license that never expires. After a permanent license is installed on a router, it is good for that particular feature set for the life of the router, even across IOS versions.
10.3.5 – License Verification and Management
10.3.5.1 – License Verification
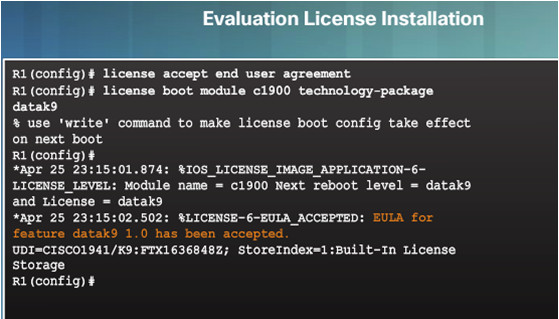
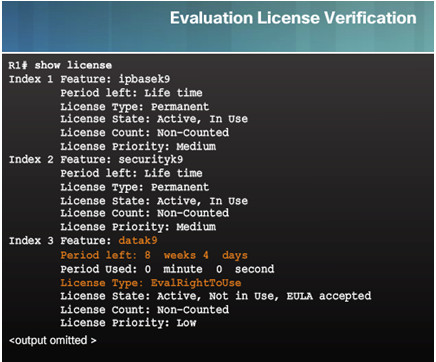
10.3.5.2 – Activate an Evaluation Right-To-Use License
10.3.5.3 – Back up the License
The license save command is used to copy all licenses in a device and store them.
Saved licenses are restored by using the license install command.
The command to back up a copy of the licenses on a device is:
- Router# license save file-sys://lic-location
Use the show flash0: command to verify that the licenses have been saved.

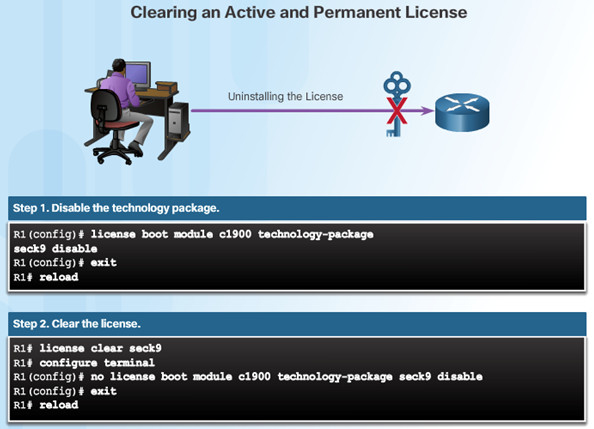
10.3.5.4 – Uninstall the License
- Only licenses that have been added by using the license install command are removed.
10.3.5.5 – Video Demonstration – Working with IOS 15 Image Licenses
Objective
- Identify the additional licensing types of Cisco ISR-G2 routers
- Identify the differences between permanent licensing and evaluation right-to-use licensing
- Activate the security technology package on a Cisco 1941 router
- Accept the end user license agreement
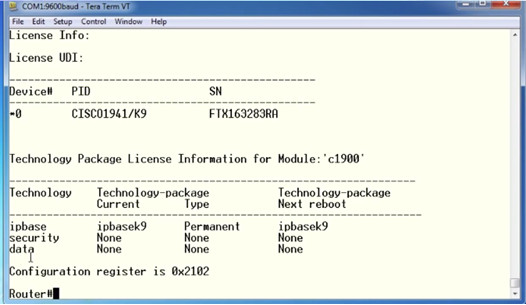
- Verify the securityk9 license and save it to flash memory
10.4 – Summary
10.4.1 – Conclusion
10.4.1.1 – Packet Tracer – Skills Integration Challenge

10.4.1.1 Packet Tracer – Skills Integration Challenge
10.4.1.2 – Chapter 10: Device Discovery, Management, and Maintenance
- Use discovery protocols to map a network topology.
- Configure NTP and Syslog in a small to medium-sized business network.
- Maintain router and switch configuration and IOS files.
New Terms and Commands
Section 10.1
| •Cisco Discovery Protocol (CDP) | •Link Layer Discovery Protocol (LLDP) |
Section 10.2
| •Syslog
•Network Time Protocol (NTP) •NTP client •NTP server •software clock |
•stratum
•authoritative time source •severity level •facility |
Section 10.3
| •ROMMON mode
•configuration register •Services on Demand •Product Activation Key (PAK) •Cisco IOS Software Activation •technology package licenses •permanent licenses |
•evaluation license
•End User License Agreement (EULA) •Cisco License Manager (CLM) •Cisco License Registration Portal •Unique Device Identifier (UDI) •Evaluation Right-To-Use licenses (RTU) |

I cannot download the ch 10 of CCNA 1