7.2.4 Packet Tracer – Configure RIPv2 Answers
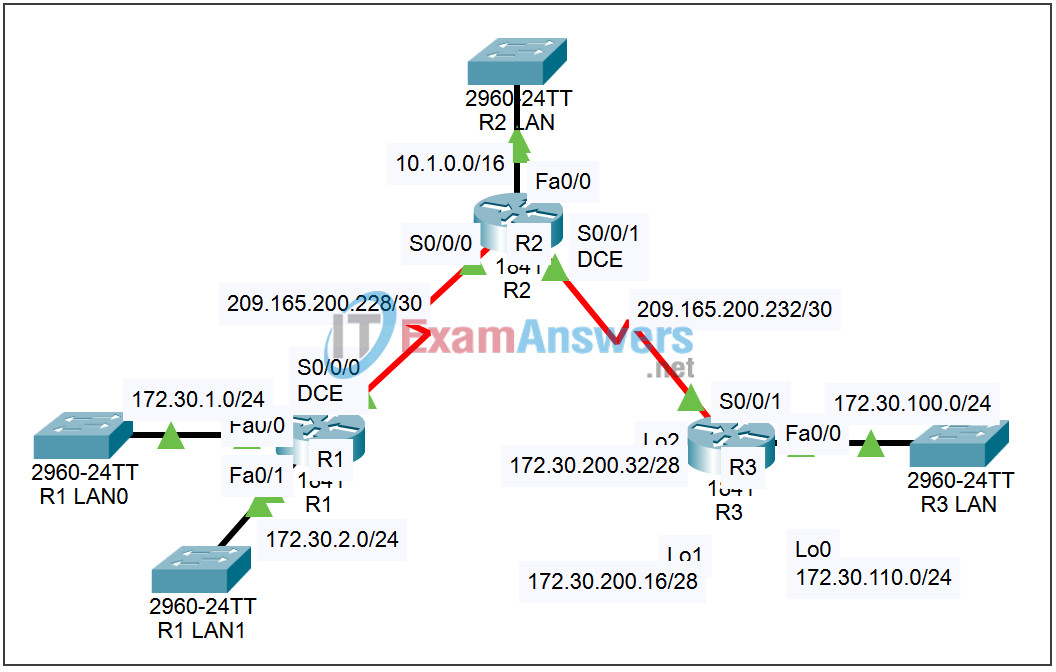
Topology

Addressing Table
| Device | Interface | IP Address | Subnet Mask | Default Gateway |
|---|---|---|---|---|
| R1 | Fa0/0 | 172.30.1.1 | 255.255.255.0 | N/A |
| Fa0/1 | 172.30.2.1 | 255.255.255.0 | N/A | |
| S0/0/0 | 209.165.200.230 | 255.255.255.252 | N/A | |
| R2 | Fa0/0 | 10.1.0.1 | 255.255.0.0 | N/A |
| S0/0/0 | 209.165.200.229 | 255.255.255.252 | N/A | |
| S0/0/1 | 209.165.200.233 | 255.255.255.252 | N/A | |
| R3 | Fa0/0 | 172.30.100.1 | 255.255.255.0 | N/A |
| Lo0 | 172.30.110.1 | 255.255.255.0 | N/A | |
| Lo1 | 172.30.200.17 | 255.255.255.240 | N/A | |
| Lo2 | 172.30.200.33 | 255.255.255.240 | N/A | |
| S0/0/1 | 209.165.200.234 | 255.255.255.252 | N/A |
Learning Objectives
- Upgrade the network to RIPv2.
- Disable automatic summarization.
Introduction:
RIPv2 is an updated version that supports VLSM and CIDR by carrying subnet mask information in its routing update packets. The default behavior of RIPv2, however, is to automatically summarize routes on classful boundaries. In this activity, we will use Packet Tracer to configure RIPv2 and disable automatic summarization of the network containing discontiguous subnets. You will then examine the changes in the operation of the network.
Task 1: Upgrade the network to RIPv2.
Step 1. Examine the operation of RIPv1.
- On each of the three routers, access the router from the CLI and examine RIP parameters by issuing the command show ip protocols. Notice the version of the RIP updates being sent and received.
- On each of the three routers, access the router from the CLI and examine the IP routing table by issuing the command show ip route. Examine the missing routes on R1 and R3 plus the multiple paths to 172.30.0.0/16 on R2.
Step 2. Configure the routers for RIPv2.
- On each of the three routers, enter privileged exec mode, enter global configuration mode, enter router configuration mode by issuing the command router rip, issue the command version 2, and exit configuration mode by using Ctrl+z.
- On each of the three routers, issue the command clear ip route * to force the routers to rebuild their routing tables. Wait about a minute for the network to converge.
Step 3. Examine the operation of RIPv2 with automatic summarization.
- On each of the three routers, access the router from the CLI and examine RIP parameters by issuing the command show ip protocols. Notice the version of the RIP updates being sent and received.
- On each of the three routers, access the router from the CLI and examine the IP routing table by issuing the command show ip route. Notice the missing routes on R1 and R3 plus the multiple paths to 172.30.0.0/16 on R2 are still there despite the upgrade to RIPv2.
- Access router R2 from the CLI. View routing updates by issuing the command debug ip rip. Allow the command to run for a few minutes. Notice the updates received from the other routers and the updates multicast to the other routers. Be sure to issue the command undebug all to turn off debugging. RIPv2 updates are being sent to the multicast address of 224.0.0.9 (all RIPv2 routers). We are still receiving updates to the classful network 172.30.0.0/16 from both of the other routers.
Task 2: Disable automatic summarization.
Step 1. Configure the routers not to automatically summarize routes.
- On each of the three routers, enter global configuration mode, enter router configuration mode by issuing the command router rip, issue the command no auto-summary, and exit configuration mode by using Ctrl+z. Save the configuration by issuing the command copy run start.
- On each of the three routers, issue the command clear ip route * to force the routers to rebuild their routing tables. Wait about a minute for the network to converge.
Step 2. Examine the operation of RIPv2 without automatic summarization.
- On each of the three routers, access the router from the CLI and examine RIP parameters by issuing the command show ip protocols. Notice that automatic summarization is not in effect.
- On each of the three routers, access the router from the CLI and examine the IP routing table by issuing the command show ip route. Notice all of the routers have specific routes to all of the networks in the topology.
- Access router R2 from the CLI. View routing updates by issuing the command debug ip rip. Allow the command to run for a few minutes. Notice the updates received from the other routers and the updates multicast to the other routers. Be sure to issue the command undebug all to turn off debugging. Detailed updates for all subnets are sent and received by the router.
- Verify that all three routers can ping the FastEthernet interfaces of the other two routers.
Step 3. Examine RIPv2 updates in Simulation mode.
- Enter Simulation mode. The Event List Filters is set to show only RIP events.
- Click the Auto Capture / Play button. Watch the simulation. When prompted, click the OK button.
- Click the colored boxes in the Info column in the Events List for all of the events. Examine the PDU information at Layer 3, 4, and 7 to understand the exchange process. Examine the Inbound and Outbound PDU details to understand the content of the RIPv2 updates.
