7.5.2 Lab – RIPv2 Challenge Configuration Answers
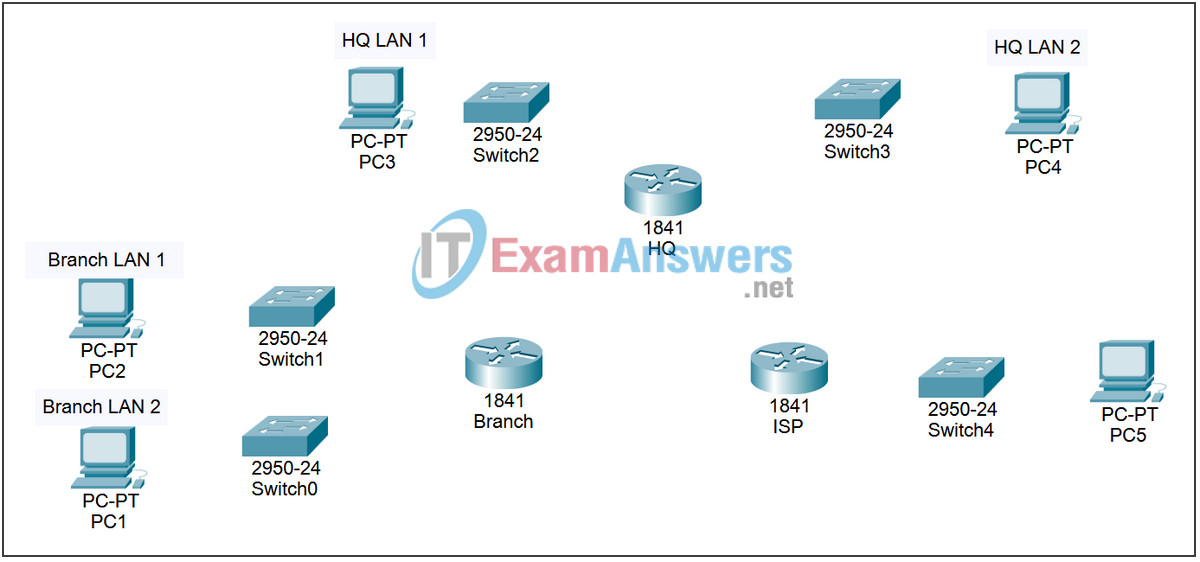
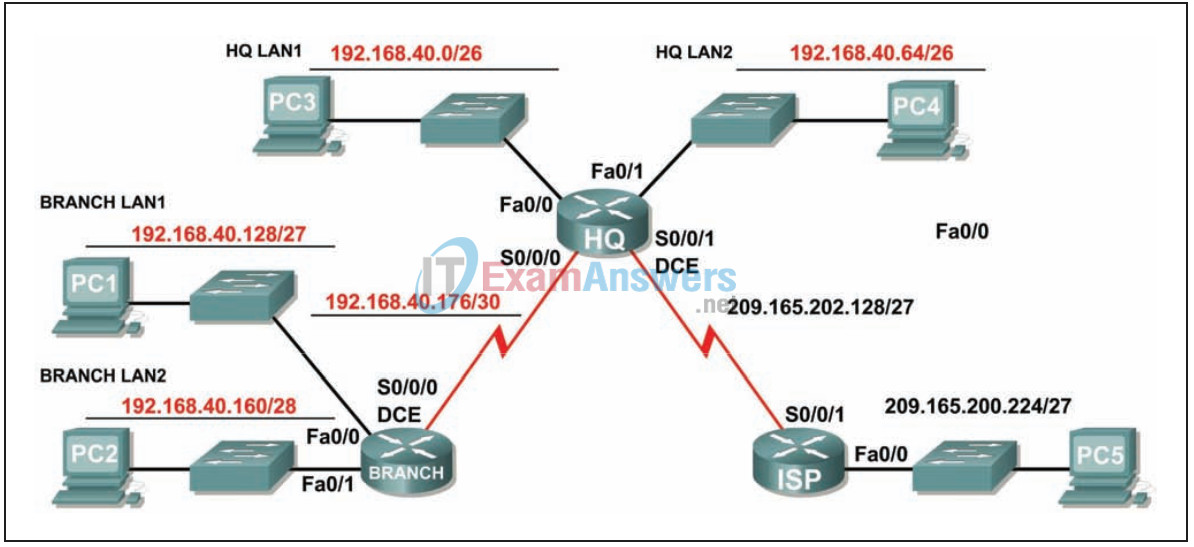
Topology


Addressing table
| Device | Interface | IP address | Subnet mask | Default gateway |
|---|---|---|---|---|
| BRANCH | Fa0/0 | 192.168.40.129 | 255.255.255.224 | N/A |
| Fa0/1 | 192.168.40.161 | 255.255.255.240 | N/A | |
| S0/0/0 | 192.168.40.178 | 255.255.255.252 | N/A | |
| HQ | Fa0/0 | 192.168.40.1 | 255.255.255.192 | N/A |
| Fa0/1 | 192.168.40.65 | 255.255.255.192 | N/A | |
| S0/0/0 | 192.168.40.177 | 255.255.255.252 | N/A | |
| S0/0/1 | 209.165.202.158 | 255.255.255.224 | N/A | |
| ISP | Fa0/0 | 209.165.200.225 | 255.255.255.224 | N/A |
| S0/0/1 | 209.165.202.129 | 255.255.255.224 | N/A | |
| PC1 | NIC | 192.168.40.158 | 255.255.255.224 | 192.168.40.129 |
| PC2 | NIC | 192.168.40.174 | 255.255.255.240 | 192.168.40.161 |
| PC3 | NIC | 192.168.40.62 | 255.255.255.192 | 192.168.40.1 |
| PC4 | NIC | 192.168.40.126 | 255.255.255.192 | 192.168.40.65 |
| PC5 | NIC | 209.165.200.254 | 255.255.255.224 | 209.165.200.225 |
Learning Objectives:
- Create an efficient VLSM design given the requirements.
- Assign appropriate addresses to interfaces and document the addresses.
- Cable a network according to the topology diagram.
- Configure RIP version 2 on routers.
- Configure and propagate a static default route.
- Verify RIP version 2 operation.
- Test and verify full connectivity.
- Reflect upon and document the network implementation.
Scenario
In this lab activity, you will be given a network address that must be subnetted using VLSM to complete the addressing of the network shown in the topology diagram. A combination of RIP version 2 and static routing will be required so that hosts on networks that are not directly connected will be able to communicate with each other.
Task 1: Subnet the address space.
Step 1- Examine the network requirements.
The addressing for the network has the following requirements:
- The ISP LAN will use the 209.165.200.224/27 network.
- The link between ISP and HQ will use the 209.165.202.128/27 network.
- The 192.168.40.0/24 network must be subnetted using VLSM for all other addresses in the network.
- The HQ LAN 1 will require 50 host IP addresses.
- The HQ LAN 2 will require 50 host IP addresses.
- The BRANCH LAN 1 will require 30 host IP addresses.
- The BRANCH LAN 2 will require 12 host IP addresses.
- The link between HQ and BRANCH will require an IP address at each end.
Step 2- Consider the following questions when creating your network design:
How many subnets need to be created from the 192.168.40.0/24 network? _5_
How many total IP addresses are required from the 192.168.40.0/24 network? _144_
What subnet mask will be used for the HQ LAN1 subnet? _255.255.255.192 or /26_
What is the maximum number of host addresses that could be used on this subnet? _62_
What subnet mask will be used for the HQ LAN2 subnet? _255.255.255.192 or /26_
What is the maximum number of host addresses that could be used on this subnet? _62_
What subnet mask will be used for the BRANCH LAN1 subnet? _255.255.255.244 or /27_
What is the maximum number of host addresses that could be used on this subnet? _30_
What subnet mask will be used for the BRANCH LAN2 subnet? _255.255.255.240 or /28_
What is the maximum number of host addresses that could be used on this subnet? _14_
What subnet mask will be used for the link between the HQ and BRANCH routers? _255.255.255.252 or /30_
What is the maximum number of host addresses that could be used on this subnet? _2_
Step 3- Assign subnetwork addresses to the Topology Diagram.
Assign subnet 0 of the 192.168.40.0 network to the HQ LAN1 subnet.
What is the network address of this subnet? _192.168.40.0/26_
Assign subnet 1 of the 192.168.40.0 network to the HQ LAN2 subnet.
What is the network address of this subnet? _192.168.40.64/26_
Assign subnet 2 of the 192.168.40.0 network to the BRANCH LAN1 subnet.
What is the network address of this subnet? _192.168.40.128 /27_
Assign subnet 3 of the 192.168.40.0 network to the BRANCH LAN2 subnet.
What is the network address of this subnet? __192.168.40.160 /28_
Assign subnet 4 of the 192.168.40.0 network to the link between the HQ and BRANCH routers.
What is the network address of this subnet? _192.168.40.176 /30_
Task 2: Determine interface addresses.
Step 1- Assign the appropriate addresses to the device interfaces.
Assign the first valid host address in the 209.165.200.224/27 network to the LAN interface on the ISP router.
Assign the last valid host address in 209.165.200.224/27 network to PC5.
Assign the first valid host address in the 209.165.202.128/27 network to the WAN interface of ISP.
Assign the last valid host address in the 209.165.202.128/27 network to the Serial 0/0/1 interface of HQ.
Assign the first valid host address in the HQ LAN1 network to the LAN1 interface of HQ.
Assign the last valid host address in the HQ LAN1 network to PC 3.
Assign the first valid host address in the HQ LAN2 network to the LAN2 interface of HQ.
Assign the last valid host address in the HQ LAN2 network to PC 4.
Assign the first valid host address in the HQ/BRANCH WAN link to the Serial 0/0/0 interface of HQ.
Assign the last valid host address in the HQ/BRANCH WAN link to the Serial 0/0/0 interface of BRANCH.
Assign the first valid host address in the BRANCH LAN1 network to the LAN1 interface of HQ.
Assign the last valid host address in the BRANCH LAN1 network to PC 1.
Assign the first valid host address in the BRANCH LAN2 network to the LAN2 interface of HQ.
Assign the last valid host address in the BRANCH LAN2 network to PC 2.
Step 2- Document the addresses to be used in the table provided under the Topology Diagram.
Task 3: Prepare the network.
Step 1: Connect a network that is similar to the one in the Topology Diagram.
You can use any router you currently have in the lab, as long as it has the necessary interfaces shown in the topology.
Note: If you use 1700, 2500, or 2600 routers, the results and router descriptions will appear differently.
Step 2: Delete all configurations that the routers have.
Task 4: Perform Basic Router Configurations.
Perform basic configuration of the BRANCH, HQ, and ISP routers according to the following guidelines:
- Configure the router hostname.
- Disable DNS lookup.
- Configure an EXEC mode password.
- Configure a message-of-the-day banner.
- Configure a password for console connections.
- Configure a password for VTY connections.
Task 5: Configure and activate serial and fast ethernet addresses.
Step 1 – Configure the BRANCH, HQ, and ISP routers.
Configure the interfaces on BRANCH, HQ, and ISP with the IP addresses from the addressing table provided under the topology diagram.
When you have finished, be sure to save the running configuration to the NVRAM of the router.
Step 2 – Configure the Ethernet interfaces of PC1, PC2, PC3, PC4, and PC5.
Configure the Ethernet interfaces of PC1, PC2, PC3, PC4, and PC5 with the IP addresses from the addressing table provided under the topology diagram.
Task 6: Verify Connectivity to Next-Hop Device.
You should not have connectivity between end devices yet. However, you can test connectivity between two routers and between an end device and its default gateway.
Step 1 – Verify BRANCH connectivity.
Verify that BRANCH can ping across the WAN link to HQ and that HQ can ping across the WAN link it shares with ISP.
Step 2 – Verify that PC1, PC2, PC3, PC4, and PC5 can ping their respective default gateways.
Task 7: Configure RIPv2 routing on the BRANCH router.
Consider the networks that need to be included in the RIP updates that are sent out by BRANCH.
What networks are present in the BRANCH routing table? List the networks with slash notation.
192.168.40.128/27
192.168.40.160/28
192.168.40.176/30
What commands are required to enable RIP version 2 and include the connected networks in the routing updates?
router rip
version 2
network 192.168.40.0
Are there any router interfaces that do not need to have RIP updates sent out? yes
What command is used to disable RIP updates on these interfaces?
passive-interface FastEthernet0/0
passive-interface FastEthernet0/1
Task 8: Configure RIPv2 and static routing on HQ.
Consider the type of static routing that is needed on HQ.
What networks are present in the HQ routing table? List the networks with slash notation.
192.168.1.0/26
209.165.200.0/27
A static default route will need to be configured to send all packets with destination addresses that are not in the routing table to ISP. What command is needed to accomplish this? Use the appropriate exit interface on HQ in the command.
ip route 0.0.0.0 0.0.0.0 Serial0/0/1
What commands are required to enable RIP version 2 and include the LAN1 and LAN2 networks as well as the link between HQ and BRANCH in the routing updates?
router rip
version 2
network 192.168.40.0
Are there any router interfaces that do not need to have RIP updates sent out? yes
What command is used to disable RIP updates on these interfaces?passive-interface
FastEthernet0/0
passive-interface FastEthernet0/1
HQ needs to send the default route information to BRANCH in the RIP updates. What command is used to configure this?
default-information originate
Task 9: Configure static routing on the ISP router.
Note: In a real-world implementation of this topology, you would not be configuring the ISP router. However, your service provider is an active partner in solving your connectivity needs. Service provider administrators are human, too, and make mistakes. Therefore, it is important that you understand the types of errors an ISP could make that would cause your networks to lose connectivity.
Static routes will need to be configured on ISP for all traffic that is destined for the RFC 1918 addresses that are used on the BRANCH LANs, HQ LANs, and the link between the BRANCH and HQ routers.
What are the commands that will need to be configured on the ISP router to accomplish this?
ip route 192.168.40.0 255.255.255.0 Serial0/0/1
Task 10: Verify the configurations.
Answer the following questions to verify that the network is operating as expected:
From PC1, is it possible to ping PC3? yes
From PC1, is it possible to ping the PC5? yes
From PC4, is it possible to ping the PC5? yes
The answer to the above questions should be yes. If any of the above pings failed, check your physical connections and configurations. Refer to your basic troubleshooting techniques used in the Chapter 1 labs.
What routes are present in the routing table of the BRANCH router?
192.168.40.0/26
192.168.40.64/26
192.168.40.128/27
192.168.40.160/28
192.168.40.176/30
0.0.0.0/0
What is the gateway of last resort in the routing table of BRANCH?
192.168.40.177 a la red 0.0.0.0
What routes are present in the routing table of the HQ router?
192.168.40.0/26
192.168.40.64/26
192.168.40.128/27
192.168.40.160/28
192.168.40.176/30
209.165.202.0/27
0.0.0.0/0
What networks are present in the routing table of ISP?
192.168.40.0/24
209.165.200.0/27
209.165.202.0/27
What networks are present in the RIP updates sent from HQ?
0.0.0.0/0
192.168.40.0/26
192.168.40.64/26
What networks are present in the RIP updates sent from BRANCH?
192.168.40.128/27
192.168.40.160/28
Task 11: Reflection
Why is it necessary to use RIPv2 instead of RIPv1 in this network design?
RIPv1 is a classful routing protocol. Classful routing protocols do not include subnet masks. Classful routing protocols summarize networks at the boundaries of the core network. RIPv1 does not support VLSM.
Task 12: Document router configurations
On each router, capture the following command output to a text (.txt) file for future reference.
- Running configuration
- Routing table
- Interface summary
Task 13: Cleaning
Clear the configurations and reload the routers. Disconnect and store the cables. For host PCs that are typically connected to other networks (such as the school LAN or the Internet), reconnect the appropriate cables and reset the TCP/IP settings.
