10.0 – Introduction
10.0.1 – Welcome
10.0.1.1 – Windows Installation
IT technicians and professionals need to understand the general functions of any operating system (OS) such as controlling hardware access, managing files and folders, providing a user interface, and managing applications. To make an OS recommendation the technician needs to understand budget constraints, how the computer will be used, and which types of applications will be installed, so they can help determine the best OS for a customer: This chapter focuses on the Windows 10, Windows 8.x, and Windows 7 operating systems. The components, functions, system requirements, and terminology related to each operating system are explored. The chapter will also detail the steps to install a Windows operating system and the Windows boot sequence.
You will learn how to prepare a hard drive for a Windows installation by formatting the drive into partitions. You will learn about the different types of partitions and logical drives as well as other terms relating to hard drive setup. You will also learn about the different file systems which are supported by Windows, such as File Allocation Table (FAT), New Technology File System (NTFS), Compact Disc File System (CDFS), and Network File System (NFS).
It is important to not only learn about virtualization and cloud technology but to also build hands-on skills. In this chapter, you will complete a lab creating a FAT 32 partition in Windows and then converting the partition to NTFS. You will also complete labs on installing Windows, performing basic Windows setup task, creating user accounts, and installing Windows updates.
10.1 – Modern Operating Systems
10.1.1 – Operating System Features
10.1.1.1 – Terms
An operating system (OS) has a number of functions. One of its main tasks is to act as an interface between the user and the hardware connected to the computer. The operating system also controls other functions:
- Software resources
- Memory allocation and all peripheral devices
- Common services to computer application software
From digital watches to computers, almost all computers require an operating system before they can be operated.
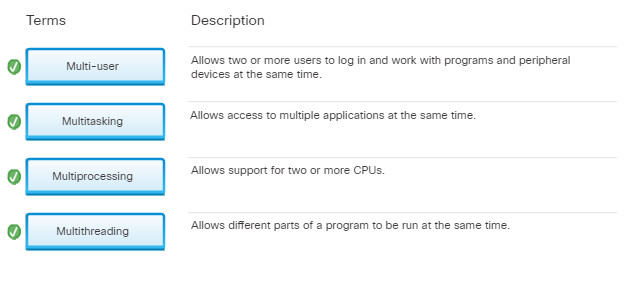
To understand the capabilities of an operating system, it is important to first understand some basic terms. The following terms are often used when describing operating systems:
- Multi-user – Two or more users have individual accounts that allow them to work with programs and peripheral devices at the same time.
- Multitasking – The computer is capable of operating multiple applications at the same time.
- Multiprocessing – The operating system can support two or more CPUs.
- Multithreading – A program can be broken into smaller parts that are loaded as needed by the operating system. Multithreading allows different parts of a program to be run at the same time.
The OS boots the computer and manages the file system. Operating systems can support more than one user, task, or CPU.
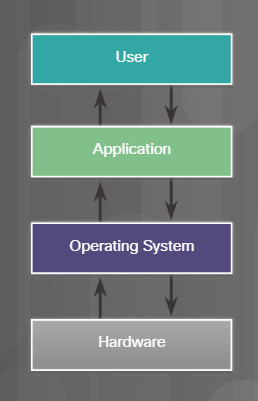
Operating System Diagram
10.1.1.2 – Basic Functions of an Operating System
The OS manages the interaction between applications and the hardware. To access and communicate with each hardware component, the OS uses a program called a device driver. When a hardware device is installed, the OS locates and installs the device driver for that component. Assigning system resources and installing drivers are performed with a plug-and-play (PnP) process. The OS then configures the device and updates the registry, which is a database that contains all the information about the computer.
If the OS cannot locate a device driver, a technician must install the driver manually either by using the media that came with the device or downloading it from the manufacturer’s website.
The OS creates a file structure on the hard disk drive to store data. A file is a block of related data that is given a single name and treated as a single unit. Program and data files are grouped together in a directory. The files and directories are organized for easy retrieval and use. Directories can be kept inside other directories. These nested directories are referred to as subdirectories. Directories are called folders in Windows operating systems, and subdirectories are called subfolders.
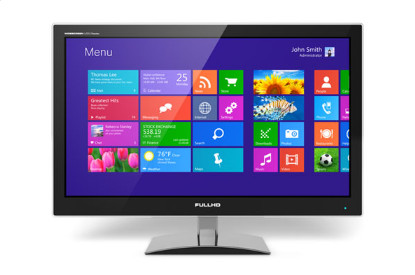
The OS enables the user to interact with the software and hardware. Operating systems include two types of user interfaces:
- Command-line interface (CLI) – The user types commands at a prompt.
- Graphical user interface (GUI) – The user interacts with menus and icons.
The OS locates an application and loads it into the RAM of the computer. Applications are software programs, such as word processors, databases, spreadsheets, and games. The OS allocates available system resources to running applications.
To ensure that a new application is compatible with an OS, programmers follow a set of guidelines known as an Application Programming Interface (API). An API allows programs to access the resources managed by the operating system in a consistent and reliable manner. Here are some examples of APIs:
- Open Graphics Library (OpenGL) – This is a cross-platform standard specification for multimedia graphics.
- DirectX – This is a collection of APIs related to multimedia tasks for Microsoft Windows.
- Windows API – The Windows API provides application developers with user interface controls, file management and graphical elements, such as windows, scroll bars, and dialog boxes.
- Java APIs – This is a collection of APIs related to the development of Java programming.
10.1.1.3 – Windows Operating Systems
10.1.1.4 – Check Your Understanding – Windows Terminology
10.1.1.4 – Check Your Understanding – Windows Terminology
10.1.2 – Customer Requirements for an Operating System
10.1.2.1 – Compatible System Software and Hardware Requirements
Understanding how a computer will be used is important when recommending an OS to a customer. The OS must be compatible with the existing hardware and the required applications.
Choosing the Correct OS
To make an OS recommendation, a technician must review budget constraints, learn how the computer will be used, determine which types of applications will be installed, and whether a new computer may be purchased. These are some guidelines to help determine the best OS for a customer:
- Does the customer use off-the-shelf applications for this computer? Off-the-shelf applications specify a list of compatible operating systems on the application package.
- Does the customer use customized applications that were programmed specifically for the customer? If the customer is using a customized application, the programmer of that application specifies which OS to use.
10.1.2.2 – Minimum Hardware Requirements and Compatibility with OS
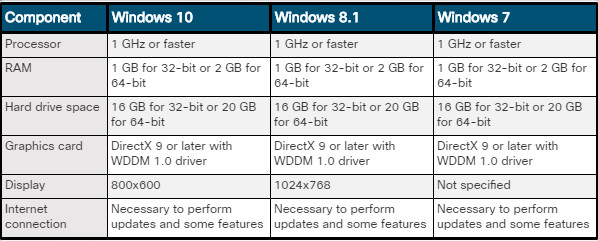
Operating systems have minimum hardware requirements that must be met for the OS to install and function correctly.
Windows Recommended Minimum System Requirements
Identify the equipment that your customer has in place. If hardware upgrades are necessary to meet the minimum requirements for an OS, conduct a cost analysis to determine the best course of action. In some cases, it might be less expensive for the customer to purchase a new computer than to upgrade the current system. In other cases, it might be cost effective to upgrade one or more of the following components:
- RAM
- Hard disk drive
- CPU
- Video adapter card
- Motherboard
Note: If the application requirements exceed the hardware requirements of the OS, you must meet the additional requirements for the application to function properly.
Microsoft lists the minimum system requirements for Windows versions on its website as shown in the figure.
10.1.2.3 – 32-bit vs. 64-bit Processor Architecture
The processor architecture of the CPU affects the performance of the computer.

32-bit vs. 64-bit Processor Architecture
The terms 32-bit and 64-bit refer to the amount of data a computer’s CPU can manage. A 32-bit register can store 2^32 different binary values. Therefore, a 32-bit processor can directly address 4,294,967,295 bytes. A 64-bit register can store 2^64 different binary values. Therefore, a 64-bit can directly address 18,446,744,073,709,551,615 bytes.
The figure shows the main differences between the 32-bit and 64-bit architectures.
10.1.2.4 – What Do You Already Know? Choosing a Windows Edition
10.1.2.5 – Check Your Understanding – Choosing an Operating System

10.1.2.5 – Check Your Understanding – Choosing an Operating System
10.1.3 – Operating System Upgrades
10.1.3.1 – Checking OS Compatibility
An OS must be upgraded periodically to remain compatible with the latest hardware and software. It is also necessary to upgrade an OS when a manufacturer stops supporting it. Upgrading an OS can increase performance. New hardware products often require that the latest OS version be installed to operate correctly. While upgrading an OS may be expensive, you can gain enhanced functionality through new features and support for newer hardware.

Checking OS Compatibility
Note: When newer versions of an OS are released, support for older versions is eventually withdrawn.
Before upgrading the operating system, check the minimum hardware requirements of the new OS to ensure that it can be installed successfully on the computer.
10.1.3.2 – Windows OS Upgrades
The process of upgrading the OS can be quicker than performing a new installation. The upgrade process varies depending on the version of Windows being upgraded.
The version of an OS determines available upgrade options. For example, a 32-bit OS cannot be upgraded to a 64-bit OS. Also, Windows 7 and Windows 8 can be upgraded to Windows 10 but Windows Vista and Windows XP cannot.
Note: Prior to performing an upgrade, back up all data in case there is a problem with the installation. Also, the version of Windows being upgraded must be activated.
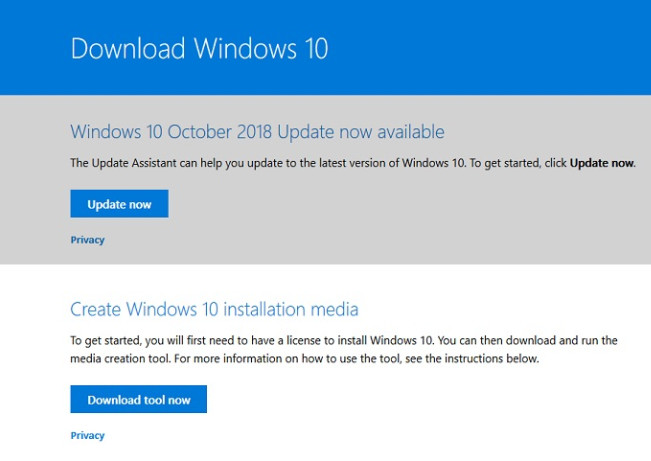
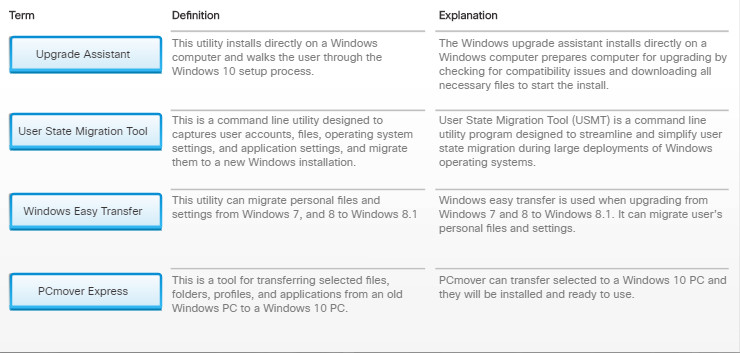
To upgrade Windows 7 or Windows 8 to Windows 10, use the Windows 10 Update Assistant available on the Download Windows 10 website shown in the figure. The Windows 10 update assistant installs and runs directly on the computer being upgraded. The tool will walk the user through all the steps in the Windows 10 setup process. It is designed to prepare your computer for upgrading by checking for compatibility issues and downloading all necessary files to start the install.
Windows OS Upgrades
Computers running Windows XP or Windows Vista do not have an upgrade path to Windows 10 and require a clean installation. Windows 10 installation media can be created using the Create Windows 10 installation media tool. This tool creates installation media (USB flash, DVD, or ISO file) which can be used to perform a clean installation.
10.1.3.3 – Data Migration
When a new installation is required, user data must be migrated from the old OS to the new one. There are several tools available to transfer data and settings. The tool you select depends on your level of experience and your requirements.

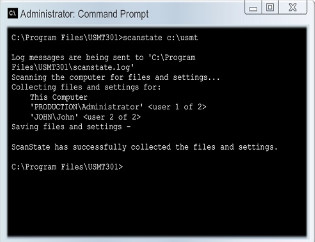
The User State Migration Tool (USMT) is a command line utility program developed by Microsoft that allows users who are comfortable with scripting languages to transfer files and settings between Windows PCs. USMT is one of many core assessment and deployment tools included in the Windows Assessment and Deployment Kit which can be downloaded from the Microsoft website. You can use USMT version 10.0 to streamline and simplify user state migration during large deployments of Windows operating systems. USMT captures user accounts, user files, operating system settings, and application settings, and then migrates them to a new Windows installation. You can use USMT for both PC replacement and PC refresh migrations.
Note: USMT version 10.0 supports data migration from Windows 7 through Windows 10.
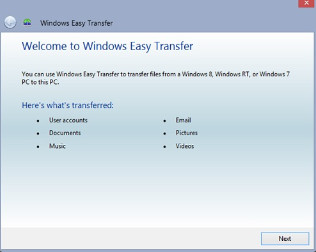
If a user is switching from an old computer to a new one, use Windows Easy Transfer to migrate personal files and settings. You can perform the file transfer using a USB cable, CD or DVD, a USB flash drive, an external drive, or a network connection.
Use Windows Easy Transfer to transfer information to a computer running Windows 8.1 from computers with one of the following operating systems:
- Windows 8
- Windows 7
- Windows Vista
Windows easy transfer is not available in Windows 10 and is replaced with PCmover Express.
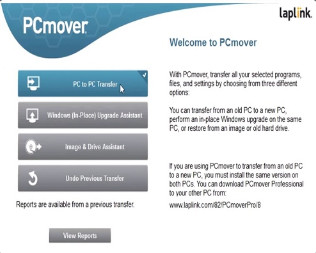
Microsoft has partnered with Laplink to provide PCmover Express which is a tool for transferring selected files, folders, profiles, and applications from an old Windows PC to a Windows 10 PC. Instead of repurchasing and manually installing programs on the new PC, a user can use PCmover to transfer selected applications to the new PC, and they will be installed and ready to use.
10.1.3.4 – Check Your Understanding – OS Upgrades
10.1.3.4 – Check Your Understanding – OS Upgrades
10.2 – Disk Management
10.2.1 – Disk Management
10.2.1.1 – Storage Device Types
As a technician, you might have to perform a clean installation of an OS. Perform a clean install in the following situations:
- When a computer is passed from one employee to another
- When the OS is corrupt
- When the primary hard drive is replaced in a computer
The installation and initial booting of the OS is called the operating system setup. Although it is possible to install an OS over a network from a server or from a local hard drive, the most common installation method for a home or small business is through external media such as DVDs or USB drives.
Note: If the hardware is not supported by the OS, you may need to install third-party drivers when performing a clean installation.
Before the operating system can be installed, a storage media device must be chosen and prepared. Several types of storage devices are available and can be used to receive the new operating system. The two most common types of data storage devices used today are hard disk drives and flash memory-based drives such as solid-state hard drives and USB drives.
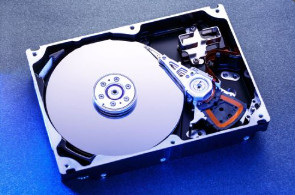
Hard disk drive
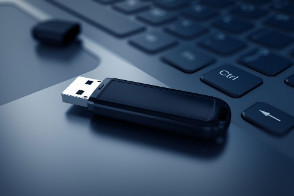
Flash drive
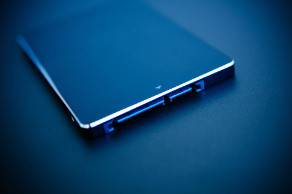
Solid state drive
When the storage device type has been chosen, it must be prepared to receive the new operating system. Modern operating systems ship with an installer program. Installers usually prepare the disk to receive the operating system, but it is crucial for a technician to understand the terms and methods involved in this preparation
10.2.1.2 – Hard Drive Partitioning
A hard drive is divided into areas called partitions. Each partition is a logical storage unit that can be formatted to store information, such as data files or applications. If you imagine a hard drive as a wooden cabinet, the partitions would be the shelves. During the installation process, most operating systems automatically partition and format available hard drive space.
Partitioning a drive is a simple process, but to ensure a successful boot, the firmware must know what disk and partition on that disk has an operating system installed. The partition scheme has direct influence in the location of the operating systems on a disk. Finding and launching the operating system is one of the responsibilities of computer firmware. The partition scheme is very important to the firmware. Two of the most popular partition scheme standards are master boot record (MBR) and globally unique identifier (GUID) partition table (GPT).

MBR and GPT Comparison
Master Boot Record
Publicly introduced in 1983, the MBR contains information on how the hard drive partitions are organized. The MBR is 512 bytes long and contains the boot loader, an executable program that allows a user to choose from multiple operating systems. MBR has become the de facto standard but has limitations that had to be addressed. MBR is commonly used in computers with BIOS-based firmware.
GUID Partition Table
Also designed as a partition table scheme standard for hard drives, the GPT makes use of a number of modern techniques to expand on the older MBR partitioning scheme. GPT is commonly used in computers with UEFI firmware. Most modern operating systems now support GPT.
The figure shows a comparison between MBR and GPT.
10.2.1.3 – Partitions and Logical Drives
10.2.1.4 – Check Your Understanding – Disk Terminology
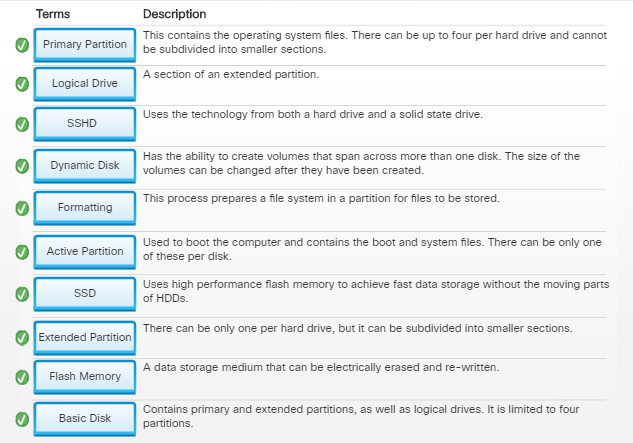
10.2.1.4 – Check Your Understanding – Disk Terminology
10.2.1.5 – File Systems
A new installation of an OS proceeds as if the disk were brand new. No information that is currently on the target partition is preserved. The first phase of the installation process partitions and formats the hard drive. This process prepares the disk to accept the new file system. The file system provides the directory structure that organizes the user’s operating system, application, configuration, and data files. There are many different kinds of file systems and each one has different structure and logic. Different file systems also differ in properties of speed, flexibility, security, size and more. Here are five common file systems:
- File Allocation Table, 32 bit (FAT32) – Supports partition sizes up to 2 TB or 2,048 GB. The FAT32 file system is used by Windows XP and earlier OS versions.
- New Technology File System (NTFS) – Supports partition sizes up to 16 exabytes, in theory. NTFS incorporates file system security features and extended attributes. Windows 8.1, Windows 7, and Windows 10 automatically create a partition using the entire hard drive. If a user does not create custom partitions using the New option, as shown in the figure, the system formats the partition and begins installing Windows. If users create a partition, they will be able to determine the size of the partition.
- exFAT (FAT 64) – Created to address some of the limitations of FAT, FAT32, and NTFS when formatting USB flash drives, such as file size and directory size. One of the primary advantages of exFAT is that it can support files larger than 4GB.
- Compact Disc File System (CDFS) – Created specifically for optical disk media.
- NFS (Network File System) – NFS is a network-based file system, that allows file access over the network. From the user’s standpoint, there is no difference between accessing a file stored locally or on another computer on the network. NFS is an open standard which allows anyone to implement it.
Quick Format versus Full Format
The quick format removes files from the partition but does not scan the disk for bad sectors. Scanning a disk for bad sectors can prevent data loss in the future. For this reason, do not use the quick format for disks that have been previously formatted. Although it is possible to quick format a partition or a disk after the OS is installed, the quick format option is not available when installing Windows 8.1 and Windows 7.
The full format removes files from the partition while scanning the disk for bad sectors. It is required for all new hard drives. The full format option takes more time to complete.
In the image above, two partitions were created by selecting “Drive 0 Unallocated Space” and clicking “New”. The installer also allows the user to specify the size of the new partition.
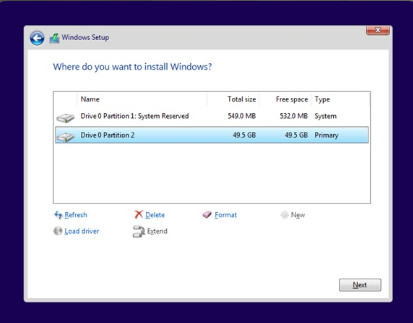
Multiple partitions during Windows 10 Installation
10.2.1.6 – Video Demonstration – Disk Management Utility and Disk Partitioning
Click Play in the figure to view a demonstration of the Disk Management utility and disk partitioning.
Click here to read the transcript of this video.
10.2.1.7 – Video Demonstration – Multiboot Procedures
Sometimes it is necessary to have more than one operating system installed in the computer. In those situations, the user must perform the installation of one OS, install a boot manager and then install the second OS. A boot manager is a program that is located in the boot sector and allows the user to choose which OS to use at boot time. By tracking the partition where a specific OS was installed, a boot manager can direct the BIOS to the correct partition, allowing it to load the desired operating system.
A popular boot manager for Linux is grub. For macOS, a common boot manager is boot camp.
Click Play in the figure to view a demonstration of multiboot procedures.
Click here to read the transcript of this video.
10.2.1.8 – Lab – Create a Partition in Windows
In this lab, you will create a FAT32 formatted partition on a disk. You will convert the partition to NTFS. You will then identify the differences between the FAT32 format and the NTFS format.
10.2.1.8 Lab – Create a Partition in Windows
10.3 – Installation and Boot Sequence
10.3.1 – Basic Windows Installation
10.3.1.1 – Lab – Windows Installation
In this lab, you will install the Windows operating system.
10.3.1.1 Lab – Windows Installation
10.3.1.2 – Account Creation
When users attempt to log on to a device or to access system resources, Windows uses the process of authentication to verify the identity of the users. Authentication occurs when users enter a username and password to access a user account. Windows uses Single-Sign On (SSO) authentication, which allows users to log in once to access all system resources versus requiring them to log in each time they need to access an individual one.
User accounts allow multiple users to share a single computer using their own files and settings. Windows 10 offers two account types: Administrator and Standard User, as shown in the Figure. In previous versions of Windows, there was also a Guest account, but that has been removed with Windows 10.
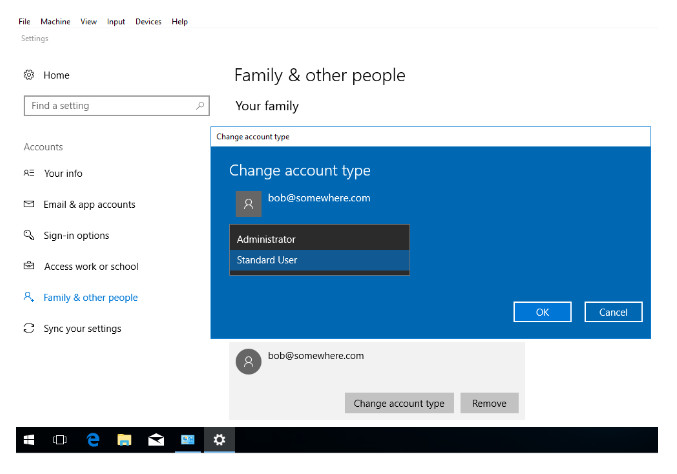
Account Creation
Administrator accounts have complete control over a computer. Users with this type of account can change settings globally, install programs, get through the User Account Control (UAC) when elevation to perform a task is required.
Standard user accounts have limited control over a computer. Users with this type of account can run applications, but they cannot install programs. A standard user account can change system settings but only settings that do not affect other user accounts
10.3.1.3 – Finalize the Installation
Windows Update
To update the OS after the initial installation, Microsoft Windows Update is used to scan for new software and install service packs and patches.
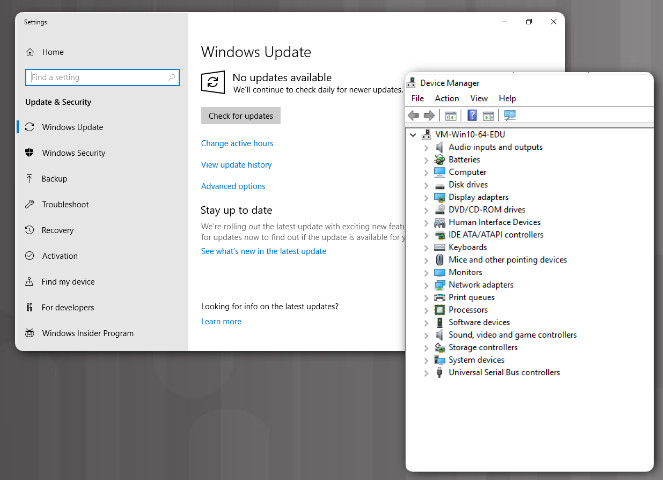
Windows Update
Device Manager
After installation, verify that all hardware is installed correctly. The Device Manager is used to locate device problems and install the correct or updated drivers in Windows.
The figure shows the Windows Update and Device Manager utilities on Windows 10.
10.3.1.4 – Lab – Finalize the Windows Installation
In this lab, you will add user accounts and finalize an installation of Windows 10.
10.3.1.4 Lab – Finalize the Windows Installation
10.3.2 – Custom Installation Options
10.3.2.1 – Disk Cloning
Installing an OS on a single computer takes time. Imagine the time it would take to install operating systems on multiple computers, one at a time. To simplify this activity, administrators usually elect a computer to act as a base system and go through the regular operating system installation process. After the operating is installed in the base computer, a specific program is used to duplicate all the information on its disk, sector by sector, to another disk. This new disk, usually an external device, now contains a fully deployed operating system and can be used to quickly deploy a fresh copy of the base operating system and any installed applications and data without the lengthy installation process or user involvement. Because the target disk now contains a sector-to-sector mapping of the original disk, the contents of the target disk is an image of the original disk.
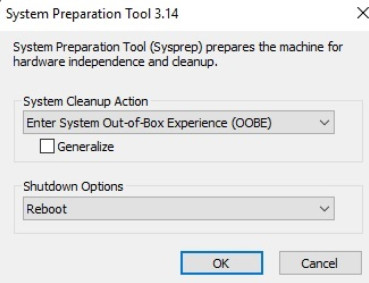
System Preparation Tool 3.14
If an undesirable setting is accidentally included during the base installation, an administrator can use Microsoft’s System Preparation (Sysprep) tool to remove it before creating the final image. Sysprep can be used to install and configure the same OS on multiple computers. Sysprep prepares the OS with different hardware configurations. With Sysprep, technicians can quickly install the OS, complete the last configuration steps, and then install applications.
To run Sysprep in Windows 10, open Windows Explorer and navigate to C:\Windows\System32\sysprep. You can also just type “sysprep” in the Run command and click “OK.”
The figure shows the Sysprep tool in Windows.
10.3.2.2 – Other Installation Methods
A standard installation of Windows is sufficient for most computers used in a home or small office environment but there are cases when a custom installation process is required.
Take, for example, an IT support department; technicians in these environments must deploy hundreds, even thousands of Windows systems. Performing this many installations in the standard way is not feasible.
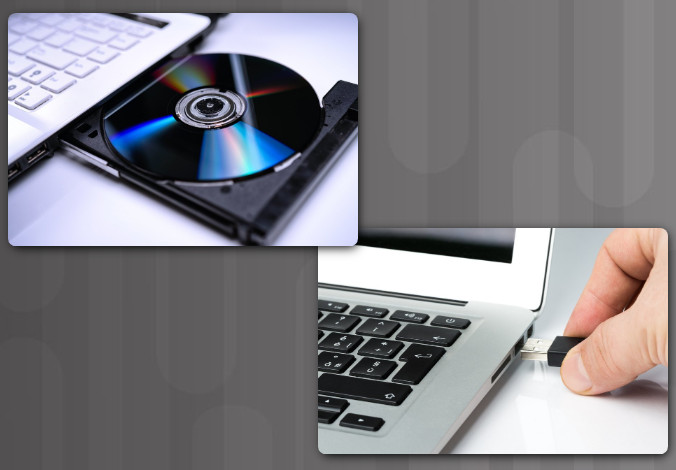
Other Installation Methods
A standard installation is done via the installation media (DVD or USB drive), shown in the figure, provided by Microsoft and is an interactive process; the installer prompts the user for settings such as time zone and system language.
A custom installation of Windows can save time and provide a consistent configuration across computers within a large organization. A popular technique to install Windows across many computers is to perform installation in one computer and use it as a reference installation. When the installation is completed, an image is created. An image is a file that contains all the data from a partition.
When the image is ready, technicians can perform a much shorter installation by simply replicating and deploying the image to all computers in the organization. If the new installation requires any adjustments, those can be done quickly after the image is deployed.
Windows has several different types of custom installations:
- Network Installation – This includes Preboot Execution Environment (PXE) Installation, Unattended Installation, and Remote Installation.
- Image-based Internal partition Installation – This is a Windows image stored on an internal (often hidden) partition that can be used to restore Windows to its original state when it was shipped from the factory.
- Other Types of Custom Installations – This includes Windows Advanced Startup Options, Refresh your PC (Windows 8.x only), System Restore, Upgrade, Repair installation, Remote network installation, Recovery partition, and Refresh/restore.
10.3.2.3 – Remote Network Installation
A popular method for OS installation in environments with many computers is a remote network installation. With this method, the operating system installation files are stored on a server so that a client computer can access the files remotely to begin the installation. A software package such as Remote Installation Services (RIS) is used to communicate with the client, store the setup files, and provide the necessary instructions for the client to access the setup files, download them, and begin the operating system installation.
Because the client computer does not have an operating system installed, a special environment must be used to boot the computer, connect to the network, and communicate with the server to begin the installation process. This special environment is known as the Preboot eXecution Environment (PXE). For the PXE to work, the NIC must be PXE-enabled. This functionality may come from the BIOS or the firmware on the NIC. When the computer is started, the NIC listens for special instructions on the network to start PXE.
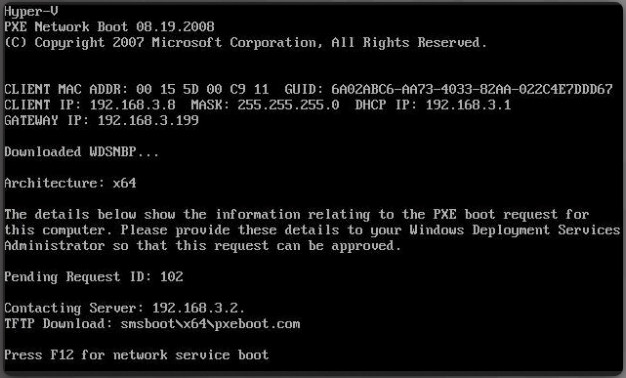
Windows PXE installation
The figure shows the client loading setup files from the PXE server over TFTP.
Note: If the NIC is not PXE-enabled, third-party software may be used to load PXE from storage media.
10.3.2.4 – Unattended Network Installation
Unattended installation, another network-based installation, allows a Windows system to be installed or upgraded with little user intervention. The Windows unattended installation is based on an answer file. This file contains simple text that instructs Windows Setup how to configure and install the OS.
To perform a Windows Unattended installation, setup.exe must be run with the user options found in the answer file. The installation process begins as usual but instead of prompting the user, Setup uses the answers listed in the answer file.
To customize a standard Windows 10 installation, the System Image Manager (SIM), shown in the figure, is used to create the setup answer file. You can also add packages, such as applications or drivers, to answer files.
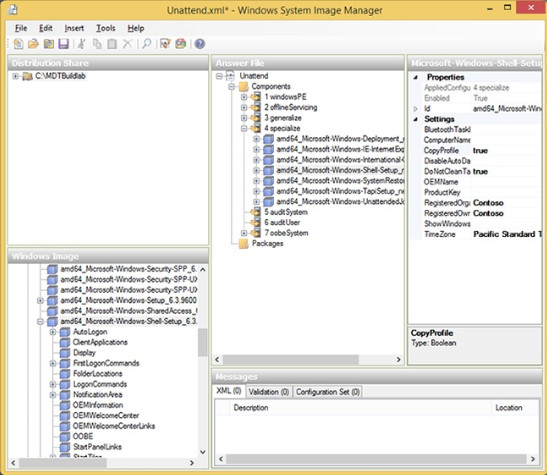
System Image Manager
The answer file is copied to the distribution shared folder on a server. At this point, you can do one of two things:
- Run the unattended.bat file on the client machine to prepare the hard drive and install the OS from the server over the network.
- Create a boot disk that boots the computer and connects to the distribution shared folder on the server. You then run a batch file containing a set of instructions to install the OS over the network.
Note: Windows SIM is part of the Windows Automated Installation Kit (AIK) and can be downloaded from the Microsoft website.
10.3.2.5 – Video Demonstration – Windows Restore and Recovery
Click Play in the figure to view a demonstration of Windows restore and recovery.
Click here to read the transcript of this video.
10.3.2.6 – Recovery Partition
Some computers that have Windows installed contain a section of the disk that is inaccessible to the user. This partition, called a recovery partition, contains an image that can be used to restore the computer to its original configuration.
The recovery partition is often hidden to prevent it from being used for anything other than restoration. To restore the computer using the recovery partition, you often must use a special key or key combination when the computer is starting. Sometimes, the option to restore from the factory recovery partition is located in the BIOS or a program from the manufacturer that is accessed in Windows. Contact the computer manufacturer to find out how to access the partition and restore the original configuration of the computer.
Note: If the operating system has been damaged because of a faulty hard drive, the recovery partition may also be corrupt and not able to recover the operating system.
10.3.2.7 – Upgrade Methods
In-place upgrade
The simplest path to upgrade a PC that is currently running Windows 7 or Windows 8.1 to Windows 10 is through an in-place upgrade. This will update the operating system and migrate apps and settings to the new OS. The System Center Configuration Manager (Configuration Manager) task sequence can be used to completely automate the process. The figure shows the Configuration Manager upgrade task sequence for Windows 10.
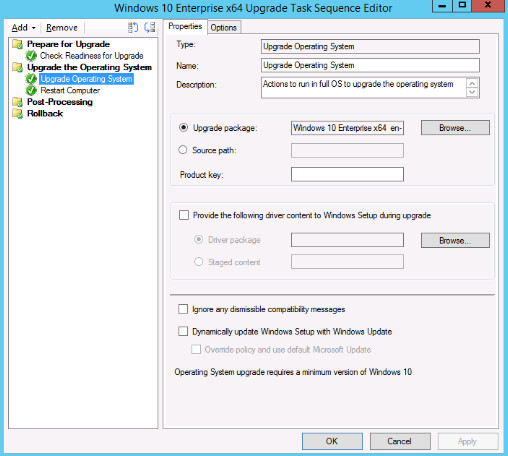
Configuration Manager upgrade task sequence for Windows 10
When upgrading Windows 7 or Windows 8 to Windows 10, the Windows installation program (Setup.exe) will perform an in-place upgrade, which automatically preserves all data, settings, applications, and drivers from the existing operating system version. This saves effort because there is no need for complex deployment infrastructure.
Note: Any user data should be backed up before performing the upgrade.
Clean install
Another way to upgrade to a newer version of Windows is to perform a clean upgrade. Because a clean install will wipe the drive completely, all files and data should be saved to some form of backup drive.
Before a clean install of Windows can be performed, the installation media will need to be created. This can be on a disc or flash drive that the PC can boot from to run the setup. Windows 7, 8.1, and 10 can be downloaded directly from Microsoft. The download Windows web site includes the directions to create the installation media.
Note: A valid product key is needed for the particular Windows version and edition in order to activate Windows after the installation process.
10.3.2.8 – Check your Understanding– Identify OS Installation Terminology
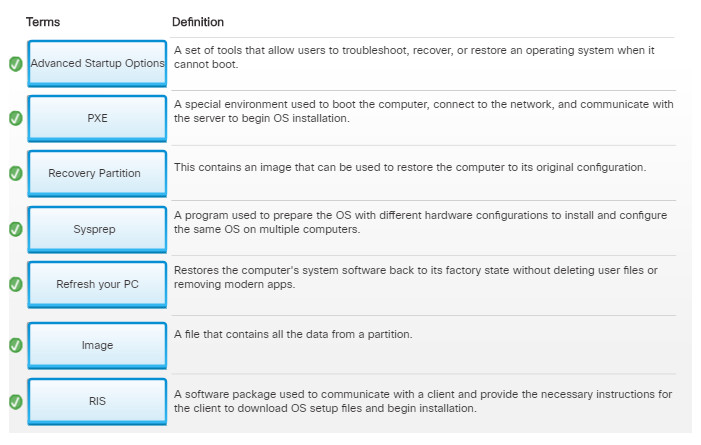
Activity – Identify OS Installation Terminology
10.3.3 – Windows Boot Sequence
10.3.3.1 – Windows Boot Sequence
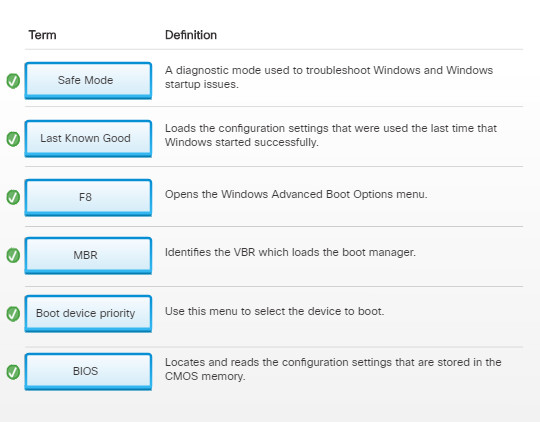
After POST, the BIOS locates and reads the configuration settings that are stored in the CMOS memory. The boot device priority, as shown in the figure, is the order in which devices are checked to locate the bootable partition. The boot device priority is set in the BIOS and can be arranged in any order. The BIOS boots the computer using the first drive that contains a valid boot sector. This sector contains the Master Boot Record (MBR). The MBR identifies the Volume Boot Record (VBR) which loads the boot manager, which for Windows is bootmgr.exe.
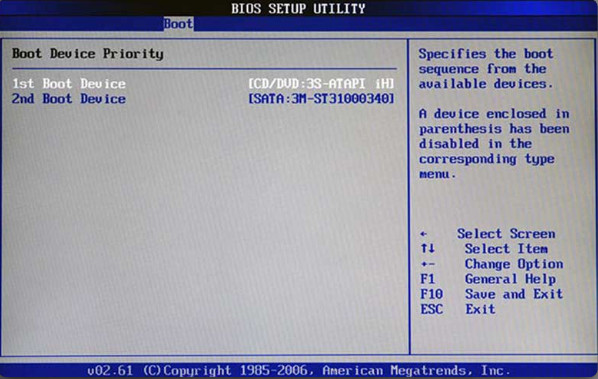
Boot Device Priority
Hard drives, network drives, USB drives, and even removable media can be used in the boot order, depending on the capabilities of the motherboard. Some BIOS also have a boot device priority menu that is accessed with a special key during computer startup. You can use this menu to select the device to boot as shown in the figure.
10.3.3.2 – Windows 7 Startup Modes
Some problems will prevent Windows from starting up. To troubleshoot and fix this kind of problem, use one of the many Windows Startup Modes.
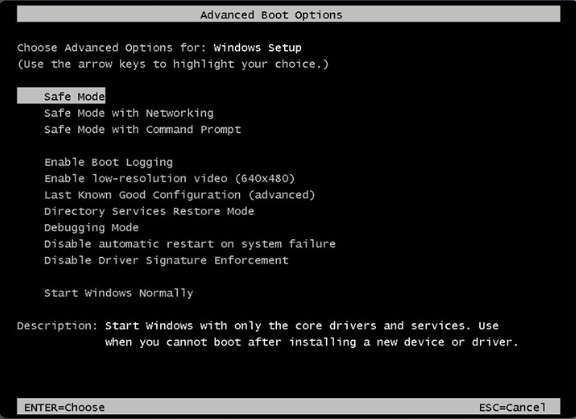
Advanced Boot Options
Pressing the F8 key during the boot process opens the Windows Advanced Boot Options menu, as shown in the figure. This allows users to select how they wish to boot Windows. These are four commonly used startup options:
- Safe Mode – A diagnostic mode used to troubleshoot Windows and Windows startup issues. Functionality is limited as many device drivers are not loaded.
- Safe Mode with Networking – Starts Windows in Safe Mode with networking support.
- Safe Mode with Command Prompt – Starts Windows and loads the command prompt instead of the GUI.
- Last Known Good Configuration – Loads the configuration settings that were used the last time that Windows started successfully. It does this by accessing a copy of the registry that is created for this purpose.
Note: Last Known Good Configuration is not useful unless it is applied immediately after a failure occurs. If the machine is restarted and manages to open Windows, the registry is updated with the faulty information.
10.3.3.3 – Windows 8 and10 Startup Modes
Windows 8 and10 Startup Modes
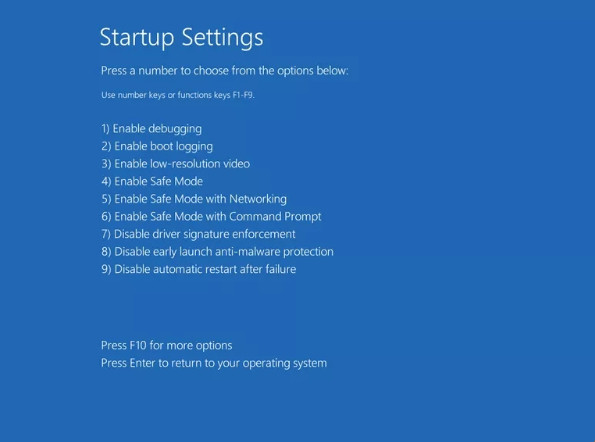
Both Windows 8 and Windows 10 boot too quickly to use F8 to access startup settings. Instead, hold the Shift key and select the Restart option in the Power menu. This will display the Choose an Option screen. To get the startup settings, select Troubleshoot, then from the next screen select Advanced options. Inside Advanced options select Startup settings, then on the next screen select Restart. The computer will then restart and display the Startup Settings menu shown in the figure. To choose a startup option use number or function keys F1-F9 that corresponds to the desired option.
10.3.3.4 – Check Your Understanding – Windows Boot Sequence
10.3.3.4 – Check Your Understanding – Windows Boot Sequence
10.4 – Summary
10.4.1 – Conclusion
10.4.1.1 – Chapter 10: Windows Installation
In this chapter, you learned that all operating systems perform the same four basic functions: Control hardware access, manage files and folders, provide a user interface, and manage applications. You also learned there are three most commonly used desktop operating systems; Microsoft Windows, Apple macOS, and Linux. This chapter focused on Microsoft Windows operating systems, specifically Windows 7, Windows 8, and Windows 10. You learned about the minimum system requirements of each Windows operating system. These system requirements define the minimum amount of RAM, storage drive space, and CPU speed needed for the operating system to install and function properly.
Before the OS can be installed, a storage media device must be chosen and prepared to receive the operating system. You learned how to prepare a storage drive for a Windows installation by formatting the drive into partitions. You learned about the primary partition that contains the operating system files, the active partition that is used to store and boot the operating system, and extended partitions that can be created to hold logical drives. You completed a lab where you created a FAT 32 partition in Windows and then converted the partition to NTFS.
You also performed a Windows operating system installation though two labs. In these labs, you installed Windows, performed basic setup tasks, created user accounts, and installed updates.
The chapter concluded with a review of the Windows boot sequence and the startup modes for Windows 7, Windows 8, and Windows 10.
