11.0 – Introduction
11.0.1 – Welcome
11.0.1.1 – Chapter 11: Windows Configuration
The first version of the Microsoft Windows operating system was released in 1985. Since then, over 25 versions, subversions, and varieties have been released. As an IT technician and professional you should understand the features of the most prevalent Windows versions in use today, Windows 7, Windows 8, and Windows 10.
In this chapter, you will learn about the different Windows versions and the editions of each that are most suited for corporate and home users. You will learn how to configure the Windows operating system and to perform administrative tasks using the Control Panel in the GUI and commands in the Windows command line (CLI) application and the PowerShell command line utility. You will have an opportunity to put into practice what you learn by working through several labs that involve working with file system commands, disk CLI commands, task and system CLI commands, and others.
You will learn about the two methods for organizing and managing Windows computers on a network, the domain and the workgroup, and how to share local computer resources, such as files, folders, and printers on the network. You will also learn how to configure a wired network connection in Windows. You will perform labs creating and sharing folders on the network and setting access permissions. You will also connect a computer to a wireless router and test the wireless connection as well as configure Windows for remote access using the Remote Desktop and Remote Assistance tools.
You will learn how a preventive maintenance plan can decrease downtime, improve performance, improve reliability, and lower repair costs and that preventive maintenance should take place when it causes the least amount of disruption to users. Regular scans for viruses and malware are also an important part of preventive maintenance. You will perform several labs to schedule a task using the GUI and at the command line and to manage startup applications using the Run key in the Registry.
At the end of the chapter, you will learn how the six steps in the troubleshooting process are applied to Windows operating systems.
11.1 – Windows Desktop and File Explorer
11.1.1 – Comparing Windows Versions
11.1.1.1 – Windows Versions
The first version of the Microsoft Windows operating system was released in 1985, over 30 years ago! Since then, over 25 versions, subversions, and varieties have been released. In addition, each version can also have editions, such as Home, Pro, Ultimate, or Enterprise, and come in either 32-bit or 64-bit versions. In the case of Windows 10, twelve editions were developed and released. However, only nine are currently offered.
Corporate and personal users of Windows operating system have different needs. On a corporate network it is usually necessary to manage user accounts and system policies centrally due to the number of devices on the network and higher security requirements. Centralized management is provided through joining an Active Directory domain where the user accounts and security policies are configured on a Domain Controller. Windows Professional, Pro, Enterprise, Ultimate, and Education editions can join an Active Directory domain.
Overview of Windows Versions
Other corporate features include:
BitLocker – A feature that enables a user to encrypt all data on a disk drive or removable drive. Found on Windows 7 Enterprise and Ultimate, Windows 8 Pro and Enterprise, and Windows 10 Pro, Enterprise, and Education Editions.
Encrypted file system (EFS) – A feature found on Windows 7 Professional, Enterprise and Ultimate, Windows 8 Pro and Enterprise, and Windows 10 Pro, Enterprise, and Education Editions that allows the user to configure file and folder-level encryption.
Branch Cache – Allows remote computers to share access to a single cache of data from shared folders and files or document portals such as SharePoint sites. This can reduce WAN traffic because the individual clients do not each need to download their own copy of cache data. Found on Windows 7 Enterprise and Ultimate, Windows 8 Enterprise, and Windows 10 Pro, Enterprise, and Education Editions.
There are some features of Windows that are aimed at personal use, such as Windows Media Center. This is a Microsoft app that allows the computer to be used as a home entertainment appliance for playing DVDs. Windows Media Center was included in Windows 7 Home Premium, Professional, Enterprise, and Ultimate editions. It was also a paid-for add-on to Windows 8 but was discontinued in Windows 10.
This chapter covers the various tools and applications that are available for configuring, maintaining, and troubleshooting Windows. The primary focus of this course will be Windows 10. When relevant, Windows 8 and Windows 7 will be discussed when major differences exist between them and Windows 10.
11.1.1.2 – Windows 7
Windows 7
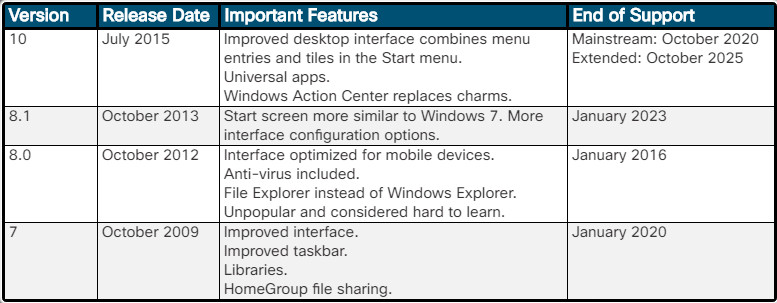
Windows 7 was released in October 2009. It offered improvements to the interface, performance, and File Explorer, including the first appearance of Libraries and HomeGroup file sharing. The taskbar offered many of the enhancements that change the look and feel of the desktop over Vista. It was quite successful and Microsoft offers extended support for it until January of 2020.
11.1.1.3 – Windows 8
Windows 8
Released in October of 2012, Windows 8 included a major revision of the Windows interface that made it very different from Windows 7. This was done to make Windows more compatible with touch screen devices like tablets and phones. Although Windows 8 included improvements in security and performance, the interface changes were unpopular and made it difficult for some users to learn to use them. For example, Windows 8 lacked a Start button, which was a major problem for some users.
11.1.1.4 – Windows 8.1
Windows 8.1
Because Windows 8 was not very well received, Microsoft quickly responded with an update that addressed some of the criticisms of that version. Windows 8.1 was released in October of 2013, only one year after Windows 8. It included a Start screen that is more familiar to users of earlier versions, including a full Start button on the Taskbar. It included other new functionalities and easier configuration options of the desktop interface.
11.1.1.5 – Windows 10
Windows 10 is the most recent version of Windows at the time of this writing. There are nine editions of Windows 10 that are currently offered. The examples used in this course are from the Windows 10 Professional edition.

Windows 10
The retail version of Windows 10 became available in July 2015. Windows 10 offered a return to the desktop computer-oriented interface that had been replaced in Windows 8. It supports an easy transition between a point-and-click interface and the touch interfaces of tablets, phones, and embedded systems like Internet of Things (IoT) single-board computers. Windows 10 includes support for universal apps that run on desktop and mobile devices. It also introduces the Microsoft Edge web browser. It offers enhanced security features, faster logons, and encryption of system files to save disk space. Charms were replaced with a new Windows Action Center that provides notifications and quick settings.
Windows 10 uses a new update model. Twice a year, Microsoft offers feature updates. These updates add new features to Windows and also improve existing features. The updates are numbered, and the description of them is listed on the Microsoft website. It is entirely possible that you will notice changes to the interfaces of some Windows apps and tools after a feature update. Quality updates, or cumulative updates, usually install monthly. They contain patches to fix problems with Windows or they contain security updates to address new threats and vulnerabilities.
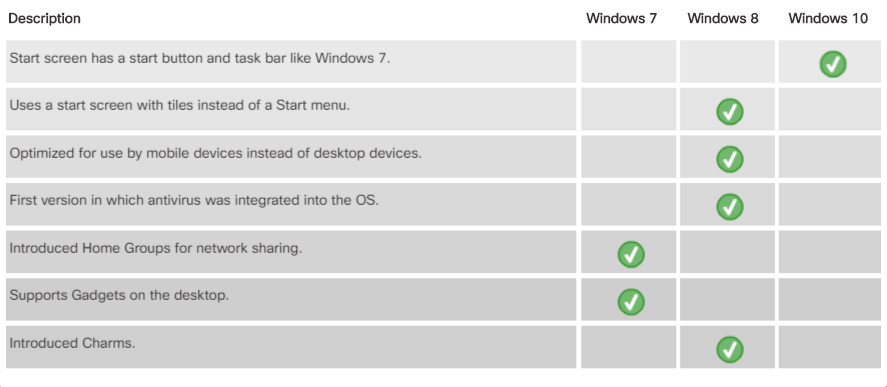
Figure 2 summarizes the important features of the Windows versions that are covered in this course.
Overview of Windows Versions
11.1.1.6 – Check Your Understanding – Windows Versions
11.1.1.6 – Check Your Understanding – Windows Versions
11.1.2 – The Windows Desktop
11.1.2.1 – The Windows 7 Desktop
Windows 7 has a default theme called Aero. Aero has translucent window borders, numerous animations, and icons that are thumbnail images of the contents of a file.
Windows versions 7 and above include the following desktop features:
- Shake – Minimize all windows that are not being used by clicking and holding the title bar of one window and shaking it with the mouse. Repeat the action to maximize all of the windows.
- Peek – View the desktop icons that are behind open windows by placing your cursor over the Show desktop button found at the right edge of the taskbar. This makes the open windows transparent. Click the button to minimize all windows.
- Snap – Resize a window by dragging it to one of the edges of the screen. Dragging the window to the left edge of the desktop fits the window to the left half of the screen. Dragging the window to the right edge of the desktop fits the window to the right half of the screen. Dragging the window to the top of the screen will maximize the window.
In Windows 7, users can place Gadgets on the desktop. Gadgets are small applications, such as games, sticky notes, a calendar, or a clock. The figure displays the weather, calendar, and clock Gadgets on a Windows 7 desktop.
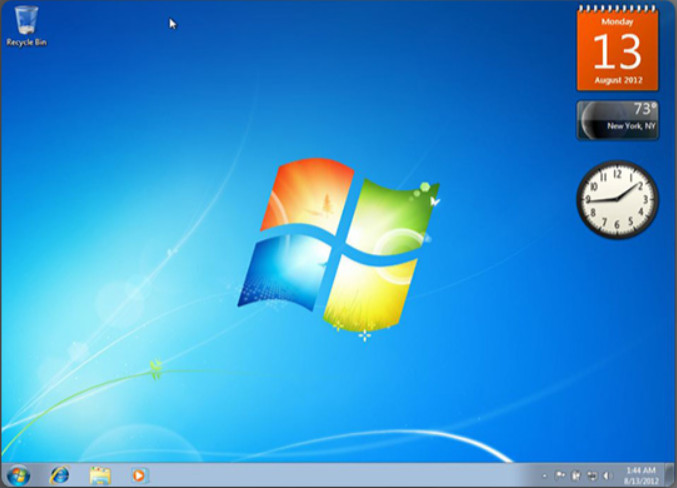
The Windows 7 Desktop
Note: Microsoft has retired the Gadgets feature in versions following Windows 7 because of security concerns.
To add gadgets to the Windows 7 desktop, follow these steps:
Step 1. Right-click anywhere on the desktop and choose Gadgets.
Step 2. Drag and drop the gadget from the menu to the desktop, or double-click the gadget to add it to the desktop, or right-click the gadget and choose Add.
Step 3. To snap a gadget, drag it to the desired desktop location. The gadget aligns itself with the screen edges and other gadgets.
11.1.2.2 – The Windows 8 Desktop
Windows 8 introduced a new desktop that used tiles on the Start screen, as shown in the figure. This environment is used on desktops and laptops, but it is optimized for mobile devices. Microsoft intended to unify the Windows interface across desktop and mobile devices. The Start screen displays a customizable array of tiles designed to access apps and other information, such as social media updates and calendar notifications. These tiles represent notifications, applications, or desktop programs. Some tiles can display dynamic content. They are called live tiles. Another new GUI element is a vertical bar of five icons known as charms. Charms can be accessed by placing the mouse cursor in the upper-right corner of the screen or swiping your finger in from the right side of the screen on a touchscreen. They provide quick access to common functions.
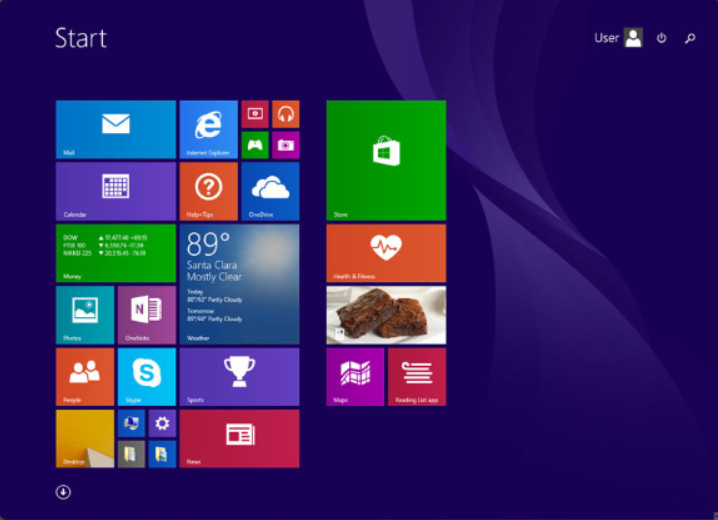
The Windows 8 Desktop
Windows 8 included a revised task manager, the addition of the ribbon menu to File Explorer (formerly known as Windows Explorer.), and the inclusion of anti-virus functionality directly in the OS called Windows Defender.
11.1.2.3 – The Windows 8.1 Desktop
The figure shows the Windows 8.1 desktop interface including the Taskbar, Start button, and pinned program icons. Clicking the Start button displays the Start screen that is very similar to the Windows 8 Start screen.
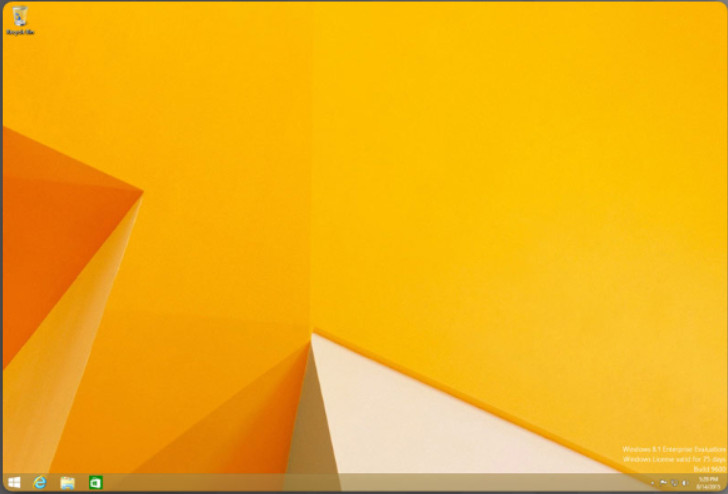
The Windows 8.1 Desktop
11.1.2.4 – Personalizing the Windows Desktop
Windows offers many settings that enable users to personalize the desktop and other aspects of the Windows GUI. The fastest way to get to these settings is to right-click an empty area of the desktop and select Personalize. This shows the Background settings. Drag the right-hand border of the settings box to widen it. This will reveal the Personalization settings menu. The fastest way to change the look and feel of the Windows GUI is to select from the available themes, as shown in Figure 1. Themes are a preset combination of GUI settings that go together. You can also create themes from settings that you have made so that they can be used later. Themes beyond those that are provided can be downloaded from the Microsoft Store. Many other changes can be made to Windows GUI from here.
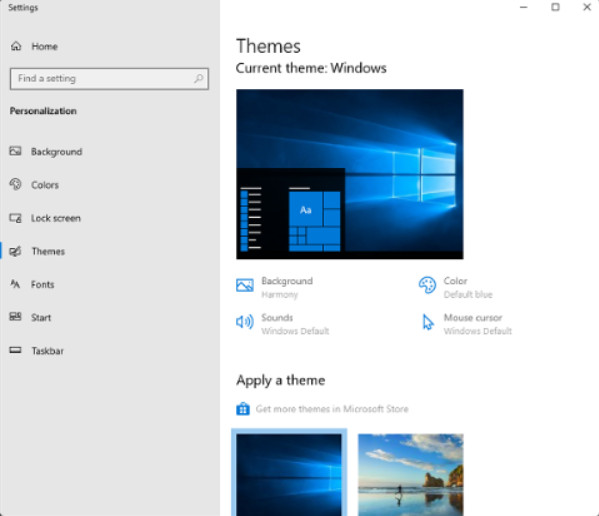
Windows 10 Themes
In Windows 8 the Apps environment is highly customizable. To re-arrange the tiles, click and drag the tiles. To rename a tile group, right-click on any empty area of the screen and select Name groups. To add tiles to the main screen, right-click the desired Windows app after searching for it and select Pin to Start. To search for an app, click Search from the Charms bar. Alternatively, you can start typing the name of the app from the Windows Apps environment. Search will start automatically. Figure 2 shows the Windows 8 Apps environment and the Charms bar.
In Windows 7 and 8.1, to customize the desktop, right-click anywhere on the desktop and choose Personalize. In the Personalization window, you can change the desktop appearance, display settings, and sound settings. Figure 3 shows the Windows 8 Personalization window. It is very similar to the Personalization window in Windows 7.
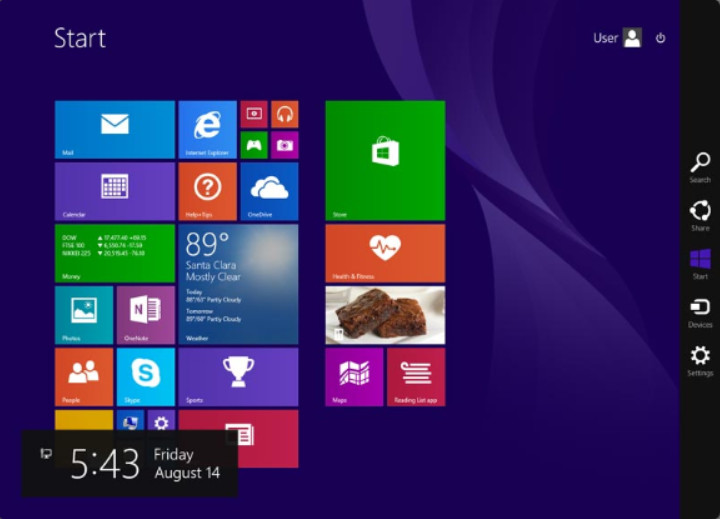
Windows 8 Start Screen
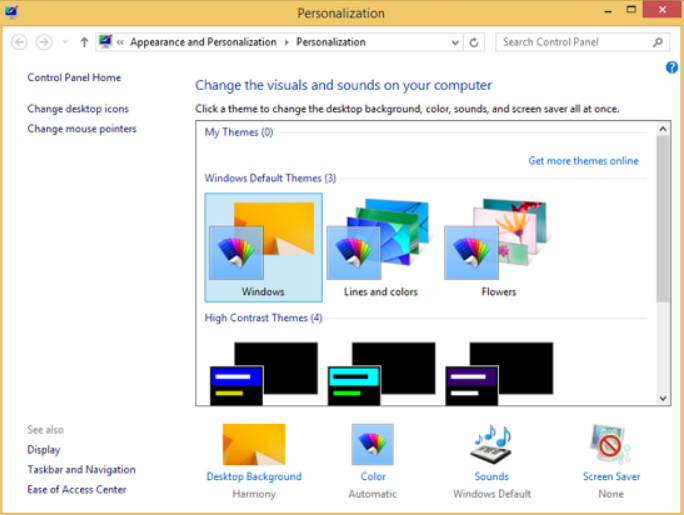
Windows 8 Personalization Menu
11.1.2.5 – Video Demonstration – The Windows 10 Desktop
After the OS has been installed, you can customize the computer desktop to suit individual needs. A computer desktop is a graphical representation of the workspace and is commonly called a graphical user interface, or GUI. The desktop has icons, toolbars, and menus that are used for a variety of purposes. You can add or change images, sounds, and colors to provide a more personalized look and feel, for example. Click Play in the figure to view a video demonstration of the Windows 10 desktop.
Click here to read the transcript of this video.
11.1.2.6 – The Windows 10 Start Menu
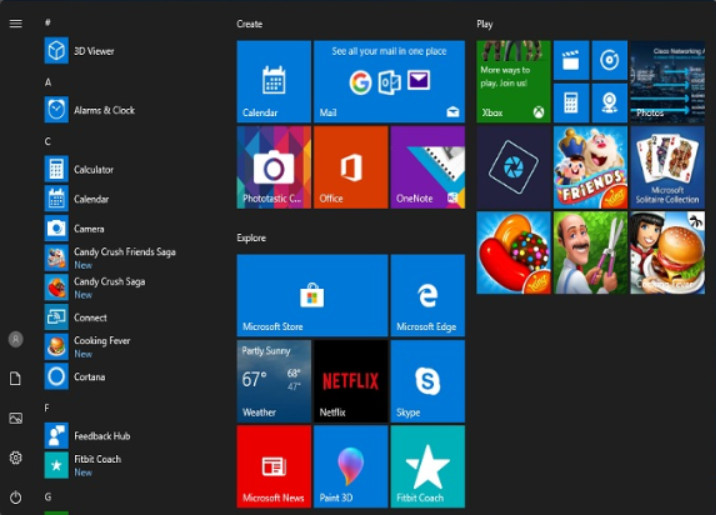
The Windows 10 Start Menu
The Windows 10 Start menu consists of three main parts. To the left, a strip of shortcuts to common libraries appears with a button that provides access to settings and the shutdown button. To the right of this is a menu of applications that are available, in alphabetical order, with areas for the most recently installed and most used applications at the top. To the right is an area containing tiles for Apps that are arranged by category, such as games, creative software, etc. The Windows 10 Start menu is shown in the figure.
11.1.2.7 – The Windows 8.1 and 8.0 Start Menu
In Windows 8.0, with the introduction of the Windows Apps environment, Microsoft chose to remove the Start Button and Start Menu. The Start Menu was replaced by the Start Screen, as shown in Figure 1. Clicking the downward-pointing arrow reveals the alphabetized list of Apps that are available, as shown in Figure 2.
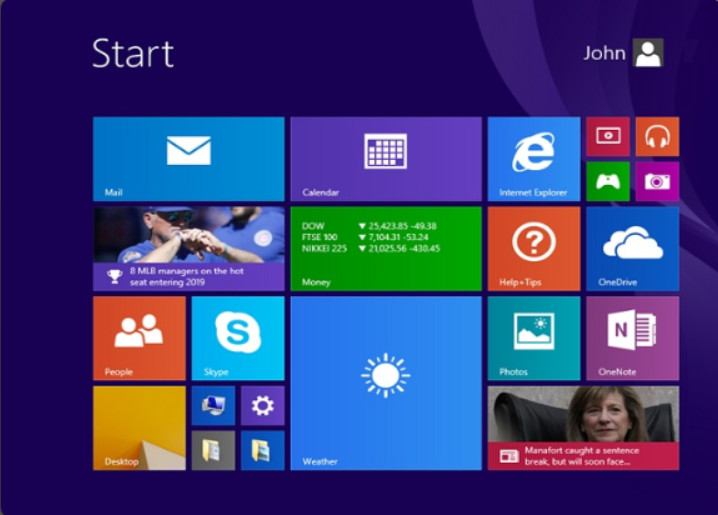
The Windows 8 Default Start Screen
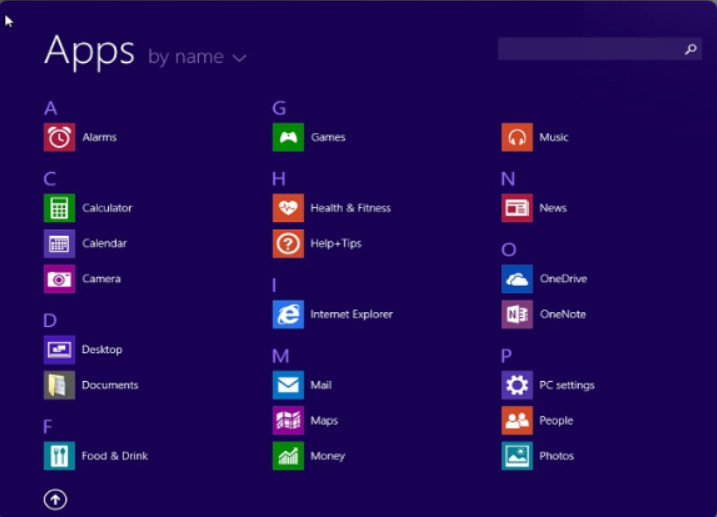
The Windows 8 Start Menu – Apps View
After many requests, Microsoft brought back a limited Start Button in Windows 8.1. The Start Screen still plays the role of the Start Menu but Windows 8.1 users now have a button to access the Start Screen. Other ways to access the Start Screen include pressing the Windows key on the keyboard or clicking the Start Button located on the Charms bar.
A limited Start Menu can be displayed in Windows 8.1 by right-clicking the Start Button, as shown in Figure 3.
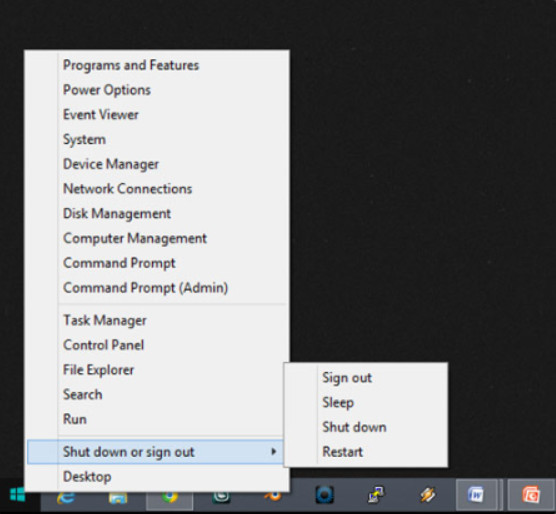
Windows 8.1 Limited Start Menu
11.1.2.8 – The Windows 7 Start Menu
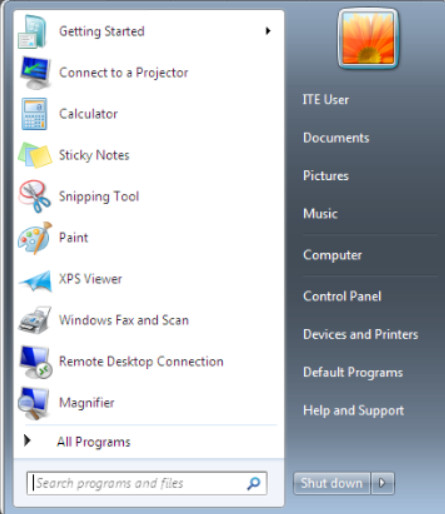
Windows 7 Start Menu
The Start Menu in Windows 7 is accessed by clicking the Windows icon at the bottom-left of the desktop. The Start Menu, shown in Figure 1, displays all of the applications installed on the computer, a list of recently opened documents, and a list of other elements, such as the search feature, Help and Support, and Control Panel. To customize Start Menu settings in Windows 7 use the following path:
Right-click an empty section of the taskbar and choose Properties > Start Menu > Customize.
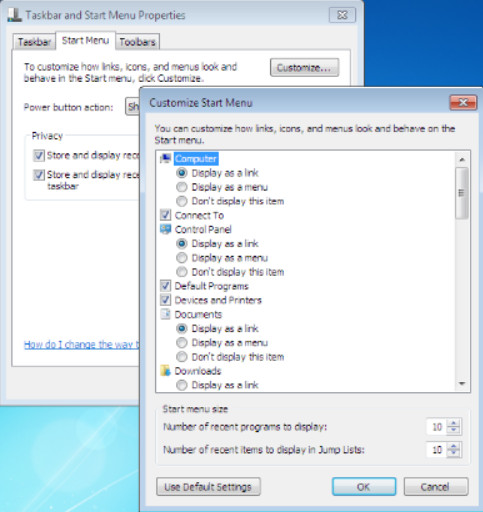
Windows 7 Taskbar and Navigation Properties
11.1.2.9 – The Taskbar
The Taskbar provides easy access to many important and commonly used features of Windows. Applications, files, tools, and settings can all be accessed from this one place. Right-clicking the Taskbar or opening the Taskbar and Navigation control panel leads you to a Settings screen that allows easy configuration of the Taskbar appearance, location, operation, and features. The Windows 10 Taskbar Settings screen is shown in figure 1. It is available from the Taskbar option in the Personalization Settings window.
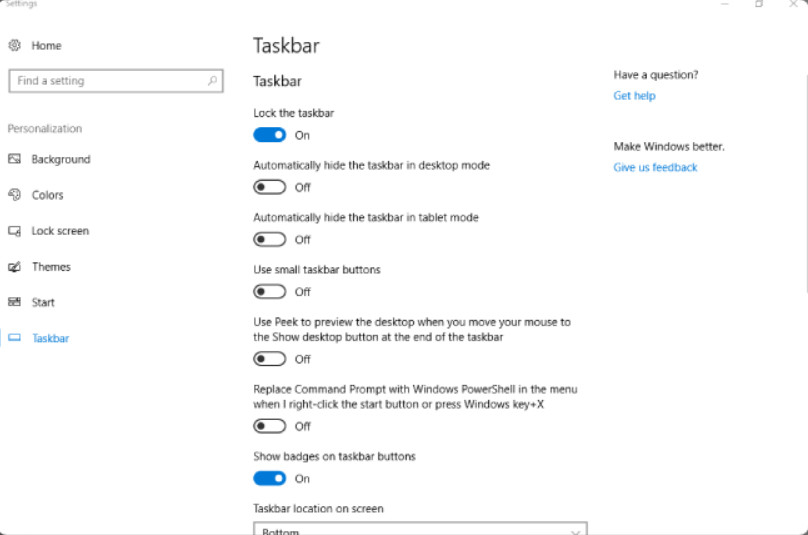
Windows 10 Taskbar Settings
These are some useful features of the Taskbar:
- Jump lists – To display a list of tasks that are unique to the application, right-click the application’s icon in the taskbar.
- Pinned applications – To add an application to the taskbar for easy access, right-click the icon of an application and select Pin to taskbar.
- Thumbnail previews – To view a thumbnail image of a running program, hover the mouse over the program icon on the taskbar.
Changes to Taskbar settings vary slightly between windows versions.
Figure 2 shows Windows 8.1 Taskbar and Navigation Properties.
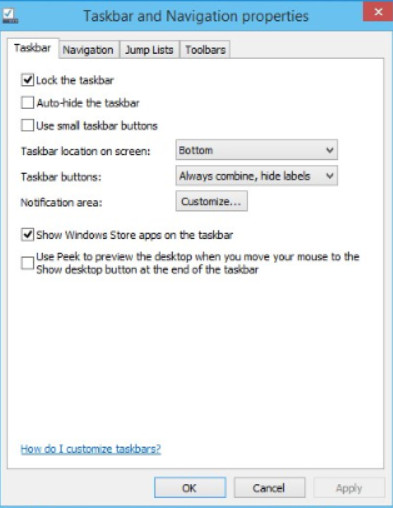
Windows 8.1 Taskbar and Navigation Properties
Figure 3 shows Windows 7 Taskbar and Navigation Properties.
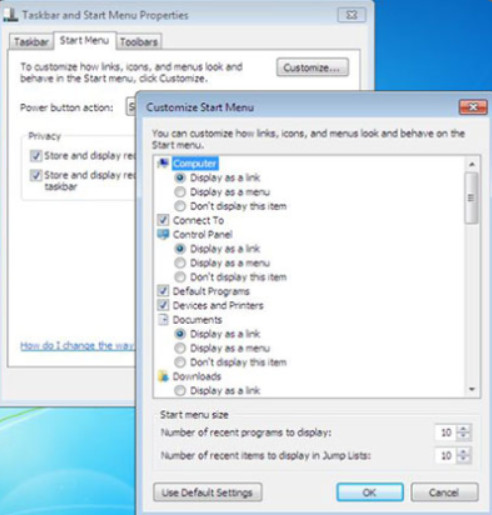
Windows 7 Taskbar and Navigation Properties
11.1.2.10 – Lab – Explore the Windows Desktop
In this lab, you will explore the Windows Desktop, Start Menu, and Taskbar.
11.1.2.10 – Lab – Explore the Windows Desktop
11.1.2.11 – Check Your Understanding – Identify Elements of the Windows Desktop
11.1.3 – Windows Task Manager
11.1.3.1 – Video Demonstration – Working With Task Manager
The Windows Task Manager provides information about all of the applications, processes, and services that are running on the computer. This can be used to monitor system resources and the programs that are using them. Task Manager can also be used to terminate processes that are causing system issues or that have stopped responding to user input. Care must be taken when terminating processes because they may be required for system operation.
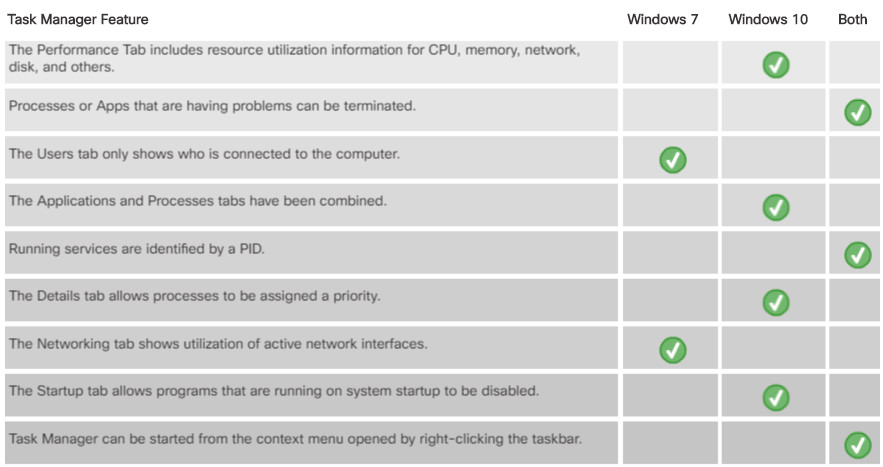
Task Manager is essentially the same in Windows 10 and Windows 8. The Windows 7 Task Manager has some essential differences.
Click Play in the figure to view a demonstration of how to use Task Manager in Windows 10.
Click here to read the transcript of this video.
11.1.3.2 – Windows 10 Task Manager Functions
11.1.3.3 – Task Manager in Windows 7

Task Manager in Windows 7
Task Manager is different in Windows 7. In many ways, the Windows 10 Task Manager is a significant upgrade from the Windows 7 Task Manager. The Windows 7 Task Manager has six tabs:
- Applications – This tab shows all running applications. From this tab, you can create, switch to, or close any applications that have stopped responding using the buttons at the bottom.
- Processes – This tab shows all running processes. From this tab, you can end processes or set process priorities.
- Services – This tab shows the available services, including their operational status. Services are identified by their PID.
- Performance – This tab shows the CPU and page file usage.
- Networking– This tab shows the usage of all network adapters.
- Users – This tab shows all users that are logged on the computer.
Several major differences exist between Task Manager in Windows 7 and Windows 10:
1. The Applications and Processes tabs have been combined in Windows 10.
2. The Networking tab is now included with the Performance tab in Windows 10.
3. The Users tab has been enhanced in Windows 10 to not only show the users that are connected but also the resources that they are using.
11.1.3.4 – Lab – Work with Task Manager
In this lab, you will use Task Manager to monitor system performance.
11.1.3.4 – Lab – Work with Task Manager
11.1.3.5 – Check Your Understanding – Compare Task Manager in Windows 7 and 10
11.1.3.5 – Check Your Understanding – Compare Task Manager in Windows 7 and 10
11.1.4 – Windows File Explorer
11.1.4.1 – File Explorer
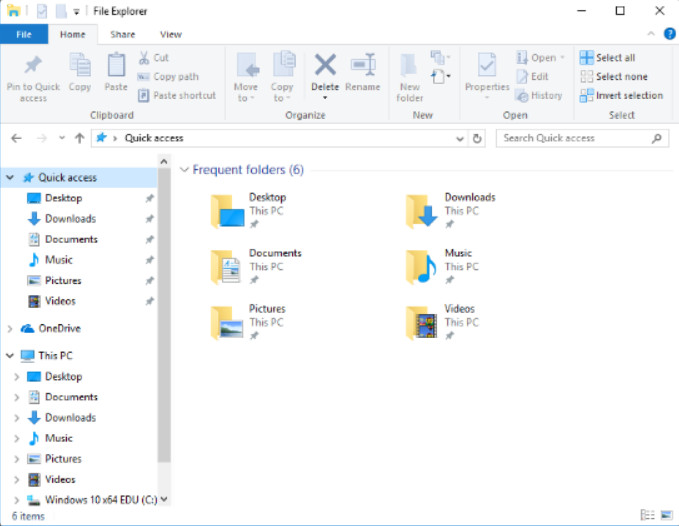
File Explorer is a file management application in Window 8 and Windows 10. It is used to navigate the file system and manage the folders, subfolders, and applications on storage media. You can also preview some types of files.
In File Explorer, common tasks, such as copying and moving files and creating new folders, can be done using the Ribbon. The tabs at the top of the window change as different types of items are selected. In the figure, the Ribbon for the File tab is displayed for Quick Access. If the Ribbon is not displaying, click the Expand the Ribbon icon, represented by a down arrow, on the upper right corner of the window.
Windows 10 File Explorer
Windows Explorer is the name of the file management application in Windows 7 and earlier. Windows Explorer performs similar functions as File Explorer but lacks the Ribbon.
11.1.4.2 – Video Demonstration – Working with File Explorer
Click Play to learn about some of the functions of File Explorer.
Click here to read the transcript of this video.
11.1.4.3 – This PC
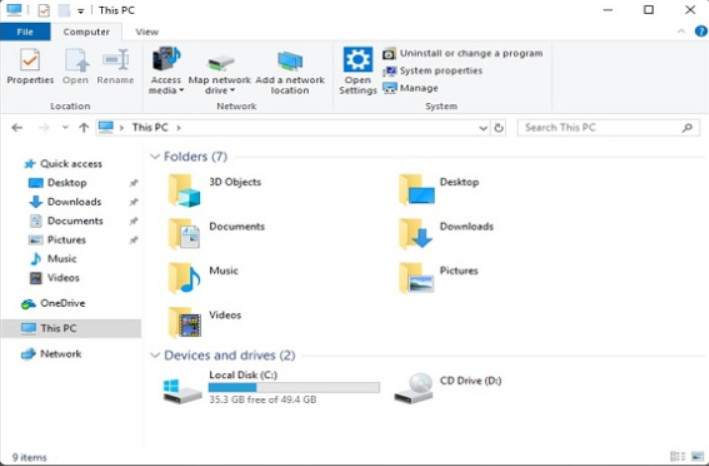
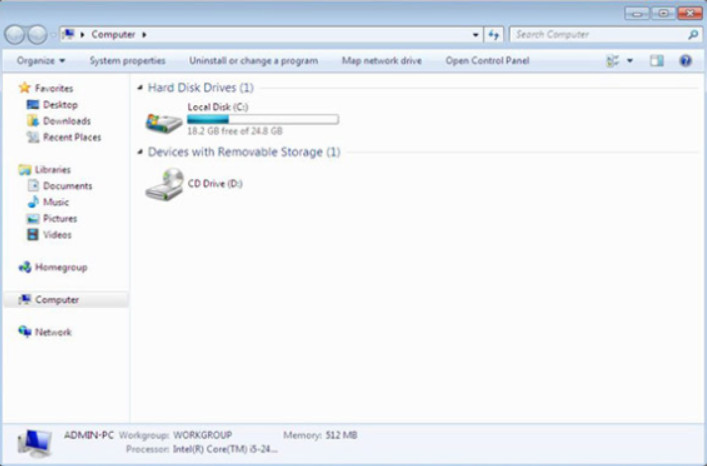
In Windows versions 10 and 8.1, the This PC feature allows you to access the various Devices and drives installed in the computer. In Windows 7, this same feature is called Computer.
To open This PC, open File Explorer, and it will display the This PC feature by default, as shown in Figure 1.
This PC
In Windows 8.0, or 7, click Start and select Computer. Figure 2 shows the Computer feature in Windows 7.
Computer in Windows Explorer
11.1.4.4 – Run as Administrator
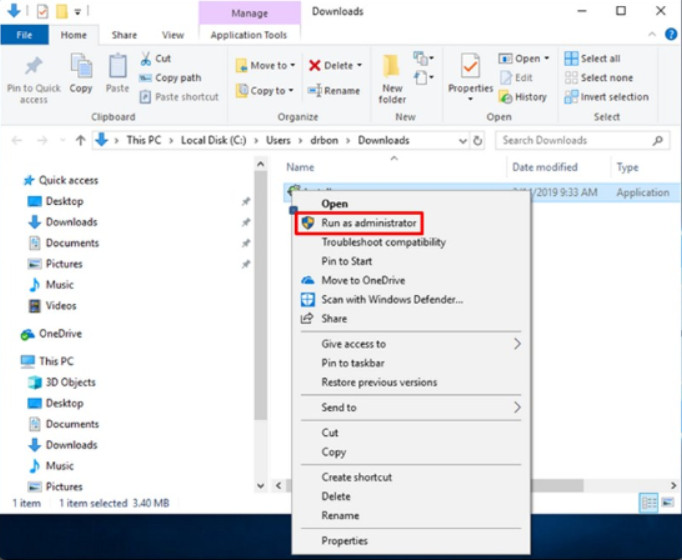
Modern operating systems use a number of methods to improve security. One of these methods is file permissions. Depending on the file permission, only users with enough permission can access the file. System files, other user files, or files with elevated permissions are examples of files that could lead Windows to deny access to a user. To override this behavior and gain access to those files, you must open or execute them as the system administrator.
Run as Administrator
To open or execute a file using elevated permission, right-click the file and choose Run as Administrator as shown in the figure. Choose Yes in the User Account Control (UAC) window. UAC is the location where administrators can manage user accounts. In some cases, software will not install properly unless the installer is run with Administrator privileges.
Note: An administrator password is required to use these feature if the current user does not belong to the Administrator group.
11.1.4.5 – Windows Libraries
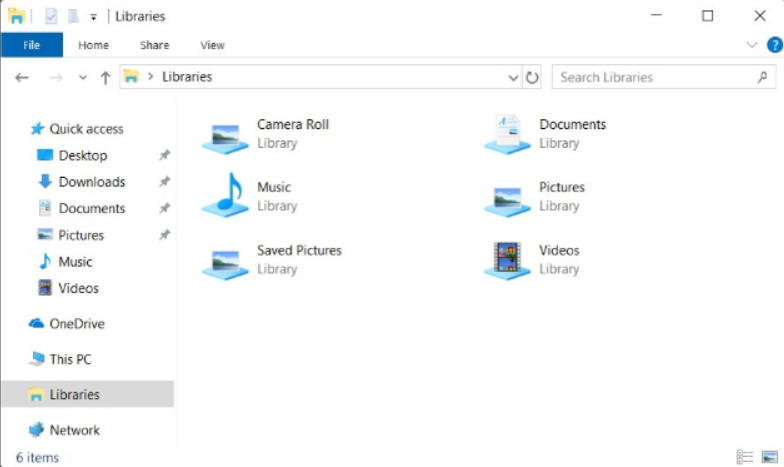
Windows Libraries allow you to easily organize content from various storage devices on your local computer and network, including removable media, without actually moving the files. A library is a virtual folder that presents content from different locations within the same view. When Windows 10 is installed, each user has six default libraries, as shown in the figure.
Windows 10 Libraries
You can search a library, and you can filter the content using criteria such as filename, file type, or date modified. In Windows 10 and Windows 8.1, the libraries are hidden by default. The context menu for the left pane of the File Explorer window contains an option that shows the libraries.
11.1.4.6 – Directory Structures
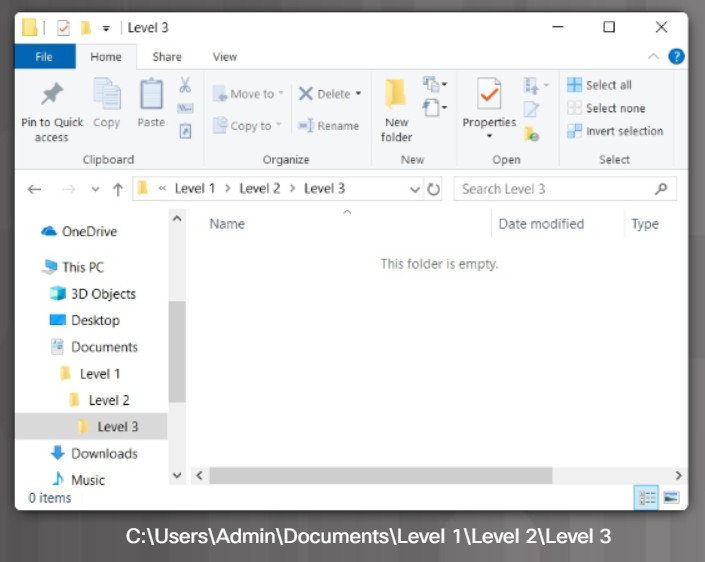
In Windows, files are organized in a directory structure. A directory structure is designed to store system files, user files, and program files. The root level of the Windows directory structure, the partition, is usually labeled drive C, as shown in the figure. Drive C contains a set of standardized directories, called folders, for the operating system, applications, configuration information, and data files. Directories may contain additional directories, as shown in the figure. These additional directories are commonly called subfolders. The number of nested folders is essentially limited by the maximum length of the path to the folders. In Windows 10, the default limit is 260 characters. The figure shows several nested folders in File Explorer along with the equivalent path.
Nested Folders and Path in File Explorer
Windows creates a series of folders for each user account that is configured on the computer. These folders appear to be the same in File Explorer for each user, however, they are actually unique to each user account. In this way, users cannot access each other’s files, applications, or data.
Note: It is a best practice to store files in folders and subfolders rather than at the root level of a drive.
11.1.4.7 – User and System File Locations
Users Folder
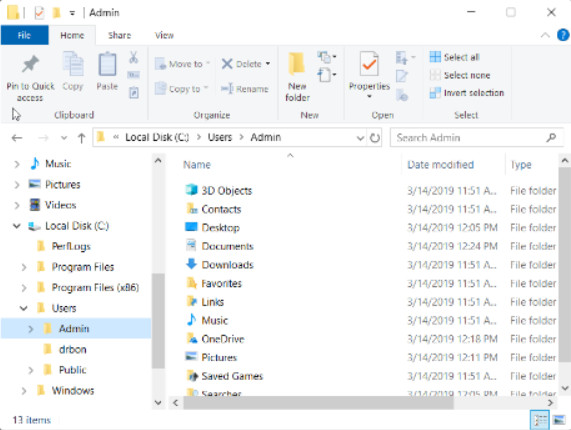
By default, Windows stores most of the files created by users in the Users Folder, C:\Users\User_name\. Each user’s folder contains folders for music, videos, websites, and pictures, among others. Many programs also store specific user data here. If a single computer has many users, they have their own folders containing their favorites, desktop items, logs, among others.
System Folder
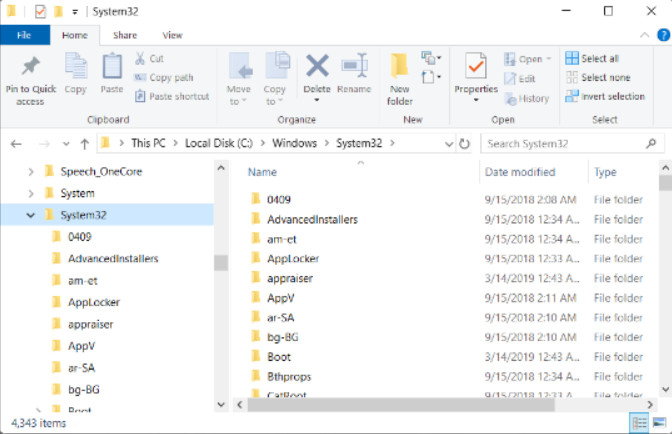
When the Windows OS is installed, most of the files that are used to run the computer are located in the folder C:\Windows\system32. Making changes to the contents of the System Folder could cause problems with Windows operation.
Program Files
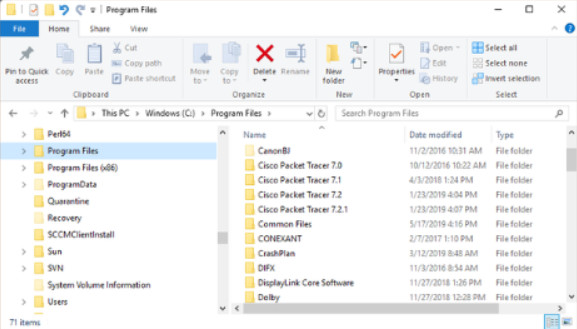
The Program Files folder is used by most application installation programs to install software. In 32-bit versions of Windows, all programs are 32-bit and are installed in the folder C:\Program Files. In 64-bit systems, 64-bit programs are installed in the folder C:\Program Files, while 32-bit programs are installed in the folder C:\Program Files (x86).
11.1.4.8 – File Extensions
Files in the directory structure adhere to a Windows naming convention:
- A maximum of 255 characters is allowed.
- Characters such as a slash or a backslash (/ \) are not allowed.
- An extension of three or four letters is added to the filename to identify the file type.
- Filenames are not case sensitive.
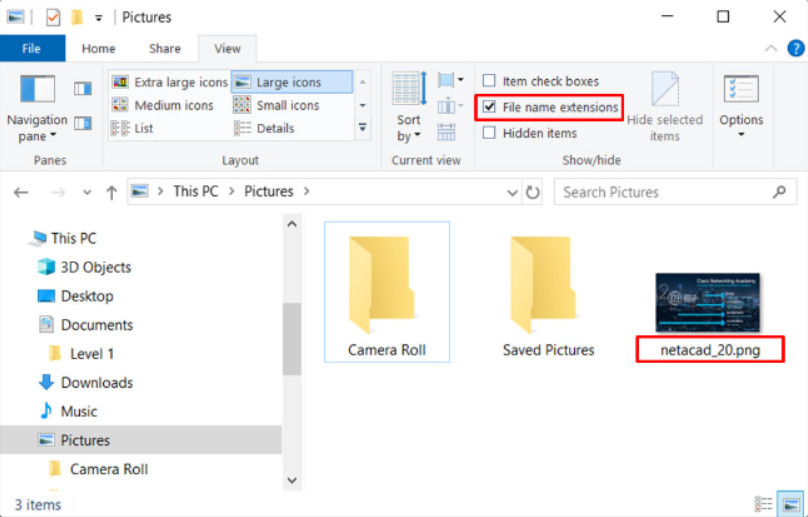
By default, file extensions are hidden. In Windows 10 and Windows 8.1, in the File Explorer ribbon, click the View tab. Then click to check File name extensions, as shown in Figure 1.
Show File Extensions – Windows 10
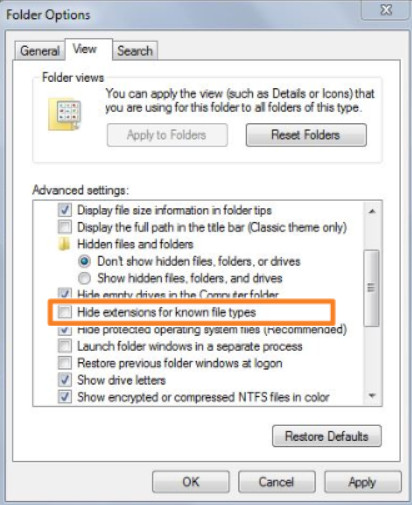
To display the file extensions In Windows 7, you must disable the Hide extensions for known file types setting in the FolderOptions control panel utility, as shown in Figure 2.
Show File Extensions – Windows 7
The following filename extensions are commonly used:
- .docx – Microsoft Word (2007 and later)
- .txt – ASCII text only
- .jpg – Graphics format
- .pptx – Microsoft PowerPoint
- .zip – Compression format
11.1.4.9 – File Attributes
The directory structure maintains a set of attributes for each file that controls how the file can be viewed or altered. These are the most common file attributes:
- R – The file is read-only.
- A – The file will be archived the next time that the disk is backed up.
- S – The file is marked as a system file, and a warning is given if an attempt is made to delete or modify the file.
- H – The file is hidden in the directory display.
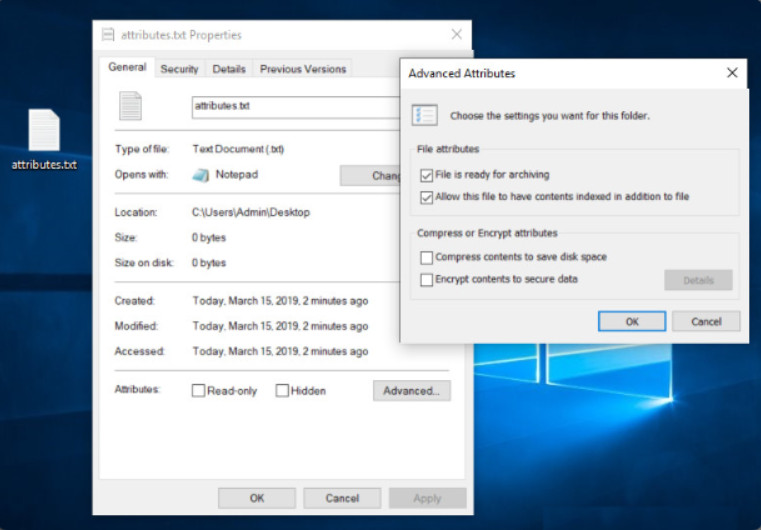
File Attributes
The figure shows the file properties dialog box in which attributes can be viewed or set.
11.1.4.10 – Video Demonstration – File and Folder Properties
Click Play in the figure to view a demonstration of the file and folder properties in Windows 10 File Explorer.
Click here to read the transcript of this video.
11.1.4.11 – Lab – Working with File Explorer
In this lab, you will use File Explorer to work with files and folders.
11.1.4.11 – Lab – Working with File Explorer
11.1.4.12 – Check Your Understanding – File Explorer
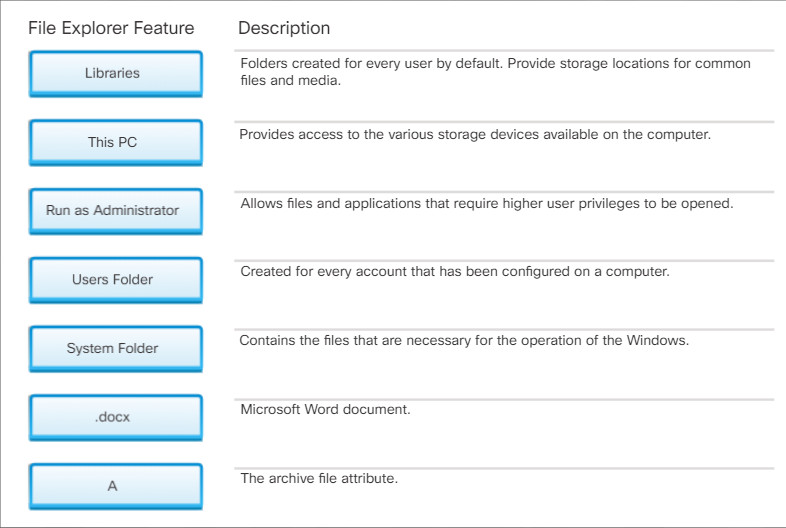
11.1.4.12 – Check Your Understanding – File Explorer
11.2 – Configure Windows with Control Panels
11.2.1 – Control Panel Utilities
11.2.1.1 – Windows 10: Settings and Control Panels
Windows 10 offers two ways to configure the operating system. The first is the Settings app. It has an interface that follows the modern Windows interface design guidelines. Figure 1 shows the Settings App menu.
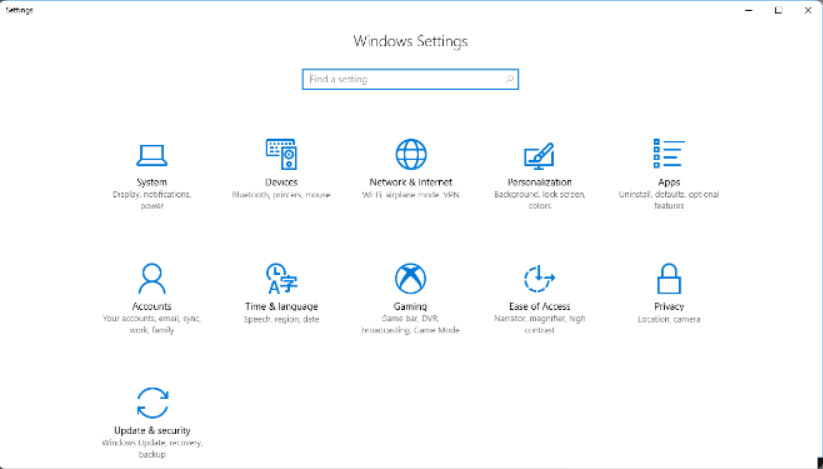
Windows 10 Settings App
From it you can access many system settings. The Settings App first appeared in Windows 8 as shown in Figure 2. It provided access to fewer settings than the Windows 10 version, which has now become robust. Note that a search field enables you to find settings without taking a lot of time clicking through menus.
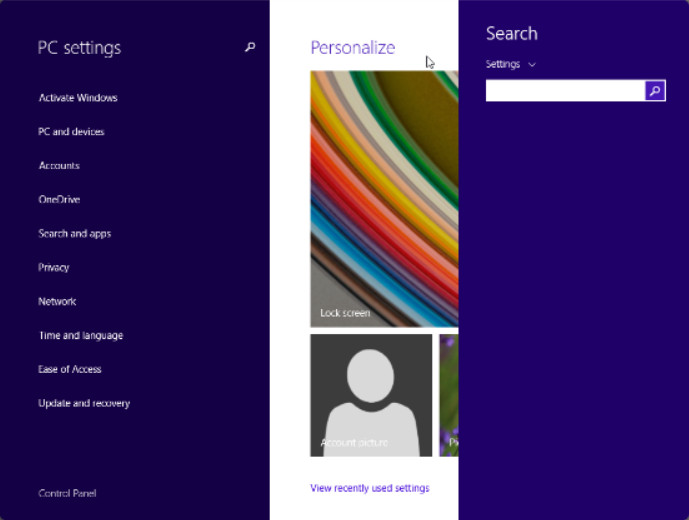
Windows 8 Settings with Search Box
In Windows 7, the Setting App was not present. The most efficient way to make system configuration changes was by using the Control Panel, as shown in Figure 3. While it appears that Microsoft is moving more and more functionality to the Settings App, the Control Panel is still present in Windows 8 and 10, and in some cases it is the only way to make changes to some configuration settings. In other cases, especially in regards to Personalization, the Settings app provides more configuration options than Control Panel.
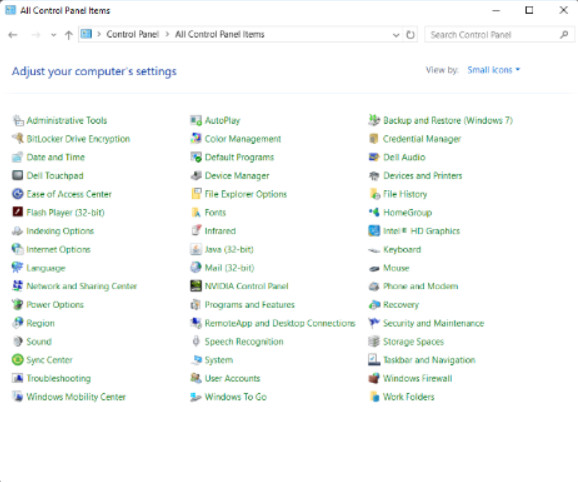
Windows 7 Control Panel
For this course, you will focus on the Control Panel in Windows 10, and learn about the Settings App where necessary. If important differences exist between the Windows 7 and 8 Control Panels and Windows 10, you will learn about those differences. The Control Panel window looks very similar between Windows versions, however some Control Panel items differ between the versions.
11.2.1.2 – Introduction to Control Panel
Windows 10 usually defaults to the Settings app for configuration changes. This is good for the casual user, however a PC technician frequently needs more configuration options than what is available in the Settings App. The Control Panel offers many configuration tools and its interface is preferred by many experienced Windows administrators. In fact, some Settings actually link to Control Panel items.
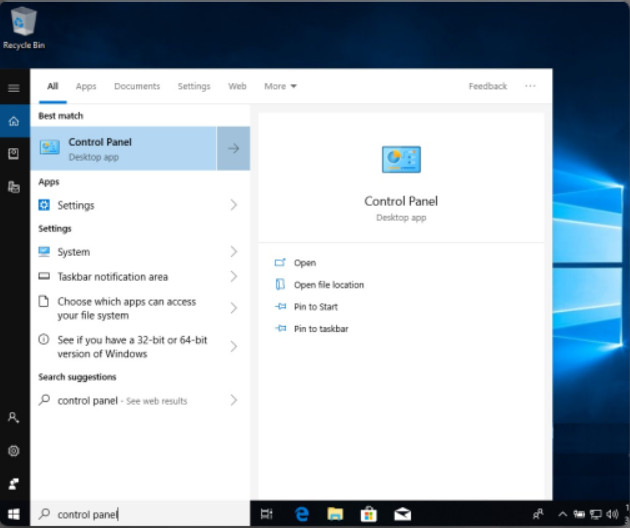
Windows 10 Control Panel Search Results
To start Control Panel, type Control Panel into the Search box and click the Control Panel Desktop app that appears in the results, as shown in the figure. If you right-click on the result, you can pin it to the Start menu to make it easier to find. You can also open it from the Command Prompt by typing control.
In Windows 7, the Control Panel has an entry on the Start menu. In Windows 8.1, it can be accessed by right-clicking the Start button. In Windows 8, it can be opened by searching for Control Panel and clicking the result.
11.2.1.3 – Control Panel Views
The Windows 10 Control Panel opens to the Categories view by default, as shown in Figure 1. This helps to organize the forty or more Control Panel items and makes them easier to find. This view also provides a search box which will return a list of Control Panel items that are relevant to a search term.
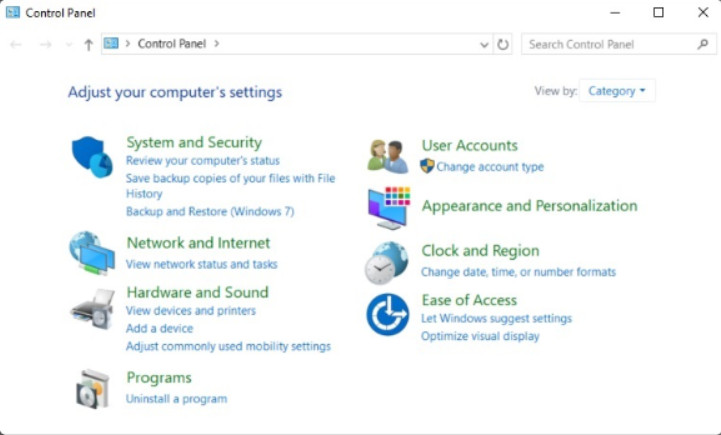
Control Panel Category View
The classic view of Control Panel is reached by changing the setting in the View by: dropdown menu to Small icons, as shown in Figure 2. Note that there will be variations in what is available in Control Panel depending on features of the individual computer.
Control Panel Small Icon View
11.2.1.4 – Define Control Panel Categories
11.2.1.5 – Lab – Explore Control Panel Categories
In this lab, you will investigate the options provided in the various commonly used Control Panel items.
11.2.1.5 – Lab – Explore Control Panel Categories
11.2.1.6 – Check Your Understanding – Control Panel Categories
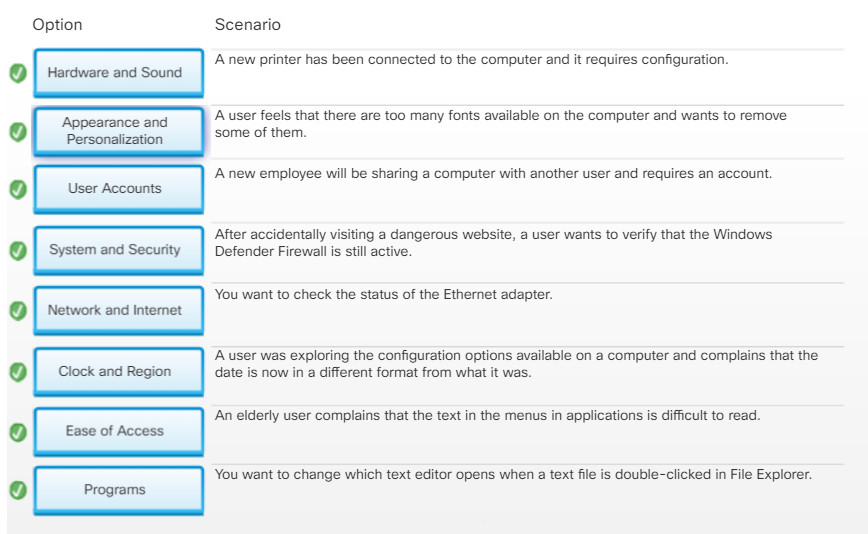
11.2.1.6 – Check Your Understanding – Control Panel Categories
11.2.2 – User and Account Control Panel Items
11.2.2.1 – User Accounts
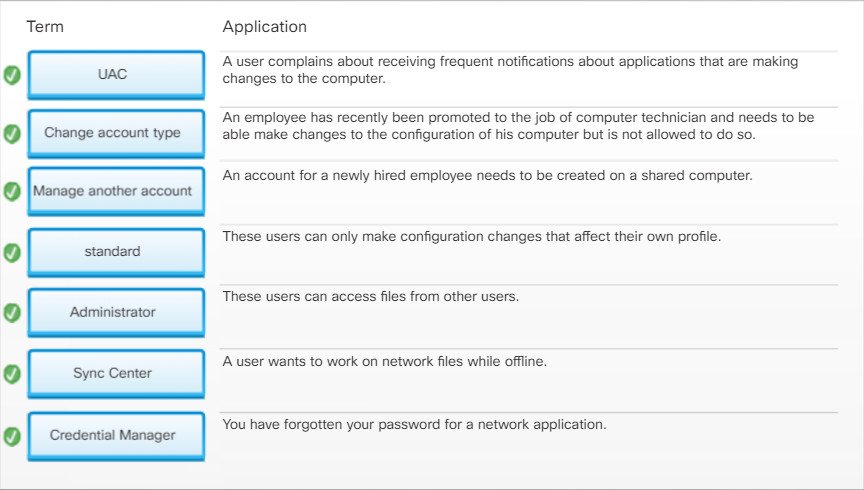
An administrative account is created when Windows is installed. To create a user account afterwards, open the User Accounts Control Panel item, as shown in the figure.
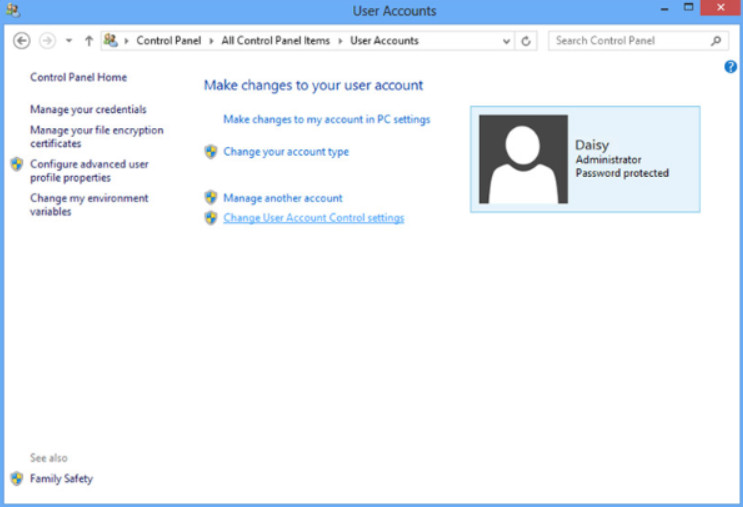
User Accounts Control Panel Options
Administrator accounts have the ability to change all system settings and access all files and folders on the computer. For that reason, administrator accounts should be carefully controlled. Standard user accounts can manage most configuration settings that don’t affect other users. They can only access their own files and folders.
The User Accounts Control Panel item provides options to help you create, change, and delete user accounts. It is very similar between Windows versions.
Note: Some features of the User Accounts utility require administrative privileges and will not be accessible with a standard user account.
11.2.2.2 – User Account Control Settings
The User Account Control (UAC) monitors programs on the computer and warns users when an action might present a threat to the computer. In Windows versions 7 through 10, you can adjust the level of monitoring that the UAC performs. When Windows is installed, the UAC for the primary account defaults to the setting “Notify me only when programs try to make changes to my computer,” as shown in the figure. You are not notified when you make changes to these settings.
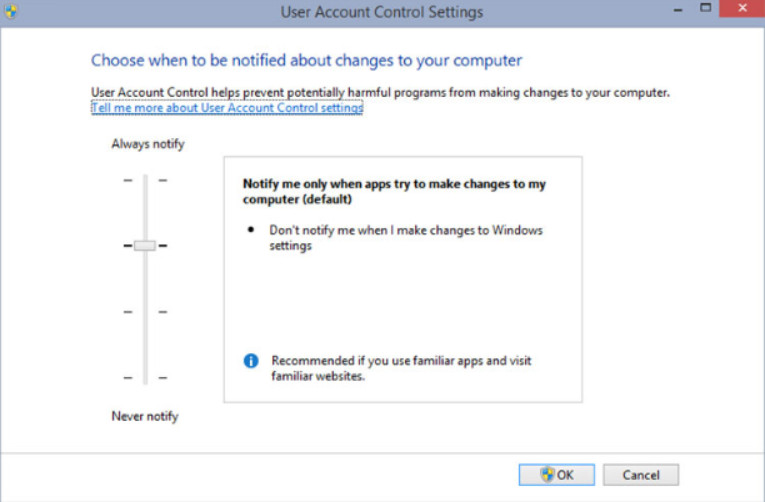
User Account Control Settings
To change when you are notified about changes that programs may make to your computer, adjust the level of UAC.
11.2.2.3 – Lab – User Accounts
In this lab, you will work with User Accounts Control Panel item create and modify users.
11.2.2.3 – Lab – User Accounts
11.2.2.4 – Credential Manager
Credential Manager helps you to manage passwords that are used for websites and Windows applications, as shown in the figure. These passwords and usernames are stored in a secure location. Credentials are automatically updated as they are created or changed. You can view, add, edit, or delete the credentials that are stored by Credential Manager.
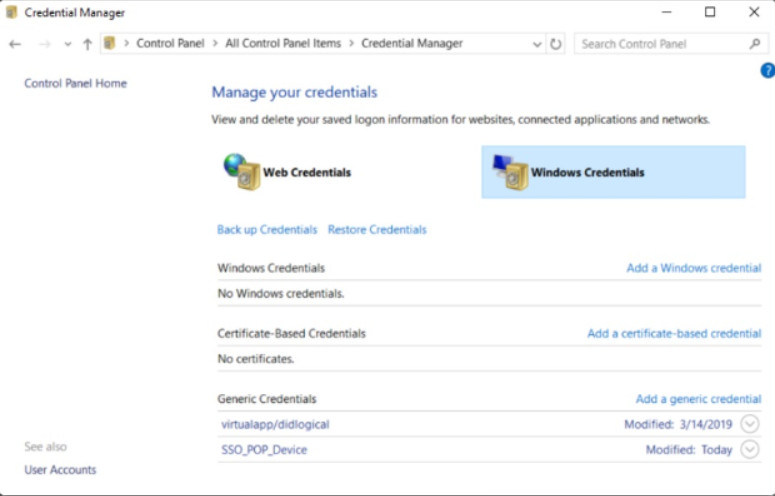
Credential Manager
Credential Manager has been enhanced since the Windows 7 version although the interface is similar.
Note: Web credentials are not saved for sites accessed by browsers other than Internet Explorer and Edge. Credentials created with other browsers must be managed from within that browser.
11.2.2.5 – Sync Center
Sync Center allows files to be edited from multiple Windows devices. While accessing networked files from multiple devices is nothing new, Sync Center allows a form of version control. This means that changes made to the networked files by one device will be made on all devices that are configured to synchronize those files. With this synchronization service, there is no need to physically copy a new version of a file from the device on which the changes were made to the device that you are currently working on. The updated file is on the networked storage location and the local versions are updated to the latest version automatically. When changes are made, those changes will be made to networked file too. All devices must be able to connect to the same networked storage location.
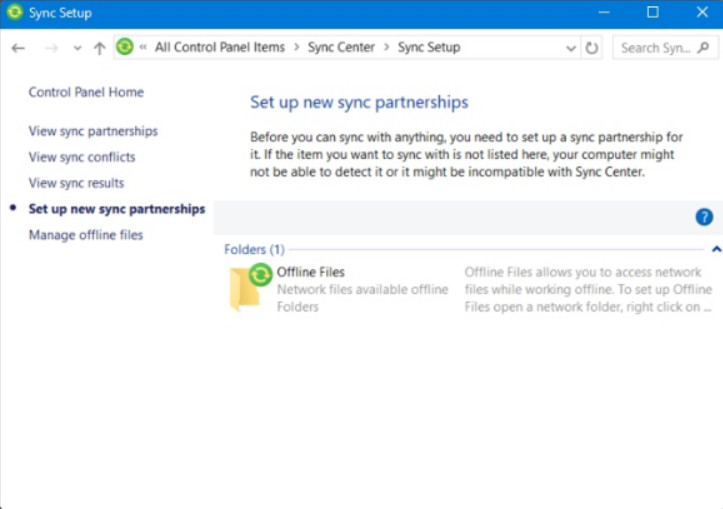
Sync Center
Another value to Sync Center is that users can work on files on a device that is offline and the server copy can be updated over the network when the device reconnects.
Using Sync Center requires activation of the Offline Files feature. This sets up a local file location that will store the files to be synchronized. It also requires you to set up a sync partnership with the networked file location. Files can be synchronized manually and synchronization can also be scheduled to occur automatically.
Microsoft OneDrive offers a similar service. OneDrive is a cloud storage service that is available to Microsoft Windows users. Since OneDrive is reachable over the internet, work can be done on any device that can connect to OneDrive from any location with internet access. Sync Center requires access to a network server that may not be reachable from networks in other locations.
11.2.2.6 – Check Your Understanding – User and Account Control Panels
11.2.2.6 – Check Your Understanding – User and Account Control Panels
11.2.3 – Network and Internet Control Panels
11.2.3.1 – Network Settings
Windows 10 has a new Settings app for network settings. It combines many different functions into one high-level app, as shown in the figure. The links in this app can point to new settings screens, Control Panel items, or even the Action Center. Some of the options, such as Airplane Mode, Mobile Hotspot, and Data Usage are more relevant to mobile devices than to desktop computers.
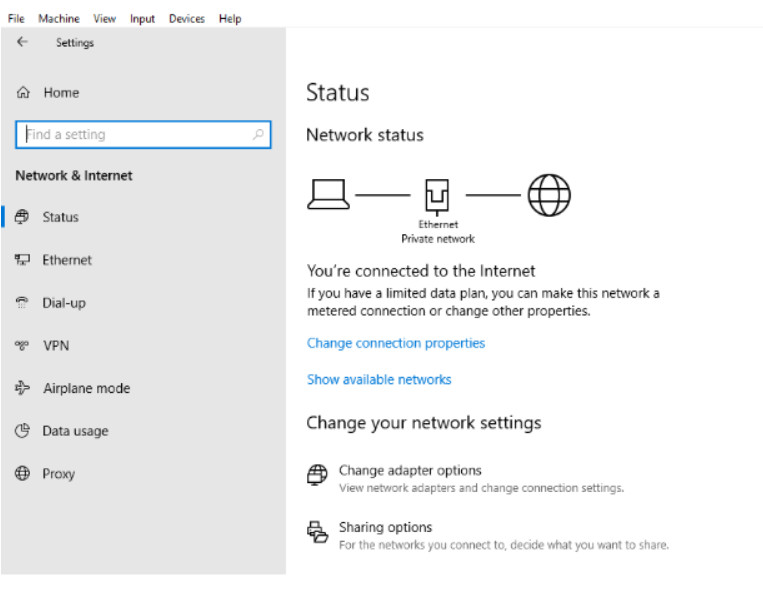
Network Settings
Mobile devices use Wireless Wide Area Network (WWAN) or cellular Internet access technology. WWAN requires using an adapter to link to a cellular provider’s network through the nearest base station or transmitter. WWAN adapters can be internal or external connected by USB. The bandwidth available over WWAN connections is dependent on the technologies supported by the adapter and the transmitter, such as 3G or 4G. Connection to the WWAN is automatic once the adapter and adapter software are installed.
11.2.3.2 – Internet Options
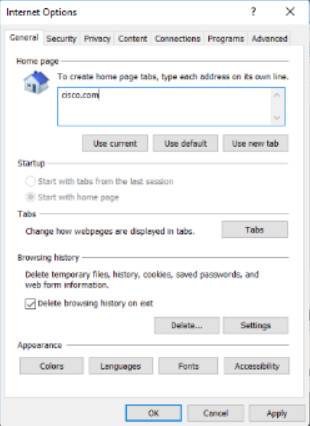
Configure basic internet settings, such as selecting the default home page, viewing and deleting browsing history, adjusting search settings, and customizing the browser appearance.
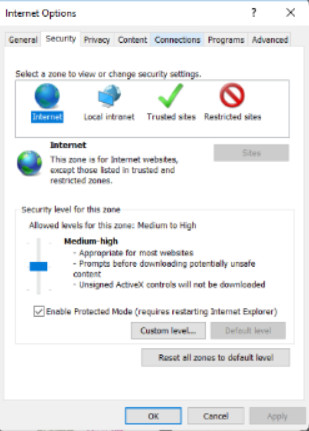
Adjust the security settings for the internet, local intranet, trusted sites, and restricted sites. Security levels for each zone can range from low (minimal security) to high (maximum security).
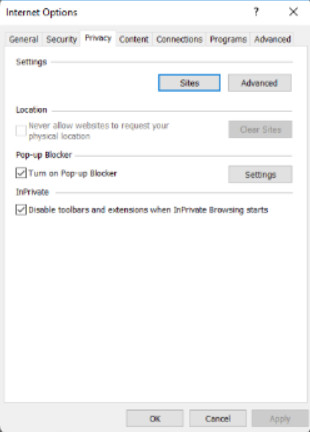
Configure privacy settings for the internet zone, manage location services, and enable the Pop-up Blocker.
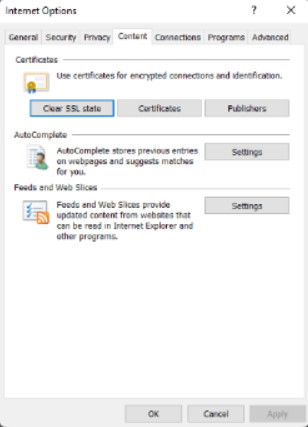
Access Parental Controls, control content viewed on the computer, adjust AutoComplete settings, and configure the feeds and web slices that can be viewed in IE. Web slices are specific content from websites that allow users to subscribe and view the updated content, such as current temperature and stock quotes.
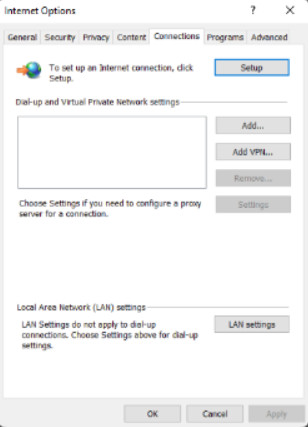
Set up an internet connection and adjust network settings. Dial-up, VPN, and proxy server settings can be managed in this tab. Use of a proxy server can improve performance and security. Internet requests from the client are sent to the proxy server which forwards them to the Internet. Return traffic is received by the proxy server which then forwards it to the client. The proxy server can cache pages and content that is frequently requested or requested by many clients which can reduce bandwidth. Configuring a proxy is done in Internet Options > Connections > LAN Settings.
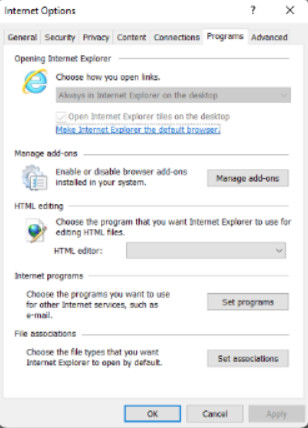
Make IE the default web browser, enable browser add-ons, select the HTML editor for IE, and select programs used for internet services. Hypertext Markup Language (HTML) is a system that tags text files to affect the appearance of web pages.
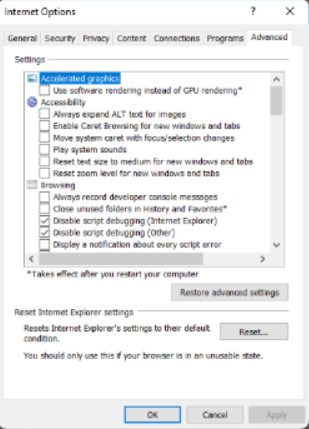
Adjust advanced settings, and reset IE’s settings to the default state.
11.2.3.3 – Network and Sharing Center
Network and Sharing Center allows an administrator to configure and review nearly all network settings on a Windows computer. With it, you can do everything from viewing network status to changing properties of the protocols and services that are running on a network adapter. Figures 1, 2, and 3 show the Network and Sharing Center for Windows 10, 8, and 7, respectively. Note that although they look very similar. Small differences exist between the versions.
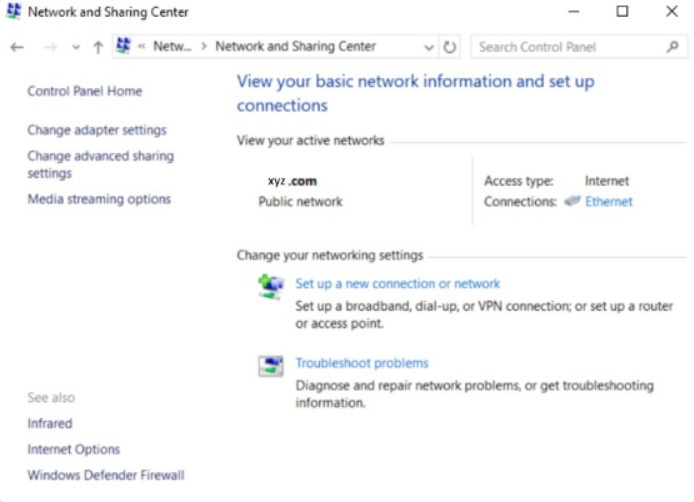
Windows 10 Network and Sharing Center
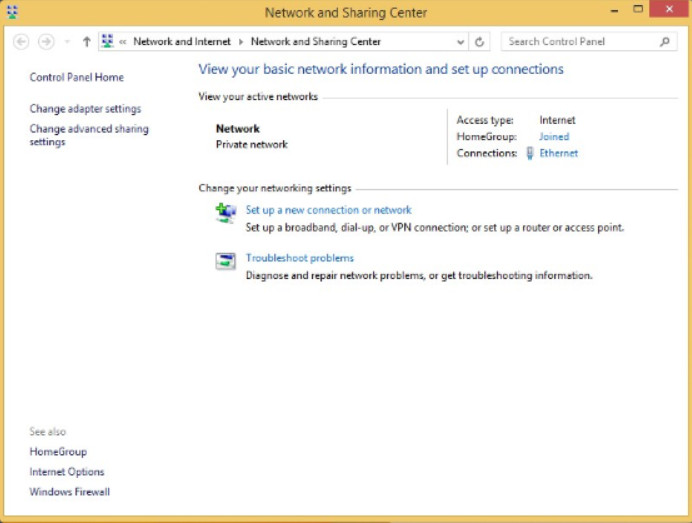
Windows 8 Network and Sharing Center
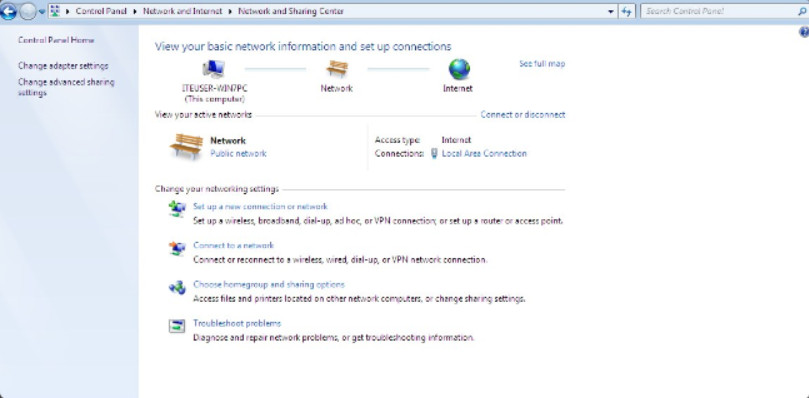
Windows 7 Network and Sharing Center
Network and Sharing Center shows how your computer connects to a network. Internet connectivity, if present, will also be displayed here. The window displays and allows the configuration of shared network resources. Some useful and common network-related tasks are displayed on the left pane of the window.
Network and Sharing center allows the configuration of file and device sharing through the use of network profiles. The network profiles enable basic sharing settings to change depending on whether you are attached to a private or public network. This enables sharing to be inactive on an insecure public network but active on a private secure network.
11.2.3.4 – HomeGroup
In Windows networking, a homegroup is a group of computers that are on the same network. Homegroups simplify sharing files on simple networks. They are intended to make networking in the home easier by requiring a minimum of configuration. You can share your library folders on the network, making it easy for other devices to access your music, videos, photos, and documents. Devices that are attached to computers in the homegroup can also be shared. Users will need the homegroup password in order to join the homegroup and access shared resources.
Homegroups were used in Windows 7 and 8. Microsoft has been phasing out the homegroup functionality. In Windows 8.1 homegroups cannot be created, however Windows 8.1 computers can join existing home groups. In newer versions of Windows 10 (version 1803 and higher), home group functionality is not available.
Figure 1 shows the Windows 8 home group configuration screen. In Windows 8, nothing is shared by default.
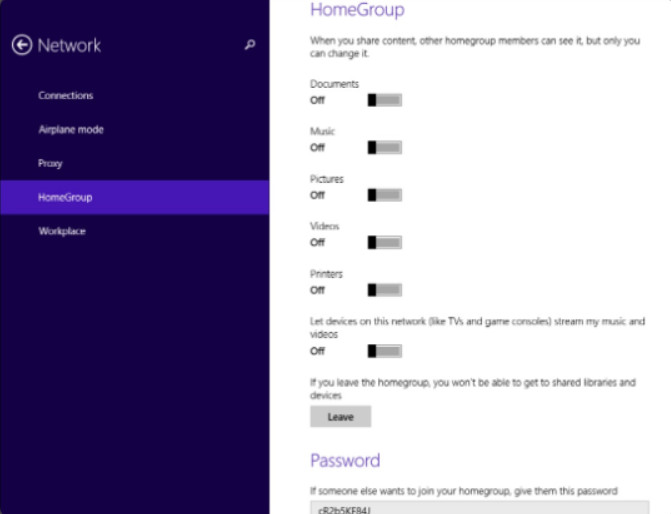
Windows 8.1 HomeGroup Configuration
Figure 2 shows the Windows 7 screen. Note that everything except for documents is shared by default.
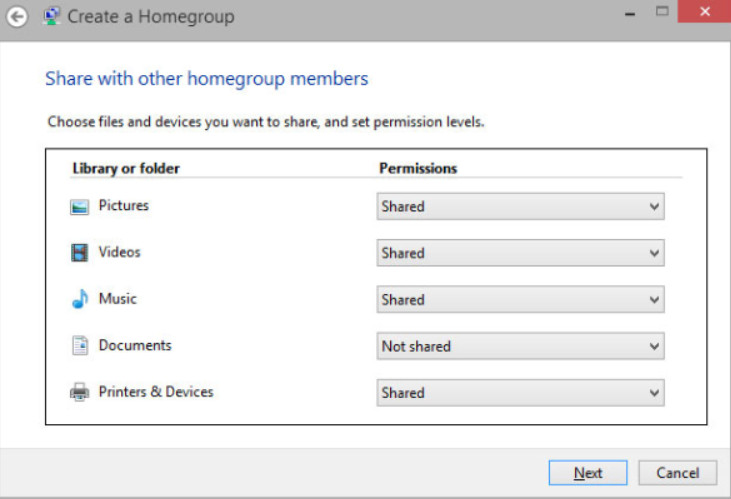
Windows 7 HomeGroup Configuration
11.2.3.5 – Lab – Configure Browser Settings
In this lab, you will configure Internet settings in Internet Explorer.
11.2.3.5 – Lab – Configure Browser Settings
11.2.3.6 – Check Your Understanding – Network and Internet Control Panel
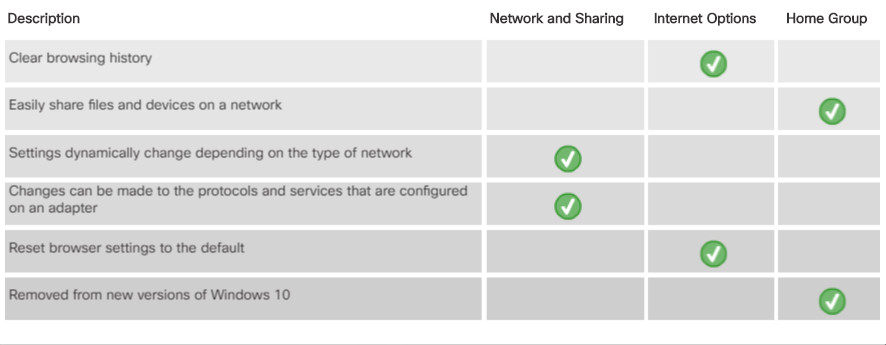
11.2.3.6 – Check Your Understanding – Network and Internet Control Panel
11.2.4 – Display Settings and Control Panel
11.2.4.1 – Display Settings and Configuration
In Windows 10, much of the Appearance and Personalization configuration has been moved to the Settings app, as shown in Figure 1. The Windows 10 display settings are reached by right-clicking an empty area of the desktop and selecting Display settings from the context menu. Alternatively, the Settings app can be opened. Display settings are available in the System category.
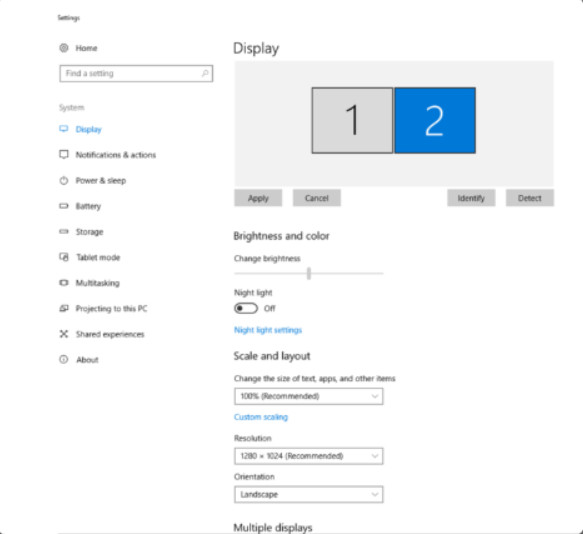
Display Settings in Windows 10
You can change the appearance of the desktop by modifying the resolution that is output by the graphics adapter. If the screen resolution is not set properly, you might get unexpected display results from different video cards and monitors. You can also change the magnification of the desktop and text size in Windows interface elements. The Windows 8.1 Display control panel item is shown in Figure 2. In Windows 7 and 8, the Display Control Panel item is found in the Hardware and Sound category.
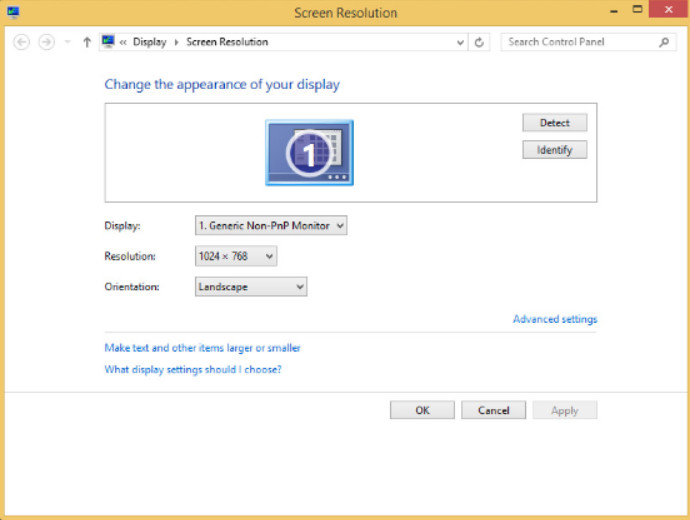
Windows 8.1 Display Control Panel Item
When using an LCD screen, set the resolution to the recommended setting. This will set the resolution to the native resolution, which sets the video output to the same number of pixels that the monitor has. If you do not use native resolution, the monitor does not produce the best picture
11.2.4.2 – Display Features
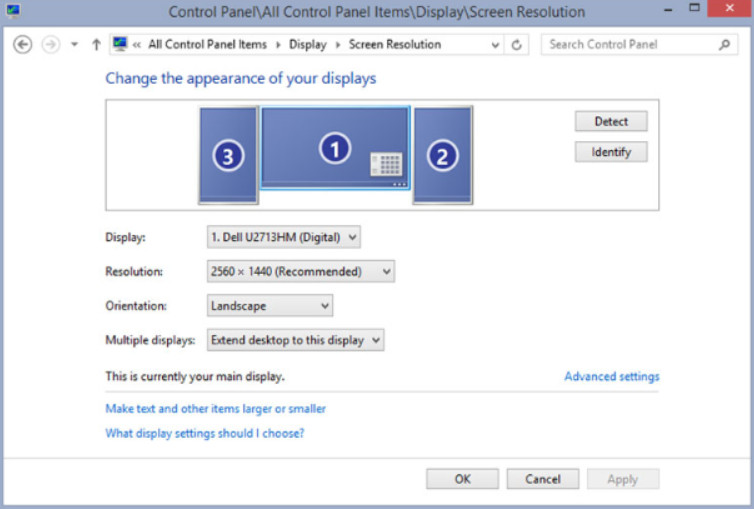
You can adjust the following features in the Windows 8 and 7 Display control panel item:
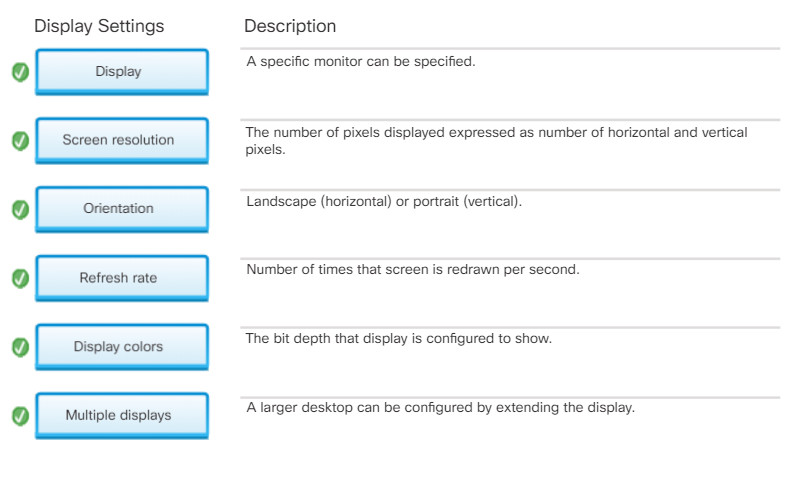
- Display – A specific monitor can be configured if there is more than one monitor.
- Screen resolution – This specifies the number of pixels horizontally and vertically. A higher number of pixels provides better resolution. Typically expressed as horizontal pixels x vertical pixels or 1920 x 1080, for example.
-
Display Features
- Orientation – This determines whether the display appears in Landscape, Portrait, flipped Landscape, or flipped Portrait orientation.
- Refresh rate – This sets how often the image in the screen is redrawn. The refresh rate is in Hertz (Hz). 60Hz means the screen is redrawn 60 times per second. The higher the refresh rate, the steadier the screen image appears. However, some monitors cannot handle all refresh rate settings.
- Display colors – In older systems, the number of colors to display, or the bit depth, needed to be set to a value that is compatible with graphics adapter and monitor. The higher the bit depth, the greater the number of colors. For example, the 24-bit color (True Color) palette contains 16 million colors. The 32-bit color palette contains 24-bit color and 8 bits for other data such as transparency.
- Multiple displays – Some computers or graphics cards permit the attachment of two or more monitors to the same computer. The desktop can be extended, meaning the displays combine to make one large display, or mirrored, meaning the same image is shown on all displays.
11.2.4.3 – Check Your Understanding – Display Features
11.2.4.3 – Check Your Understanding – Display Features
11.2.5 – Power and System Control Panels
11.2.5.1 – Power Options
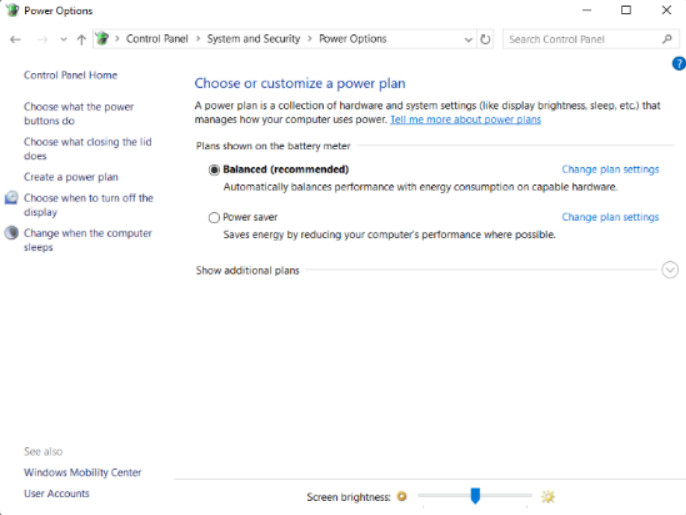
The Power Options Control Panel item allows you to change the power consumption of certain devices or the entire computer. Use Power Options to maximize battery performance or conserve energy by configuring a power plan. Power plans are a collection of hardware and system settings that manage the power usage of the computer. The figure shows the Power Options Control Panel item in Windows 10. It varies slightly in Windows 7 and 8. One important difference is that that the setting that requires a password when the computer wakes has been moved from Power Options to User Accounts in Windows 10. This is an important setting for data security.
Power Options
Windows has preset power plans. These are default settings that were created when Windows was installed. You can use the default settings or create your own customized plans that are based on specific work or device requirements.
Note: Windows automatically detects some devices that are part of the computer and creates power settings accordingly. Therefore, the Power Options settings will vary based on the hardware that is detected.
11.2.5.2 – Power Options Settings
The Power Options Control Panel item is part of the System and Security Control Panel category. The Widows 8 Power Options are shown in the figure.
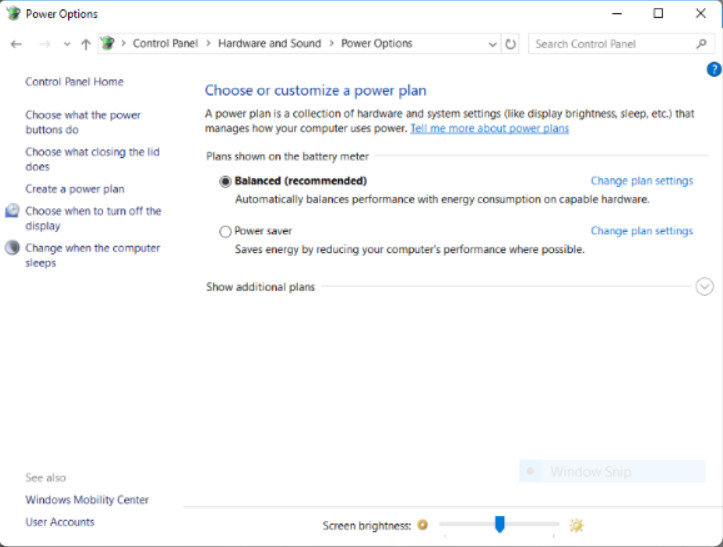
Power Options Settings
You can choose from the following options:
- Require a password on wakeup (Windows 7 and 8 only)
- Choose what the power buttons do
- Choose what closing the lid does (for laptops only)
- Create a power plan
- Choose when to turn off the display
- Change when the computer sleeps
11.2.5.3 – Power Options Actions
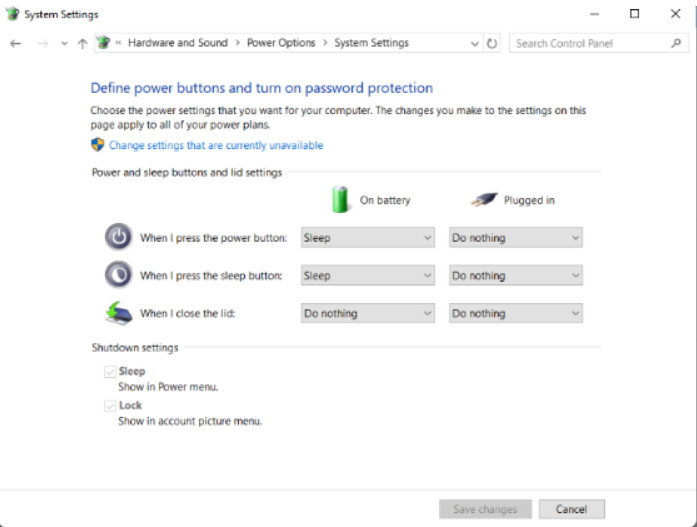
Power Options Actions
Selecting Choose what the power buttons do, or Choose what closing the lid does, configures how a computer acts when power or sleep buttons are pressed, or the lid is closed. Some of these settings also appear as shutdown options for the Windows Start button or the Windows 10 Power button. If users do not want to completely shut down a computer, the following options may be available:
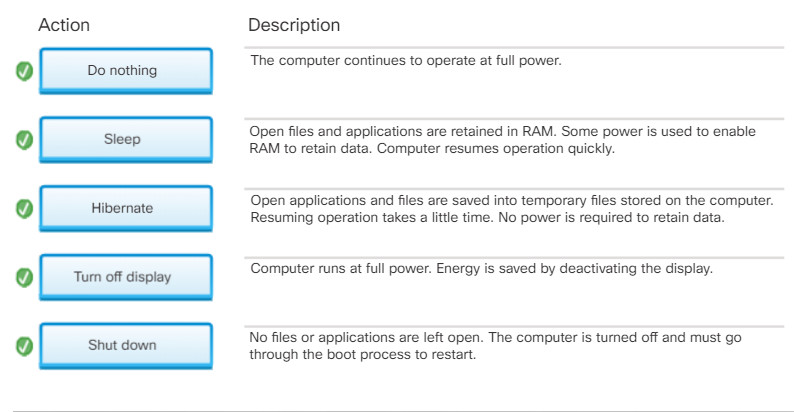
- Do nothing – The computer continues to run at full power.
- Sleep – Documents, applications, and the state of the operating system are saved in RAM. This allows the computer to power on quickly, but uses power to retain the information in RAM.
- Hibernate – Documents, applications, and the state of the operating system are saved to a temporary file on the hard drive. With this option, the computer takes a little longer to power on than the Sleep state, but does not use any power to retain the information on the hard drive.
- Turn off the display – The computer operates at full power. The display is turned off.
- Shut down – Shuts down the computer.
11.2.5.4 – Check Your Understanding – Power Options
11.2.5.4 – Check Your Understanding – Power Options
11.2.5.5 – System Control Panel Item
The System Control Panel item allows all users to view basic system information, access tools, and configure advanced system settings. The System Control Panel item is found under the System and Security category. The Windows 10 System Control Panel item is shown in Figure 1. The System Control Panel item is very similar in Windows 7 and 8.
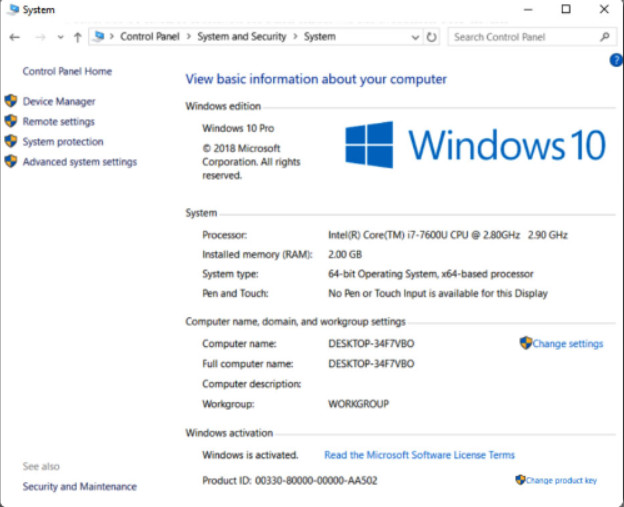
System Control Panel Item
The various settings can be accessed by clicking the links on the left panel.
11.2.5.6 – System Properties
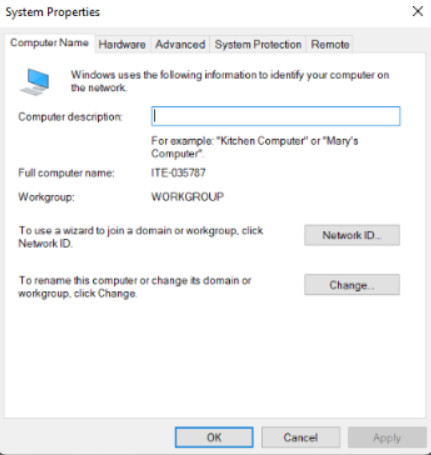
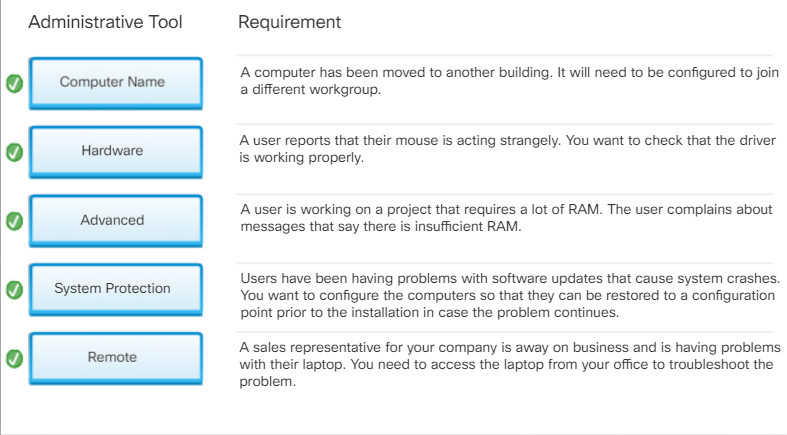
View or modify the name and workgroup settings for a computer, as well as change the domain or workgroup.
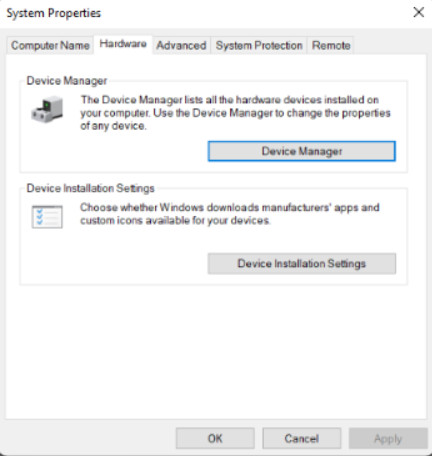
Access the Device Manager or adjust the device installation settings.
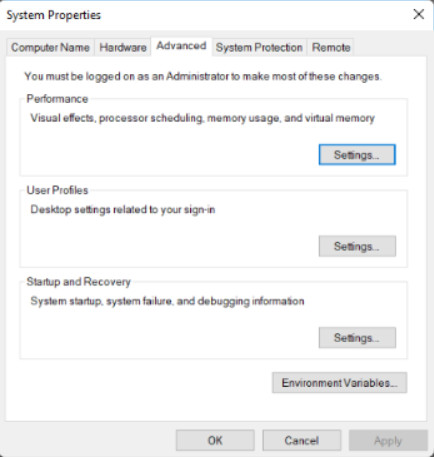
Configure settings for performance, user profiles, startup, and recovery.
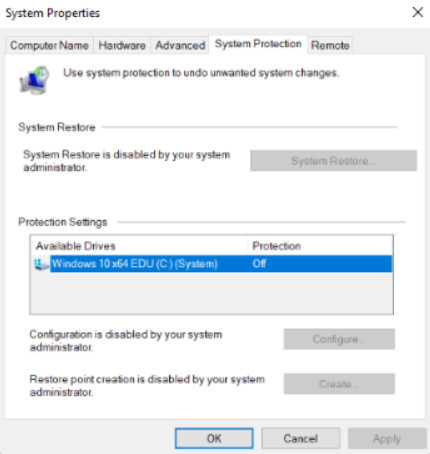
Access System Restore, which will return a computer to an earlier configuration, and configure settings enable system restore points, and the amount of disk space that is used for them.
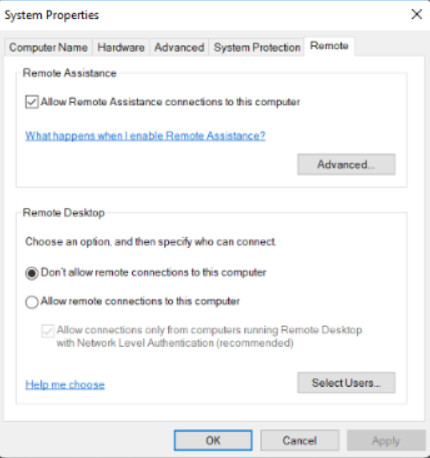
Adjust settings for Remote Assistance and Remote Desktop. This will allow other people to connect to a computer to view or work on it.
11.2.5.7 – Increasing Performance
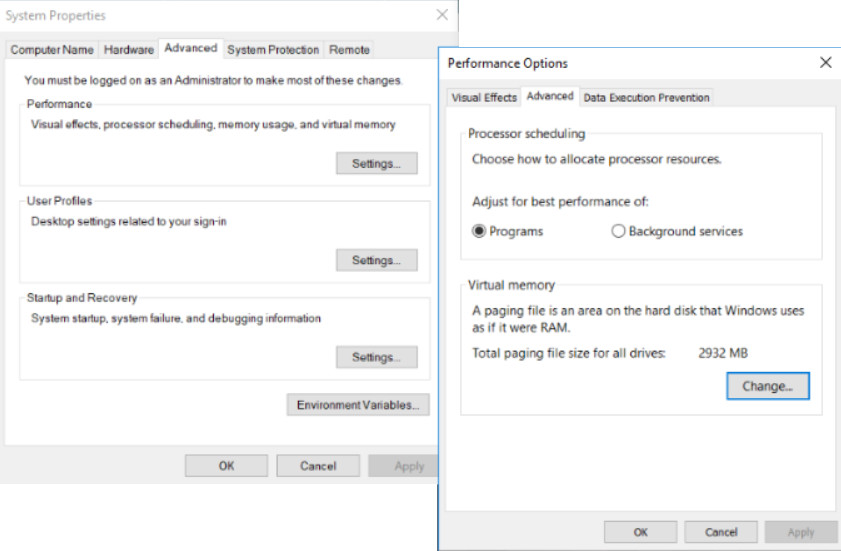
To enhance the performance of the OS, you can change the virtual memory configuration settings, as shown in the figure. When Windows determines that system RAM is insufficient, it will create a paging file on the hard drive that contains some of the data from RAM. When the data is required back in RAM, it is read from the paging file. This process is much slower than accessing the RAM directly. If a computer has a small amount of RAM, consider purchasing additional RAM to reduce paging.
Increasing Performance
Another form of virtual memory is the use of an external flash device and Windows ReadyBoost to enhance system performance. Windows ReadyBoost enables Windows to treat an external flash device, such as a USB drive, as hard drive cache. ReadyBoost will not be available if Windows determines that no performance improvement will be gained.
To activate Windows ReadyBoost, insert a flash device and right-click the drive in File Explorer. Click Properties and select the ReadyBoost tab
11.2.5.8 – Lab – Manage Virtual Memory
In this lab, you will use the System Control Panel item to configure and manage virtual memory.
11.2.5.8 – Lab – Manage Virtual Memory
11.2.5.9 – Check Your Understanding – Power Options and System Properties
11.2.5.9 – Check Your Understanding – Power Options and System Properties
11.2.6 – Hardware and Sound Control Panels
11.2.6.1 – Device Manager
Device Manager, shown in Figure 1, displays a list of all the devices installed in the computer, allowing you to diagnose and resolve device problems.

Device Manager
You can view details about the installed hardware and drivers, as well as perform the following functions:
- Update a driver – Change the currently installed driver.
- Roll back a driver – Change the currently installed driver to the previously installed driver.
- Uninstall a driver – Remove a driver.
- Disable a device – Disable a device.
Device Manager organizes devices by type. To view the actual devices, expand the appropriate category. You can view the properties of any device in the computer by double-clicking the device name.
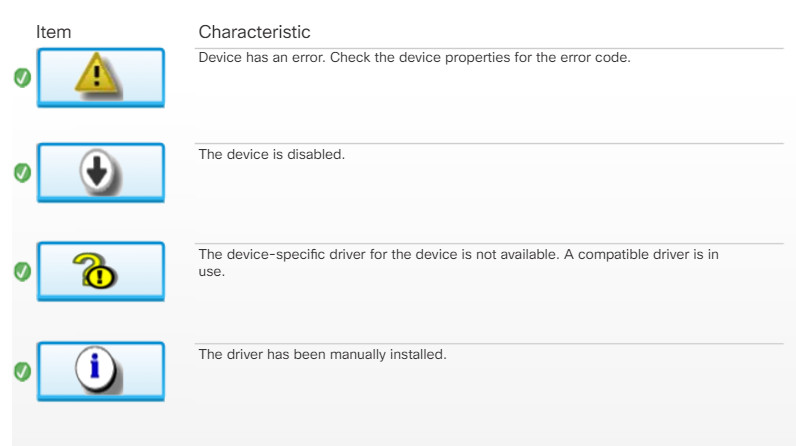
The Device Manager utility uses icons to indicate the types of problems that may exist with a device, as indicated in the icons that are shown in Figure 2.
Device Manager Status Icons
The devices that are available in Device Manager vary from computer to computer. Device Manager is very similar in Windows versions 7, 8, and 10.
11.2.6.2 – Lab – Use Device Manager
In this lab you will investigate Device Manager.
11.2.6.2 – Lab – Use Device Manager
11.2.6.3 – Devices and Printers
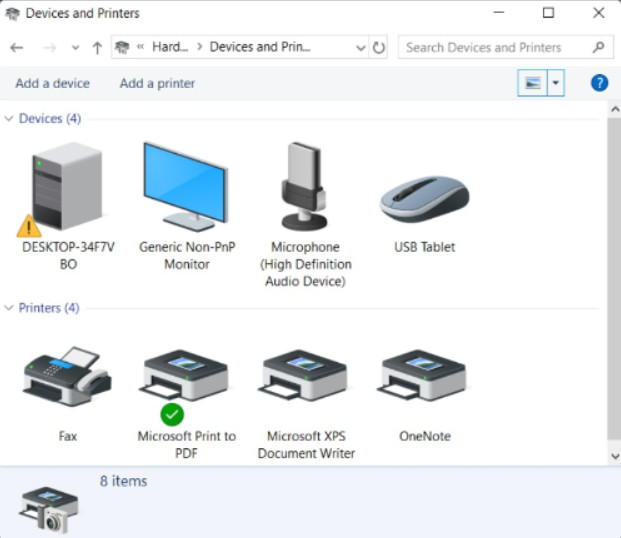
Use the Devices and Printers Control Panel item for a high-level view of the devices connected to a computer, as shown in the figure. Devices displayed in the Devices and Printers Control Panel item are typically external devices you can connect to your computer through a port such as USB, or a network connection. Devices and Printers also allows you to quickly add a new device to the computer. In most cases, Windows will automatically install any necessary drivers that are required by the device. Note that the desktop computer device in the figure shows a yellow triangle alert, indicate that there is a problem with the driver. The green check mark next to a device indicates that is to be used as the default device. Right-click on a device to view its properties.
Devices typically shown in Devices and Printers include:
- Portable devices that you occasionally connect to your computer, such as mobile phones, personal fitness devices, and digital cameras.
- Devices you plug into a USB port on your computer, such as external USB hard drives, flash drives, webcams, keyboards, and mice.
- Printers connected to your computer or available on the network.
- Wireless devices connected to your computer, such as Bluetooth and wireless USB devices.
- Compatible network devices connected to your computer, such as network-enabled scanners, media extenders, or Network Attached Storage devices (NAS).
Devices and Printers is very similar in Windows versions 7, 8, and 10.
Devices and Printers in Windows 10
11.2.6.4 – Sound
Use the Sound Control Panel item to configure audio devices or change the sound scheme of the computer. For example, you can change the email notification sound from a beep to a chime. Sound also allows a user to choose which audio device is to be used for playback or recording.
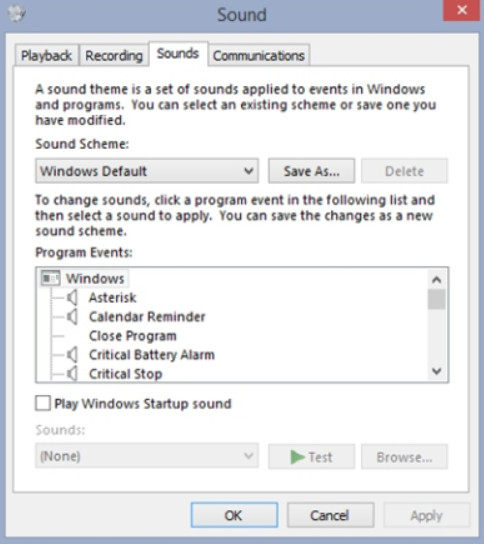
The Sound Control Panel Item
The Sound Control Panel utility is largely unchanged between Windows 7, 8, and 10.
11.2.6.5 – Check Your Understanding – Device Manager Alerts
11.2.6.5 – Check Your Understanding – Device Manager Alerts
11.2.7 – Clock, Region, and Language
11.2.7.1 – Clock
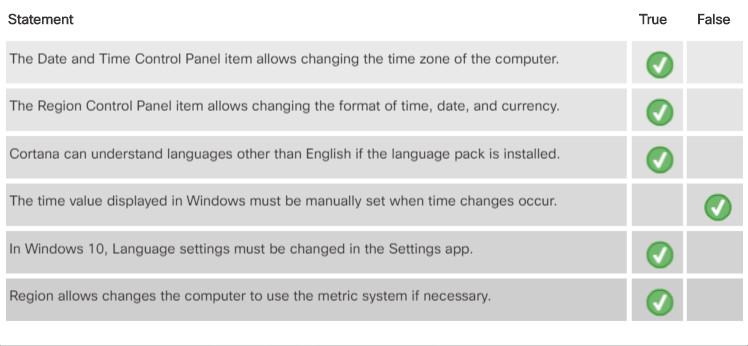
Windows allows you to change the system time and date through the Date and Time control panel item, as shown in the figure. You can also adjust your time zone. Windows will automatically update the time settings when time changes occur. The Windows clock will automatically synchronize with a time authority on the internet. This ensures that the time value is accurate.
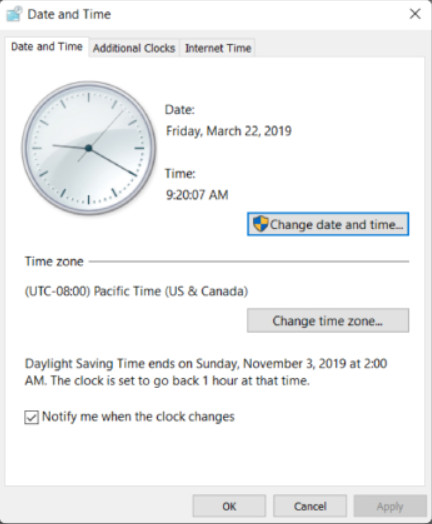
Windows 10 Date and Time
Time and Date is accessed through the Clock and Region Control Panel category in Windows 10. In Windows 7 and 8, it is accessed through the Clock, Language, and Region Control Panel category.
11.2.7.2 – Region
Windows allows you to change the format of numbers, currencies, dates, and times by using the Region Control Panel item. In Windows 7 there were tabs available to allow changing the system keyboard layout and language, and the computer location. In Windows 8 the keyboard and language tab was removed. Windows 10 attempts to use location services to automatically detect the location of the computer. The location can also be set manually if the location can’t be determined. The Windows 8 and Windows 10 Region Control Panel item are shown in Figures 1 and 2 respectively.
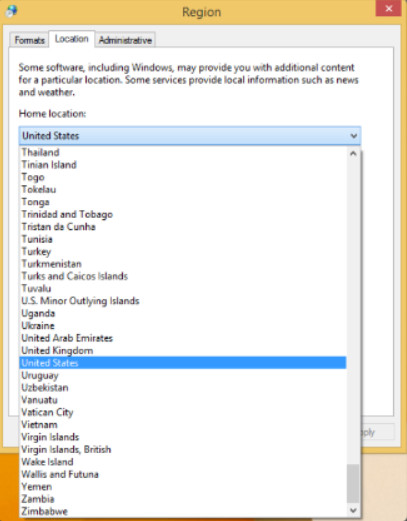
Windows 8 Region Control Panel Item With Location
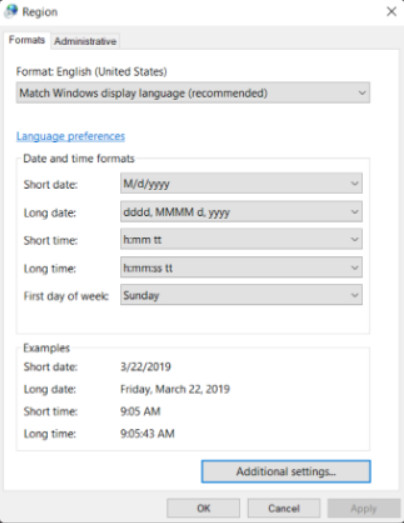
Windows 10 Region Control Panel Item
Date and time setting formats can be changed by changing the display patterns available in the Date and Time formats area. Click Additional settings to change number and currency formats and the measurement system used in the region. Additional date and time formats are also available.
11.2.7.3 – Language
In Windows 7 and Windows 8, shown in Figure 1, Language can be configured through Control Panel items. This allowed users to install language packs that included fonts and other resources required by different languages.
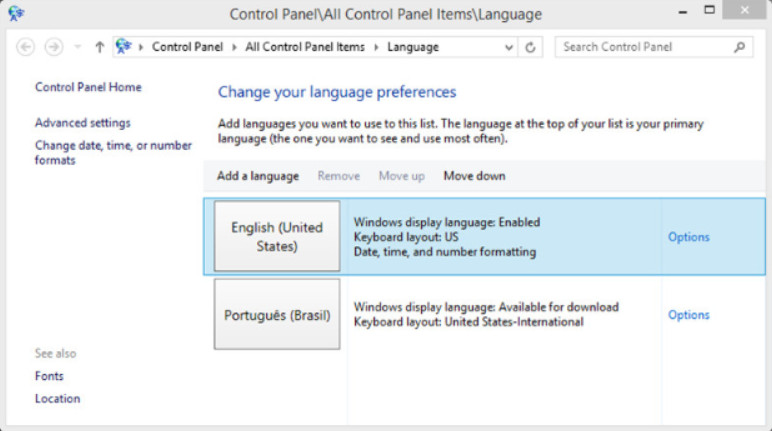
Windows 8 Language Configuration
In Windows 10, this was moved to the Region settings app, shown in Figure 2. When adding a language, you can even choose to install Cortana support for voice commands in that language, if available.
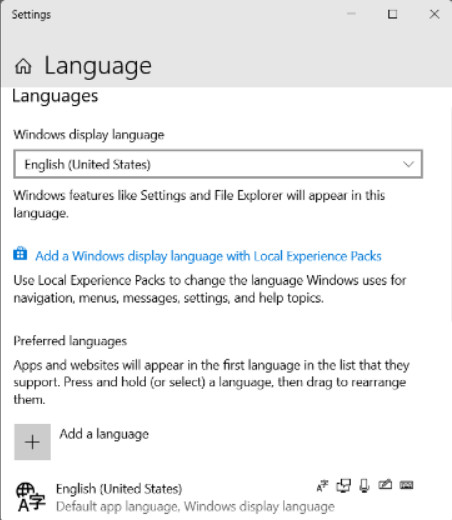
Windows 10 Language Settings
11.2.7.4 – Lab – Region and Language Options
In this lab, you will examine region and language options in Windows.
11.2.7.4 – Lab – Region and Language Options
11.2.7.5 – Check Your Understanding – Clock, Region, and Language
11.2.7.5 – Check Your Understanding – Clock, Region, and Language
11.2.8 – Programs and Features Control Panels
11.2.8.1 – Programs
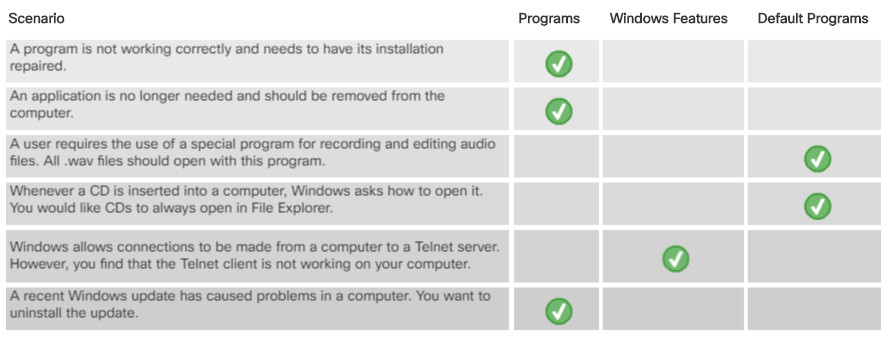
Use the Program and Features Control Panel items to uninstall a program from your computer if you no longer use it or if you want to free up space on your hard disk, as shown in the figure. It is important that applications be uninstalled either through the Programs and Features Control Panel item or from an uninstallation menu choice that is associated with the application in the Start menu.
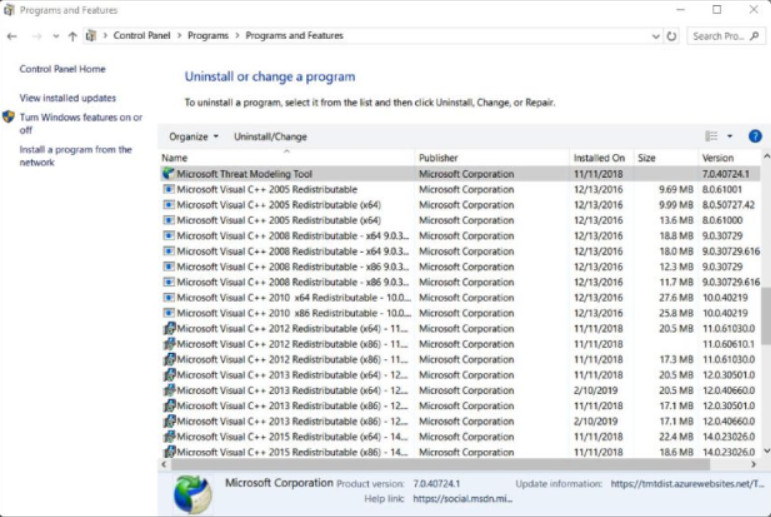
Uninstall Programs
In addition, you can repair the installation of some programs that may have problems. You can also troubleshoot problems with programs that were made for older versions of Windows that are not running correctly.
Finally, you can choose to manually install software from the network. It is possible that your organization provides updates or patches that could require manual installation.
11.2.8.2 – Windows Features and Updates
You can also activate or deactivate Windows features, as shown in the figure. Programs and Features also allows you to view the Windows updates that have been installed, and uninstall specific updates if they are causing problems and don’t have dependencies with other installed updates or software.
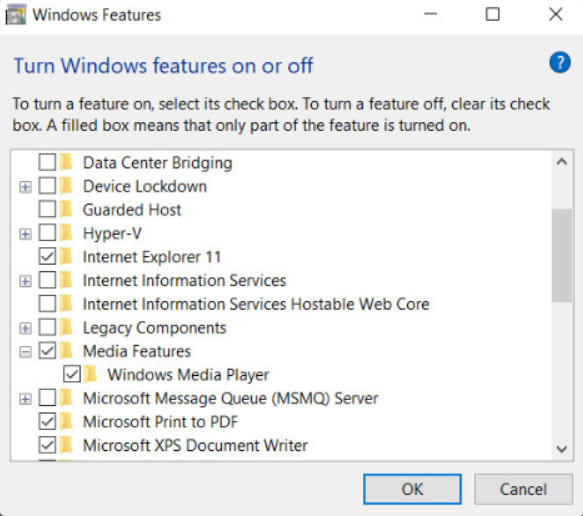
Configure Windows Features
11.2.8.3 – Default Programs
The Default Programs Control Panel item provides the means to configure the way that Windows handles files and the applications that are used to work with them, as shown in the figure. For example, if you have multiple web browsers installed, you can choose which web browser will open to view a link that you have clicked on in an email or other file.
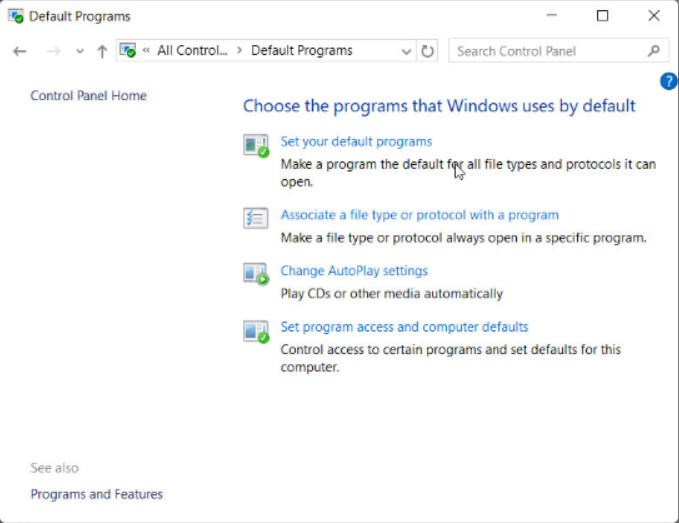
This can be done by choosing default applications, or by choosing which application opens for a specific file type. For example, you configure a JPEG graphics file to open in a browser, for viewing, or in a graphics editor.
Finally, you can choose how AutoPlay works. You can select how Windows will automatically open files of different types depending on the type of removable storage media that they are stored on. You can select to have audio CDs open automatically in Windows Media Player, or have a Windows File Explorer display a directory of the disk contents.
Windows 10 uses a settings app for all but the AutoPlay configuration. Windows 7 and 8 use Control Panel utilities.
11.2.8.4 – Check Your Understanding – Programs and Features
11.2.8.4 – Check Your Understanding – Programs and Features
11.2.9 – Other Control Panels
11.2.9.1 – Troubleshooting
The Troubleshooting Control Panel item has a number of built-in scripts that are used to identify and solve common problems with many Windows components, as shown in the figure. The scripts run automatically and can be configured to automatically make the changes to fix the problems that are found. You can also view when the troubleshooting scripts have been run in the past by using the View History feature.
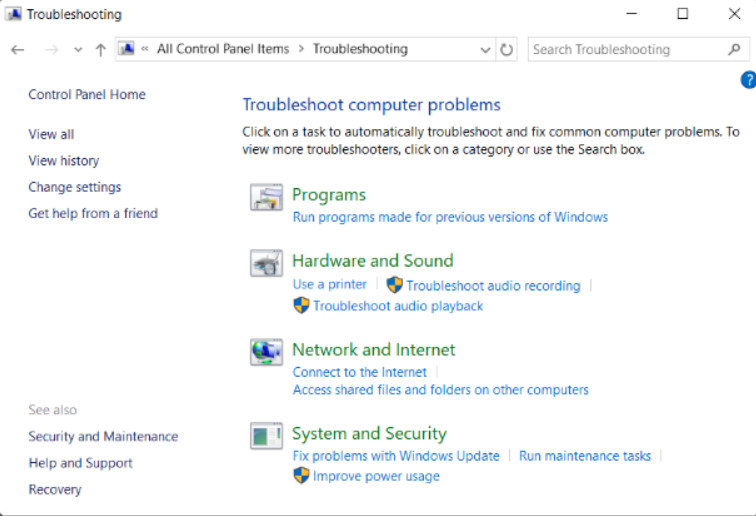
Windows 10 Troubleshooter Categories
11.2.9.2 – BitLocker Drive Encryption
BitLocker is a service provided with Windows that will encrypt an entire volume of disk data so that it can’t be read by unauthorized parties. Data can be lost if your computer or disk drives are stolen. In addition, when the computer is taken out of service, BitLocker can help insure that the hard drive can’t be read when it has been removed from the computer and scrapped.
The BitLocker Control Panel item, shown in the figure, enables you to control the way BitLocker operates.
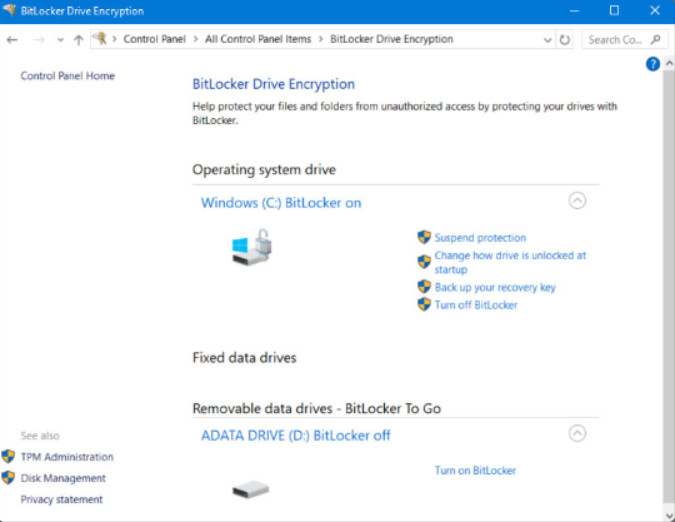
BitLocker Control Panel Item
11.2.9.3 – File Explorer and Folder Options
The Folder Option Control Panel item permits changing a variety of settings regarding the way files are displayed in Windows Explorer or File Explorer. This Control Panel item is called File Explorer Options in Windows 10, and Folder Options in Windows 7 and 8.1 The Windows 10 File Explorer Options Control Panel item is shown in Figure 1. The Windows 7 and 8 version is very similar. The Windows 8 version is shown in Figure 2.
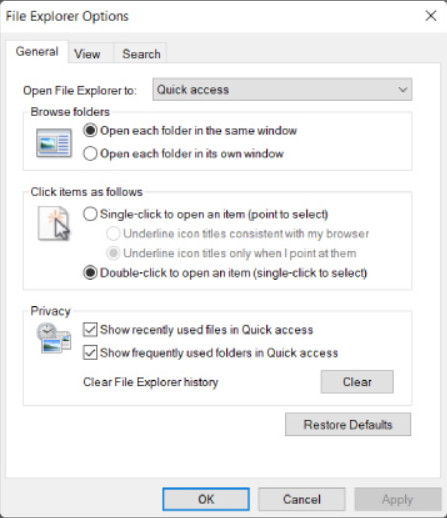
Windows 10 File Explorer Folder Options
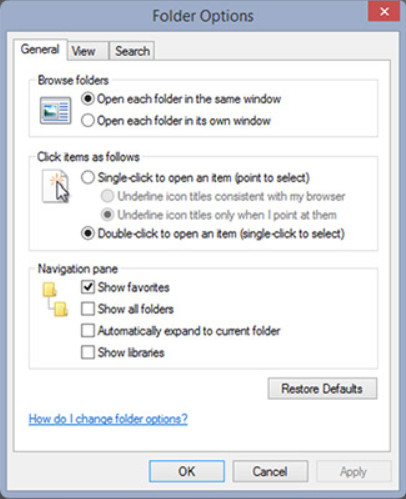
Folder Options in Windows 8.1
In Windows 10, many of the most commonly used file and folder options can be found in the File Explorer ribbon. In Windows 8.1 some functions are present in the ribbon, but the selection is not as comprehensive as it is in Windows 10. In Windows 7, there is no ribbon, so the Control Panel must be used.
The functions of the tabs in Windows 10 are described below.
The General tab is used to adjust the following settings:
- Browse folders – Configures how a folder is displayed when it is opened.
- Click items as follows – Specifies the number of clicks required to open an item.
- Privacy – Determines which files and folders are shown in Quick Access. Also allows File History to be cleared.
The View tab is used to adjust the following settings:
- Folder views – Applies the view settings for a folder being viewed to all folders of the same type.
- Advanced settings – Customizes the viewing experience including the ability to view hidden files and file extensions.
The Search tab is used to adjust the following settings:
- What to search (Windows 7) – Configures search settings based on indexed and non-indexed locations to make files and folders easier to find.
- How to search – Choose whether an indexed search is used.
- When searching non-indexed locations – Determines whether system directories, compressed files and file contents are included when searching non-indexed locations.
11.2.9.4 – Check Your Understanding – Other Control Panels
- What can be done with the BitLocker Control Panel?
- Protect emails from being intercepted and read while on the network.
- Configure encryption of the data on an entire volume.*
- Read data belonging to other users.
- Prevent storage devices from being lost or stolen.
- What is the purpose of the Troubleshooting Control Panel item?
- To find solutions to common Windows problems.*
- To install Windows patches.
- To locate Windows features and components.
- To review security logs.
- Why is the File Explorer Options control panel useful?
- You can select which applications open different types of files.
- You can show and hide the File Explorer ribbon.
- The language used in file names can be changed.
- The behavior and appearance of File Explorer files and folders can be customized.*
11.3 – System Administration
11.3.1 – Administrative Tools
11.3.1.1 – Administrative Tools Control Panel Item
The Administrative Tools Control Panel item is a collection of tools that are used to monitor and configure Windows operation. This Control Panel item has evolved over time. In Windows 7 it was somewhat limited. Microsoft added many different utilities in Windows 8.1. In Windows 10, the available tools changed slightly.
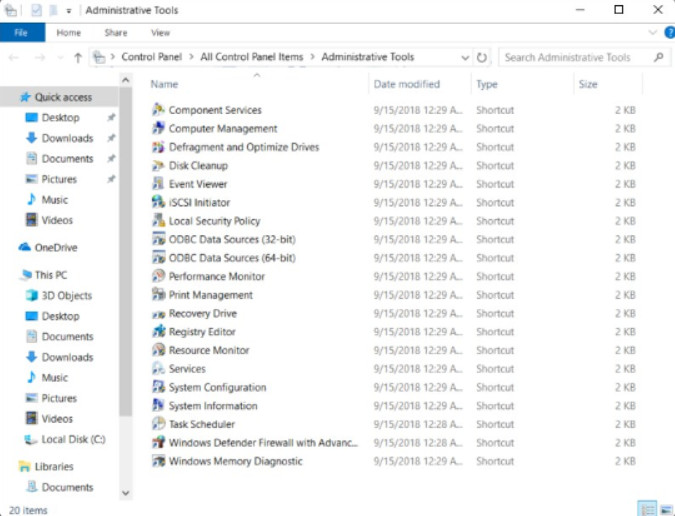
Administrative Tools Control Panel Item
The Administrative Tools Control Panel item is unusual in that it is a collection of shortcuts that open in File Explorer. Since each icon represents a shortcut to an application, investigate the properties of each shortcut to see the name of the application file that is run when the shortcut is clicked. You can start the same applications by typing the name of application at the command prompt. Once you become experienced with managing Windows, this may be the most efficient way for you to access the tools you need. The figure shows the Administrative Tools Control Panel item in Windows 10.
11.3.1.2 – Computer Management
One of the Administrative Tools items is the Computer Management console, shown in the figure. It allows you to manage many aspects of your computer and remote computers in one tool.
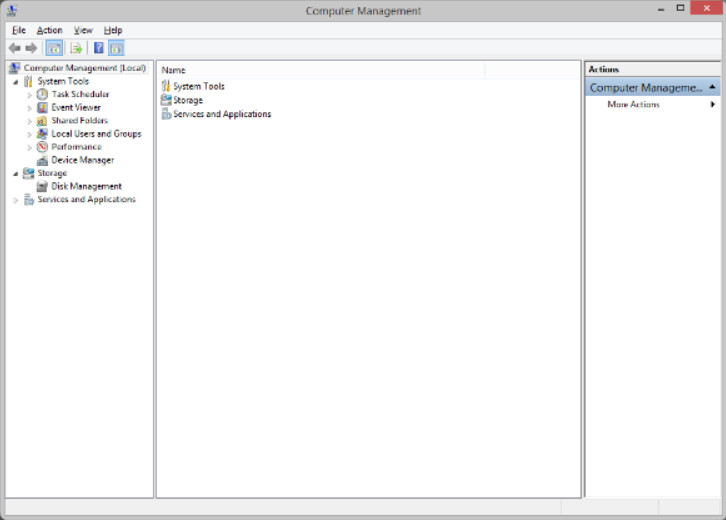
Computer Management
The Computer Management console provides access to three groups of utilities. Here we will learn about the System Tools group.
Conveniently, the Computer Management tool can be accessed by right-clicking This PC in Windows 8.1 or 10, or by right-clicking Computer in Windows 7 and 8 and selecting Manage. Administrator privileges are required to open Computer Management.
To view the Computer Management console for a remote computer, follow these steps:
- Step 1. In the console tree, click Computer Management (Local) and select Connect to another computer.
- Step 2. Enter the name of the computer or click Browse to find the computer to manage on the network.
11.3.1.3 – Event Viewer
Event Viewer, shown in the figure, allows viewing the history of application, security, and Windows system events. These events are stored in log files. They are a valuable troubleshooting tool because they provide information necessary to identify a problem. Event Viewer permits filtering and customization of log views to make it easier to find important information from the various log files that Windows compiles.
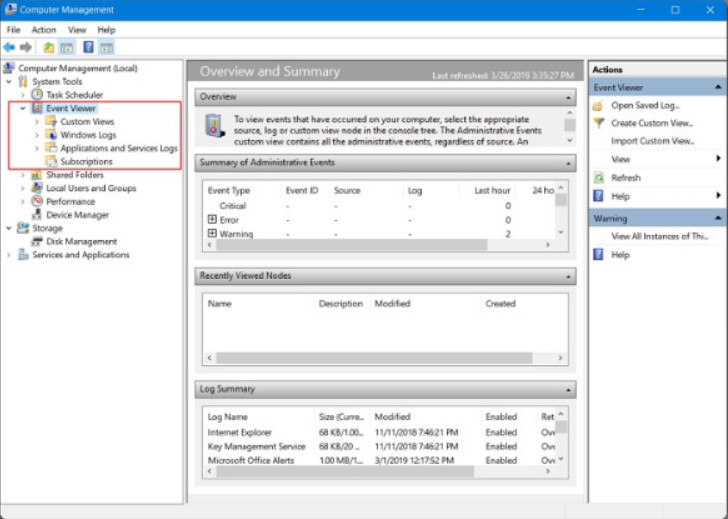
Event Viewer
Windows logs many events that can originate from applications, the Windows OS, application setup, and security events, by default. Each message is identified by its type or level:
- Information – A successful event. A driver or program has executed successfully. Windows logs thousands of information level events.
- Warning – Indication of a potential problem with a software component that is not functioning ideally.
- Error – A problem exists, but no immediate action is required.
- Critical – Immediate attention is required. Usually related to system or software crashes or lockups.
- Success Audit (security only) – A security event has been successful. For example, a successful logon from a user will trigger an event with this level.
- Failure Audit (security only) – A security event has not been successful. Failed attempts by someone attempting to log on to a computer will trigger this event.
11.3.1.4 – Local Users and Groups
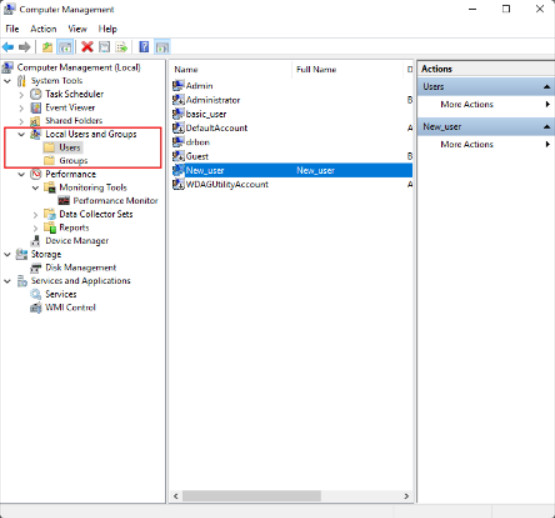
Local Users and Groups
Local Users and Groups, shown in the figure, provides an efficient way of managing users. You can create new users and assign those users to membership in Groups. Groups have rights and permissions assigned that are suitable for different types of users. Rather than configuring rights and permissions for each individual user, a user can be assigned an appropriate group. Windows provides default user accounts and groups to make managing users easier:
- Administrators – Full control of the computer and access to all folders.
- Guests – Guests can access the computer through a temporary profile that is created at logon and deleted on logoff. Guest accounts are disabled by default
- Users – Users can perform common tasks such as running applications and accessing local or network printers. A user profile is created and persists on the system.
11.3.1.5 – Performance Monitor
Performance Monitor allows customized performance graphs and reports to be created from a wide range of hardware and software components. Data Collector Sets are collections of metrics, called performance counters. Windows has a number of default Data Collector Sets and you can create your own. A wide range of counters can be graphed against time and reports can also be generated and read or printed. Data collection can be scheduled to occur at different times and for different durations and stop criterion for a monitoring session can also be set.
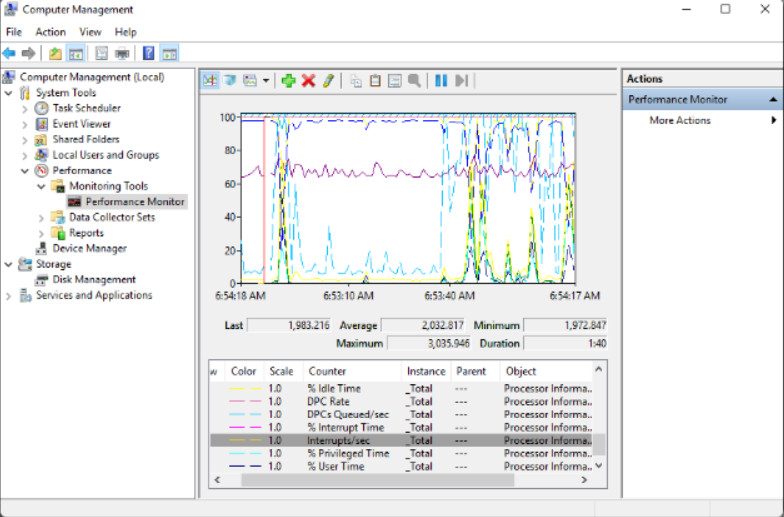
Performance Monitor
The Performance Monitor provided here is different from the performance information that is available through Task Manager and Resource Monitor. The purpose of the Performance Monitor administrative tool is the creation of detailed custom reports from very specific counters. The figure shows a graph derived from a selection of data counters that are available for the CPU.
11.3.1.6 – Component Services and Data Sources
Component Services is an administrative tool used by administrators and developers to deploy, configure, and manage Component Object Model (COM) components. COM is a way to allow the use of software components in distributed environments such as in enterprise, internet, and intranet applications.
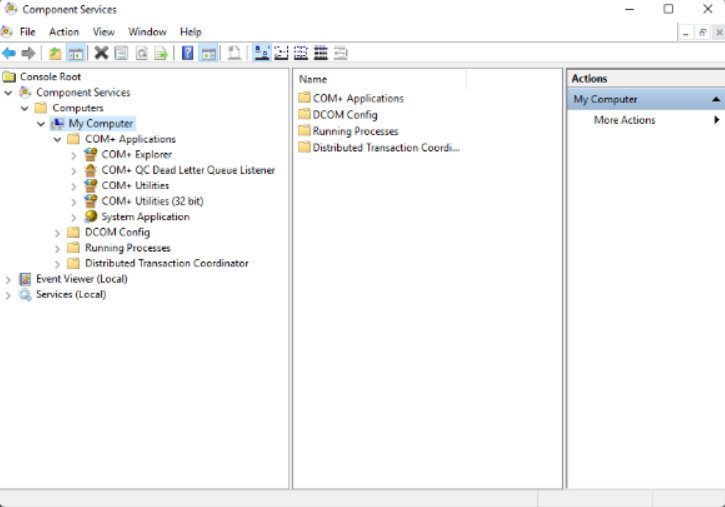
Component Services and Data Sources
11.3.1.7 – Services

Services
The Services console (SERVICES.MSC) allows you to manage all the services on your computer and remote computers. A service is a type of application that runs in the background to achieve a specific goal, or to wait for service requests. To reduce security risks, only start the necessary services. You can use the following settings, or states, to control a service:
- Automatic – The service starts when the computer is started. This prioritizes the most important services.
- Automatic (delayed) – The service starts after services that are set to Automatic have started. The Automatic (delayed) setting is available only in Windows 7.
- Manual – The service must be started manually by the user or by a service or program that needs it.
- Disabled – The service cannot be started until it is enabled.
- Stopped – The service is not running.
To view the Services console for a remote computer right-click on Services (Local) in the Computer Management window and select Connect to another computer. Enter the name for the computer or click Browse to allow Windows to scan the network for connected computers.
11.3.1.8 – Data Sources
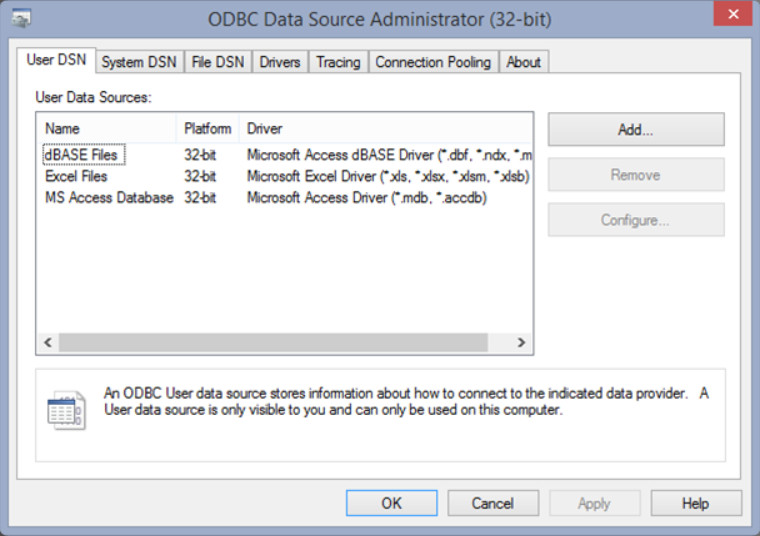
Data Sources
Data Sources is a tool used by administrators to add, remove, or manage data sources using Open Database Connectivity (ODBC). ODBC is a technology that programs use to access a wide range of databases or data sources. The tool is shown in the figure.
11.3.1.9 – Print Management
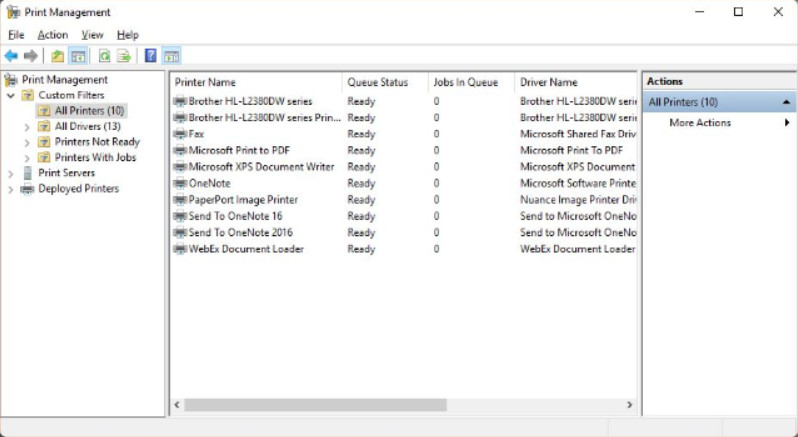
Print Management
The Print Management utility, shown in the figure, provides a detailed view of all of the printers that are available to a computer. It is not available in all Windows editions. It is available in Windows servers, Pro, Enterprise, and Ultimate editions. It enables efficient configuration and monitoring of directly attached and network printers, including print queues for all printers to which it has access. It also allows the deployment of a printer configuration to multiple computers on a network through the use of group policies.
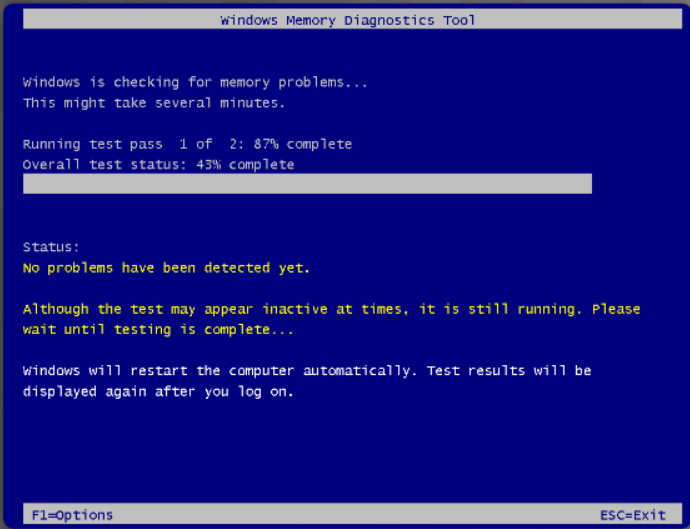
11.3.1.10 – Windows Memory Diagnostics
Windows Memory Diagnostics
The Windows Memory Diagnostics tool schedules a memory test that will be executed when the computer starts. It can be configured to automatically restart the computer or execute the test the next time the computer starts. After the tests are complete, Windows will restart. The type of diagnostics to be run can be configured by pressing F1 from the diagnostic as it runs, as shown in the figure. The results of the test can be viewed by finding the memory diagnostic test result in the Windows Log folder in Event Viewer.
11.3.1.11 – Lab – Monitor and Manage System Resources
In this lab, you will use administrative tools to monitor and manage system resources.
11.3.1.11 – Lab – Monitor and Manage System Resources
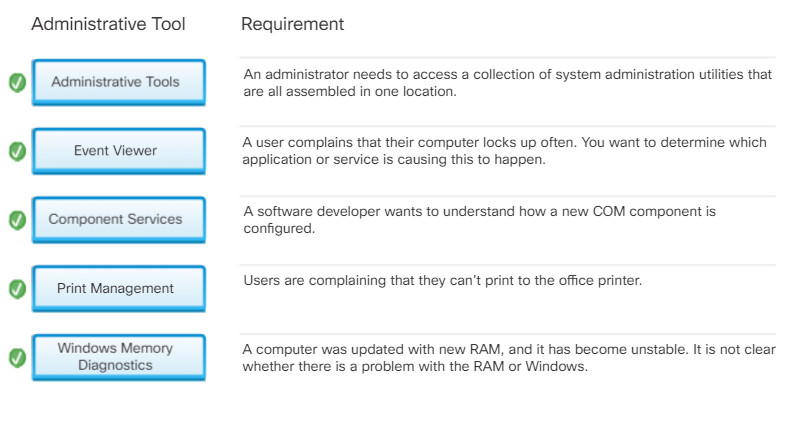
11.3.1.12 – Check Your Understanding – Administrative Tools
11.3.1.12 – Check Your Understanding – Administrative Tools
11.3.2 – System Utilities
11.3.2.1 – System Information
Administrators can use the System Information tool, as shown in the figure, to collect and display information about local and remote computers. The System Information tool is designed to quickly find information about software, drivers, hardware configurations, and computer components. Support personnel can use this information to diagnose and troubleshoot a computer.
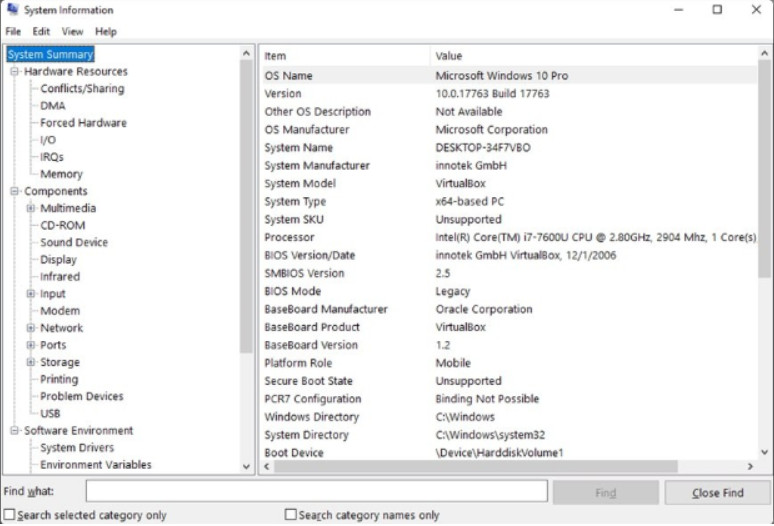
System Information (msinfo32)
You can also create a file containing all the information about the computer to send to someone. To export a System Information file, select File > Export, type the filename, choose a location, and click Save. The System Information utility can also display the configuration of other machines on the network.
The System Information tool can be opened from the command prompt by typing msinfo32, or it can be found in the Administrative Tools Control Panel item.
11.3.2.2 – System Configuration
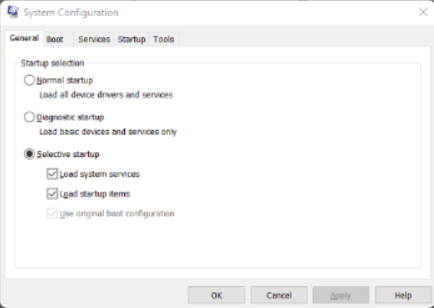
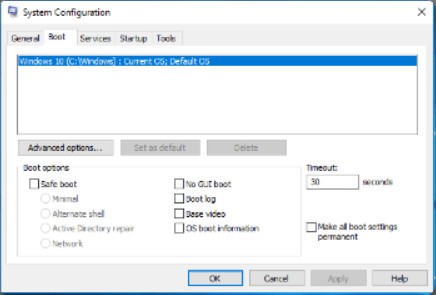
System Configuration (MSCONFIG) is a tool used to identify problems that keep Windows from starting correctly. To help with isolating the issue, services and startup programs can be turned off and turned back on one at a time. After you have determined the cause, permanently remove or disable the program or service, or reinstall it.
Explore the tabs available in the msconfig System Configuration utility by clicking the buttons in the figure.
Displays three startup selections to aid troubleshooting.
Normal startup– full startup as normal
Diagnostic startup– starts with basic services and drivers only
Selective startup– starts with basic services and drivers by default, can be changed
You can choose the Windows OS version to boot if more than one is present. You can also choose to boot up in Safe boot (formerly Safe mode) with different options regarding the way that Windows starts.
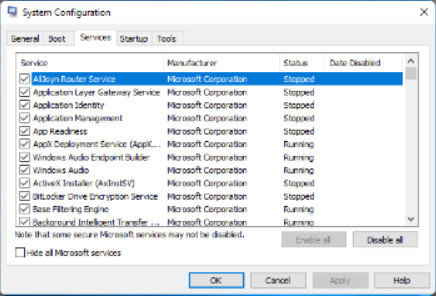
Displays a list of services that are started with the operating system. Allows individual services to not be loaded on boot for troubleshooting purposes.
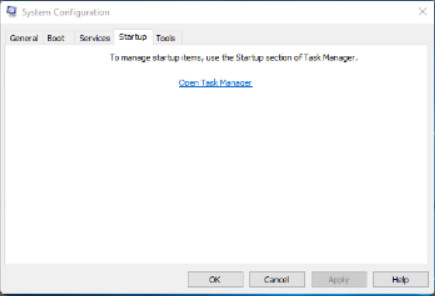
In Windows 7, displays a list of all the applications that run automatically when Windows starts. Individual items can be disabled. In Windows 8.1 and 10, the user is referred to the same settings in Task Manager.
Displays a compact and very comprehensive list of diagnostic tools that can be run to help with troubleshooting.

11.3.2.3 – The Registry
The Windows Registry is a database that contains settings for Windows and for applications that use the Registry. The settings contained in the Registry are very low-level, meaning there are many, many of them. Values in the registry are created when new software is installed or new devices are added. Every setting in Windows, from the background of the desktop and the color of the screen buttons, to the licensing of applications, is stored in the Registry. When a user makes changes to the Control Panel settings, file associations, system policies, or installed software, the changes are stored in the Registry.

The Registry
The registry consists of a hierarchical arrangement of keys and subkeys that are represented as a tree. Levels of the subkey tree can be deeply nested with a maximum of 512 levels permitted. Locating the key for the value you want to see is a matter of working through the hierarchy of trees and subtrees. There are five top- level, or root, keys, as shown in the figure.
The registry exists as multiple database files, called hives, that are associated with each of the top level registry keys. Each key has values. The values consist of the name of the value, its data type, and the setting or data that is associated with the value. The values tell Windows how to operate.
The Windows Registry keys are an important part of the Windows boot process. These keys are recognized by their distinctive names, which begin with HKEY_, as shown in the figure. The words and letters that follow HKEY_ represent the portion of the OS controlled by that key.
11.3.2.4 – Regedit
The Registry Editor allows an administrator to view or make changes to the Windows Registry. Using the Registry Editor utility incorrectly could cause hardware, application, or operating system problems, including problems that require you to reinstall the operating system.
The registry editor can only be opened from a search or command prompt. You can search for regedit and open it from the search results, or you can open a command or PowerShell prompt and type regedit.
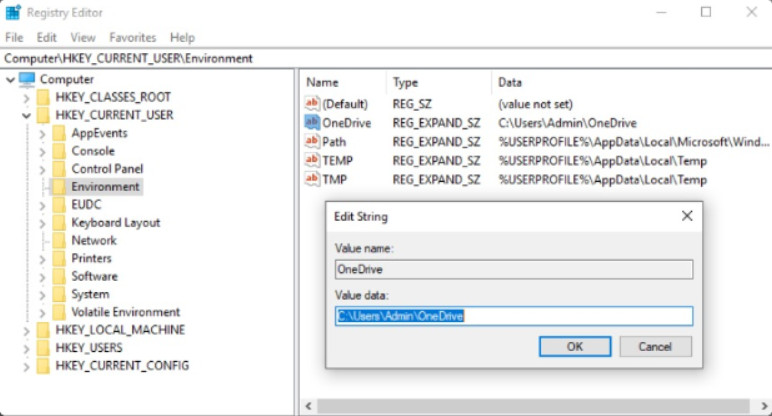
Regedit
The figure shows the regedit utility with the value of the OneDrive subkey open for modification.
11.3.2.5 – Microsoft Management Console
Microsoft Management Console (MMC) is an application that allows the creation of custom management consoles for collections of utilities and tools from Microsoft or other sources. The Computer Management console that was previously discussed is a premade MMC. When initially opened, the console is empty. Utilities and tools, known as snap-ins, can be added to the console. You can also add web page links, tasks, ActiveX controls, and folders.
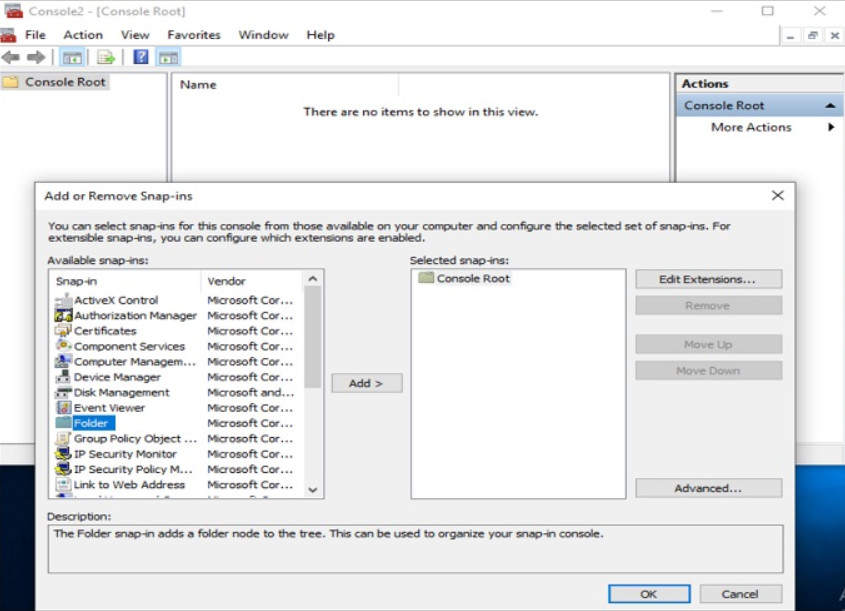
Microsoft Management Console
The console can then be saved and reopened when needed. This allows the construction of management consoles for specific purposes. You can create as many customized MMCs as needed, each with a different name. This is useful when multiple administrators manage different aspects of the same computer. Each administrator can have an individualized MMC for monitoring and configuring computer settings.
The figure shows a new empty console with the dialog box for selecting and adding snap-ins.
11.3.2.6 – DxDiag
DxDiag stands for DirectX Diagnostic Tool. It displays details for all DirectX components and drivers that are installed in a computer, as shown in the figure. DxDiag is run from a search or from the command line.
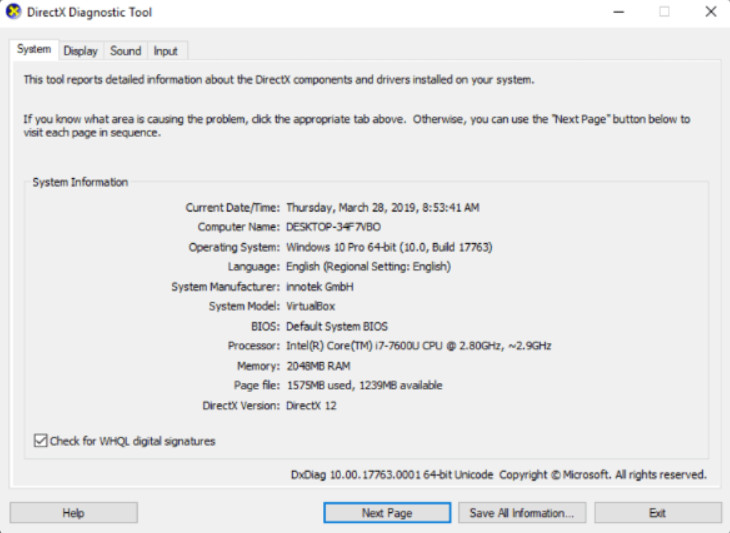
DxDiag
DirectX is a software environment and interface for multimedia applications, especially games. It defines interfaces for 2D and 3D graphics, audio, media encoders and decoders, etc.
11.3.2.7 – Lab – System Utilities
In this lab, you will use Windows utilities to configure operating system settings.
11.3.2.7 – Lab – System Utilities
11.3.2.8 – Lab – Manage System Files
In this lab, you will use Windows utilities to gather information about the computer.
11.3.2.8 – Lab – Manage System Files
11.3.2.9 – Check Your Understanding – System Utilities
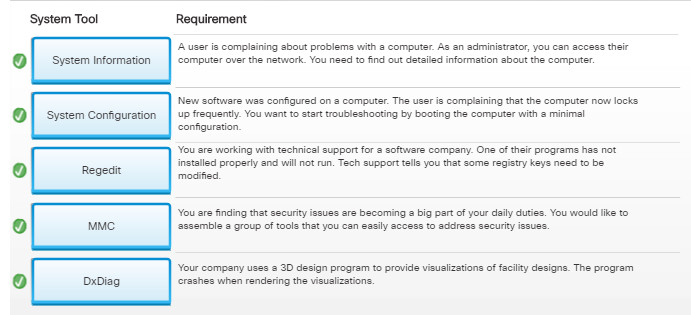
11.3.2.9 – Check Your Understanding – System Utilities
11.3.3 – Disk Management
11.3.3.1 – What Do You Already Know? – Disk Operations
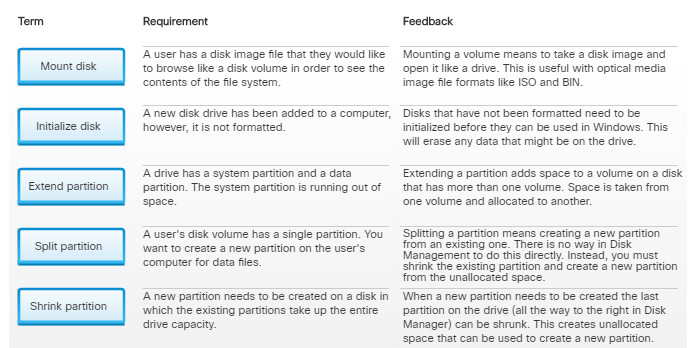
11.3.3.1 – What Do You Already Know? – Disk Operations
11.3.3.2 – Disk Management Utility
The Disk Management utility is part of the Computer Management console. It can be opened by right-clicking on This PC or Computer and selecting Manage. It can also be opened through the Computer Management Control Panel item or in its own Window by using the Win+X menu and selecting Disk Management.
In addition to extending and shrinking partitions, as demonstrated in the previous chapter, you can also use the Disk Management utility to complete the following tasks:
- View drive status
- Assign or change drive letters
- Add drives
- Add arrays
- Designate the active partition
The figure shows the Disk Management utility in Windows 10.
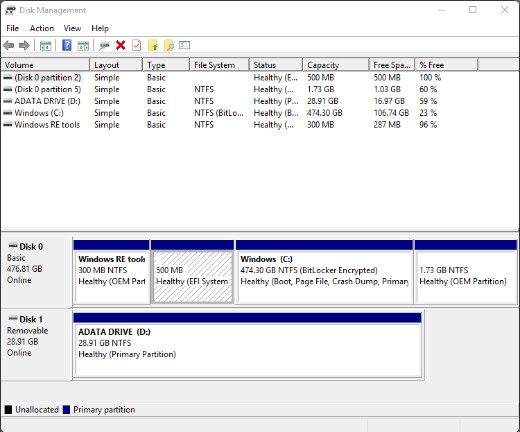
Disk Management Utility
11.3.3.3 – Drive Status

Disk Volumes
The Disk Management utility displays the status of each disk, as shown in the figure. The drives in the computer display one of the following conditions:
- Foreign – A dynamic disk that has been moved to a computer from another computer running Windows
- Healthy – A volume that is functioning properly
- Initializing – A basic disk that is being converted into a dynamic disk
- Missing – A dynamic disk that is corrupted, turned off, or disconnected
- Not Initialized – A disk that does not contain a valid signature
- Online – A basic or dynamic disk that is accessible and shows no problems
- Online (Errors) – I/O errors detected on a dynamic disk
- Offline – A dynamic disk that is corrupted or unavailable
- Unreadable – A basic or dynamic disk that has experienced hardware failure, corruption, or I/O errors
Other drive status indicators might be displayed when using drives other than hard drives, such as an audio CD that is in the optical drive, or a removable drive that is empty.
11.3.3.4 – Mounting a Drive
Mounting a drive refers to making a disk image file readable as a drive. A good example of this is an ISO file. It is the entire contents of the disk represented as a single file. ISO images are used as archives of the contents of an optical disk. Disk writer software can take an ISO file and write its contents to the disk.
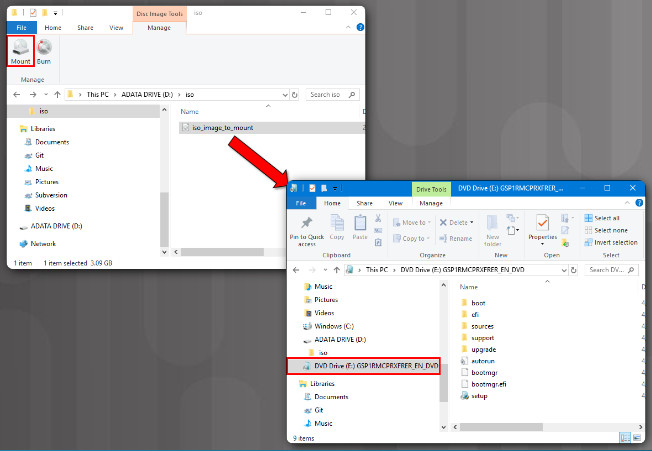
Mounting a Drive
These ISO files can also be mounted on virtual drives. To mount an image, open File Explorer and locate and select an ISO file. In the ribbon, select the Manage menu under Disk Image Tools. Select Mount. The ISO file will be mounted as a removable media drive. The drive can be browsed and files opened. However, there is actually no drive. The drive is an ISO image mounted as a volume.
You can also create a mount point. A mount point is similar to a shortcut. You can create a mount point that makes an entire drive appear as a folder. This might provide an easy way for users to access files since the mounted folder can appear in their My Documents folder, for example.
11.3.3.5 – Adding Arrays
In Windows disk management, you can create mirrored, spanned, or RAID 5 arrays from multiple dynamic disks. This is done by right-clicking a volume and selecting the type of multidisc volume that you want to create, as shown in Figure 1. Note that there must be two or more initialized dynamic drives available on the computer.
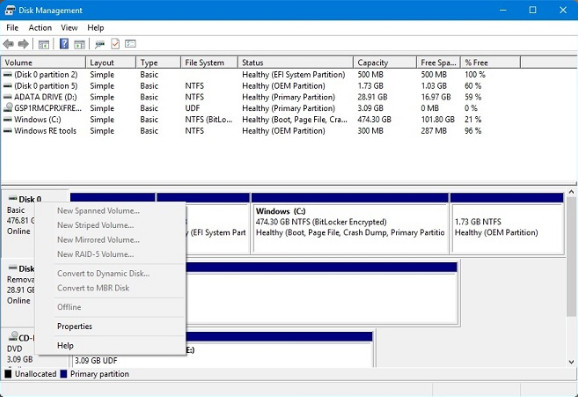
Arrays in Disk Management
Storage Spaces became available in Windows 8 and 10. Storage Spaces can be configured from a Control Panel item as shown in Figure 2. Storage Spaces is the disk array technology that is recommended by Windows. It creates pools of physical hard drives from which virtual disks (storage spaces) can be created. Many different types of drives can be combined. Like other disk arrays, Storage Spaces offer mirrored, striped, and parity options.
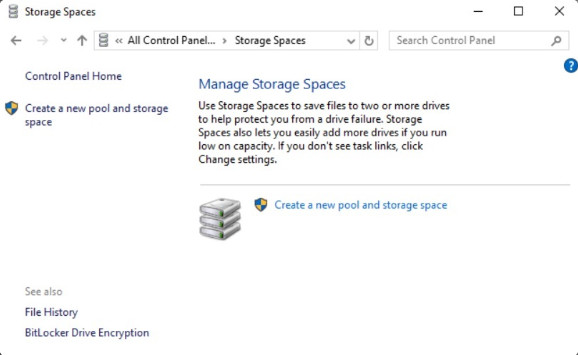
Storage Spaces Control Panel Item
11.3.3.6 – Disk Optimization
To maintain and optimize disk storage, you can use various tools within Windows. Some of these tools include hard drive defragmentation, which consolidates files for faster access.
As files increase in size, some data is written to the next available cluster on the disk. In time, data becomes fragmented and spread over nonadjacent clusters on the hard drive. As a result, it takes longer to locate and retrieve each section of the data. A disk defragmenter gathers the noncontiguous data into one place, making the OS run faster.
Note: It is not recommended to perform disk defragmentation on SSDs. SSDs are optimized by the controller and firmware they use. It should not be harmful to defragment Hybrid SSDs (SSHD) because they use hard disks to store data, not solid-state ram.
In Windows 8 and 10, the option is called Optimize, as shown in Figure 1. In Windows 7, it is called Defragment Now. It can be accessed from the disk properties menu or from the File Explorer ribbon in Windows 8 and 10.
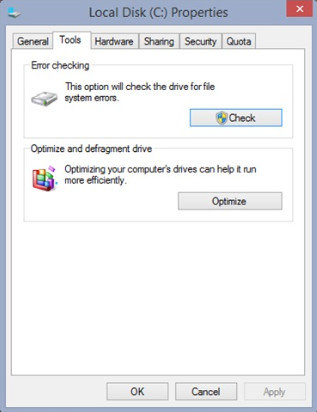
Disk Optimization
Figure 2 shows the Optimize Drives utility. It allows analysis of the drive prior to optimization. The analysis will display the degree of fragmentation of the drive.
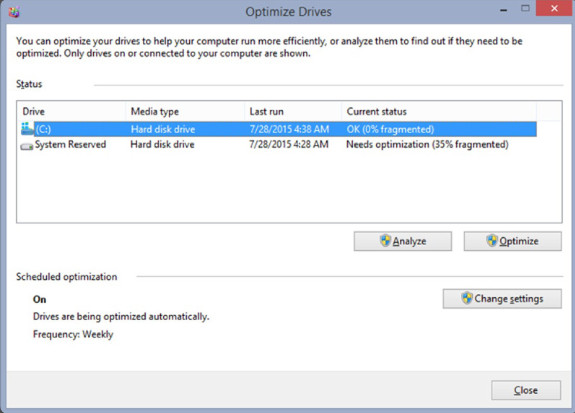
Disk Optimization Tool
You can also optimize the available space by doing a disk Cleanup operation. This will remove unnecessary files from the drive.
11.3.3.7 – Disk Error – Checking
The Disk Error-Checking tool checks the integrity of files and folders by scanning the hard disk surface for physical errors.
If errors are detected, the tool attempts to repair them. In File Explorer or File Manager, right-click the drive and select Properties. Select the Tools tab and select Check or Check Now in Windows 7. In Windows 8, select Scan Drive to attempt to recover bad sectors. In Windows 7, select Scan for and attempt recovery of bad sectors and click Start. The tool fixes file system errors and checks the disk for bad sectors. It also attempts to recover data from bad sectors.
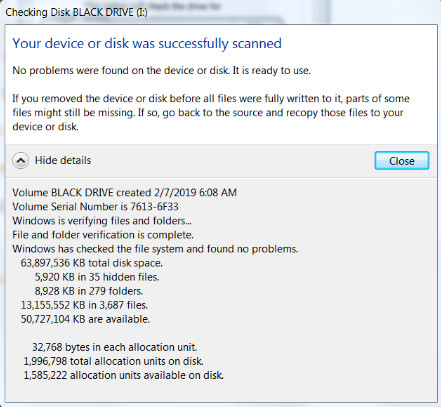
Disk Error – Checking
In Windows 8 and 10, if you want to see a detailed report of the results of the scan, click Check Results after the scan has completed. This will open an Event Viewer window that will allow you to view the log entry for the scan. In Windows 7, a report is displayed by the error-checking utility, as shown in the figure.
Note: Use the Disk Error-Checking tool whenever a sudden loss of power causes the system to shut down incorrectly.
11.3.3.8 – Lab – Hard Drive Maintenance
In this lab, you will perform hard drive maintenance tasks including defragmentation and error checking.
11.3.3.8 – Lab – Hard Drive Maintenance
11.3.3.9 – Check Your Understanding – Disk Management
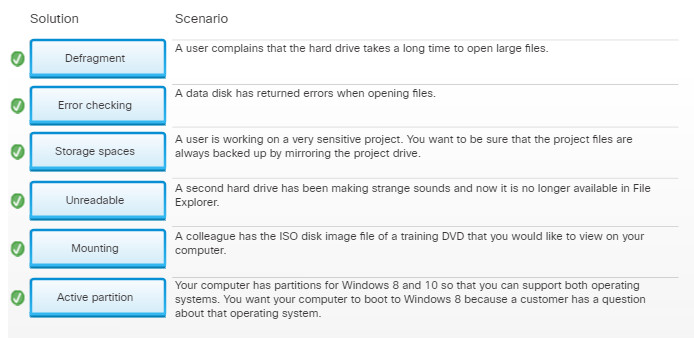
11.3.3.9 – Check Your Understanding – Disk Management
11.3.4 – Application Installation and Configuration
11.3.4.1 – System Requirements

System Requirements
Before purchasing or attempting to install an application, you should verify that the system requirements are met. System requirements are usually stated as the minimum requirements. The recommended system requirements may also be stated, as shown in the figure. The following requirements are normally defined in the software packaging or on the software download page:
- Processor speed – 32 or 64-bit, x86 or other.
- RAM, sometimes as minimum or recommended capacities
- Operating system and version
- Hard disk space available
- Software dependencies – runtime and other frameworks or environments may be required to be present in order for the software to run.
- Graphics and display
- Network access, if any
- Peripheral devices
11.3.4.2 – Installation Methods
As a technician, you will be responsible for adding and removing software from your customers’ computers. Most applications use an automatic installation process when the application disc is inserted in the optical drive. The user is required to click through the installation wizard and provide information when requested. Most Windows software installations are attended, meaning the user must be present to interact with the installer software to provide input about the options to use when installing the software. The various types of installations are defined in the figure.

Installation Methods
11.3.4.3 – Installing an Application
Local installation can occur from the hard drive, CD, DVD, or USB media. To perform a local, attended installation, insert the media or drive, or open the downloaded program file. Depending on autoplay settings, the software installation process may not automatically start. In that case, you will need to browse the installation media in order to find and execute the installer. Installer software usually has an EXE or MSI (Microsoft Silent Installer) file extension.
Note that the user must have the appropriate permissions in order to install the software. They must also not be blocked by group policies that prevent software installation.
The Microsoft Store
After the application is installed, you can run it from the Start Menu or the shortcut icon that the application places on the desktop. Check the application to ensure that it is functioning properly. If there are problems, repair or uninstall the application. Some applications, such as Microsoft Office, provide a repair option within the installation program. In addition to the process described above, Windows 8 and 10 provide access to the Microsoft Store, as shown in the figure. The Microsoft Store allows a user to search for and install apps on Windows devices. To open the Windows Store app, search from the Start Screen taskbar by entering Store. Click the Store icon when it appears in the search results. The Windows Store app is not available in Windows 7.
11.3.4.4 – Compatibility Mode
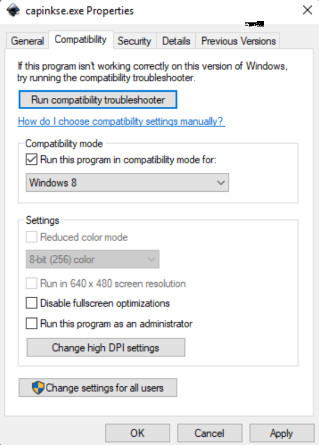
Compatibility Mode
Older applications may not run properly on newer Windows operating systems. Windows provides a way that these programs can be configured to run. If older software is not running properly, locate the executable file for the application. This can be done by right-clicking a shortcut for the application and selecting Open file location. Right-click the executable file and choose Properties. From the Compatibility tab, shown in the figure, you can run the Windows compatibility troubleshooter or manually configure the environment for the application.
11.3.4.5 – Uninstalling or Changing a Program
If an application is uninstalled incorrectly, you might be leaving files on the hard drive and unnecessary settings in the registry, which wastes hard drive space and system resources. Unnecessary files might also reduce the speed at which the registry is read. Microsoft recommends that you always use the Programs and Features Control Panel utility when removing, changing, or repairing applications. The utility guides you through the software removal process and removes every file that was installed, as shown in the figure.
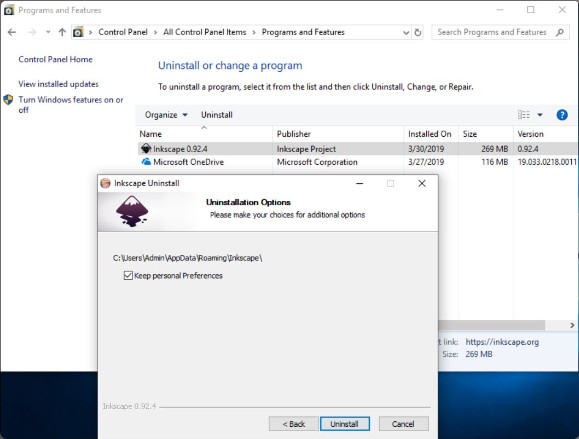
Uninstall Application
Some applications may include an uninstall feature that is located in the Windows Start menu with the application.
11.3.4.6 – Lab – Install Third-Party Software
In this lab, you will install and remove a third party software application.
11.3.4.6 – Lab – Install Third-Party Software
11.3.4.7 – Security Considerations
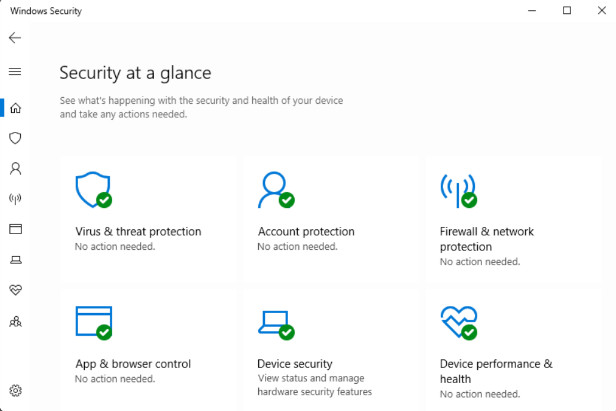
Windows 10 Security Settings Dashboard
Allowing users to install software on computers that are owned by a business organization can be a security risk. Users can be tricked into downloading malicious software that can cause data loss, either through theft or destruction. Malicious software, known as malware, can infect all computers that are attached to a network and can cause widespread damage and loss. As a technician, it is important to enforce policies regarding software installation and ensure that antimalware software, such as Windows Defender is active and up to date.
11.3.4.8 – Check Your Understanding – Application Installation and Configuration
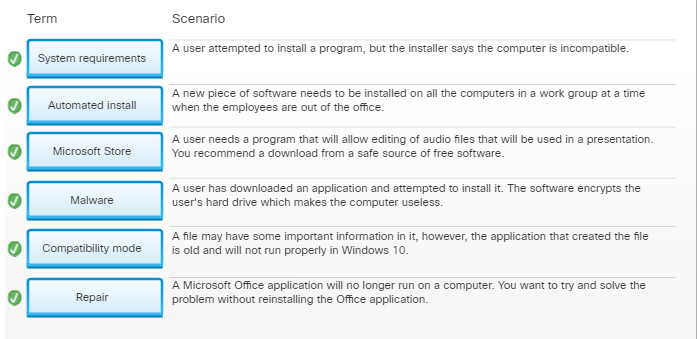
11.3.4.8 – Check Your Understanding – Application Installation and Configuration
11.4 – Command-Line Tools
11.4.1 – Using Windows CLI
11.4.1.1 – PowerShell
The old Windows command line application was replaced in the Windows Power User menu Win+X with PowerShell. The original command line still exists in Windows 10, and can be opened by typing cmd into the search field on the Taskbar. You can also change which command line is displayed in the menu by changing a Taskbar setting.
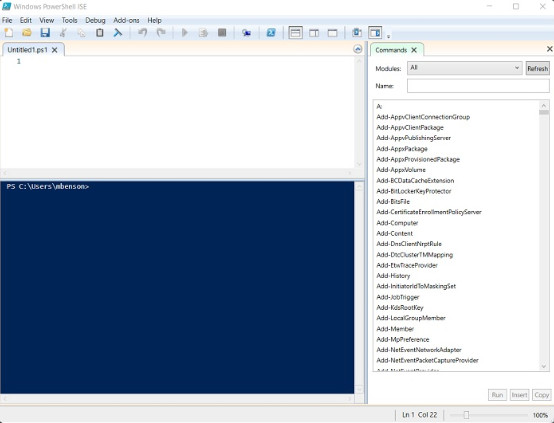
PowerShell
PowerShell is a more powerful command line utility. It offers many advanced features, such as scripting and automation. It even comes with its own scripting development environment, called PowerShell ISE, to help with the task of writing scripts. PowerShell uses “cmdlets”, or small applications, that represent the commands that are available. PowerShell also allows naming of cmdlets with aliases, so the same cmdlet can be run at the command line with any name that adheres to naming conventions that you choose to assign to it. Microsoft has created aliases for all of the old cmd commands so that it works much like the older command line.
The figure shows Windows ISE, with the PowerShell command line in the lower right window. PowerShell can also be opened as the command line shell alone.
11.4.1.2 – The Command Shell
Windows has two command line utilities. One is the classic command application, known as cmd. This command line is a remnant of the very early days of Microsoft when DOS was the only operating system that Microsoft had to offer. Many users were experienced with using cmd, so it was retained when Windows was developed. It has persisted as the default command line for Windows until Windows 10 build 14791 when PowerShell became the default. To open the command shell, type cmd in the search box and click the app in the results. You can also use the Win+R key to open a run box. Type cmd in the run box and click OK. Press Ctrl+Shift+Enter to run the command prompt as an administrator. The title bar for the command window will indicate that the command window is open in Administrator mode. You can also use the whoami command to display the name of the computer that the prompt is open on and the user account, as shown in the figure.
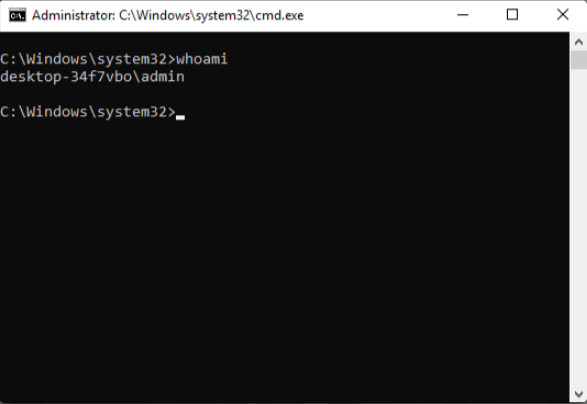
The Command Shell
Here we will focus on the cmd command line. All commonly used commands are supported by Windows 7, 8, and 10.
11.4.1.3 – Basic Commands
Enter by itself to see all available commands. Type help followed by a specific command to see information about that command.

This is an alternative to using the help command. In this case, help is specified as a command option. All commands accept this option.
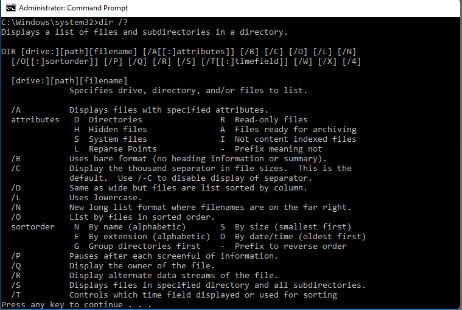
This command deletes all command output and moves the command prompt to the top of the command window.
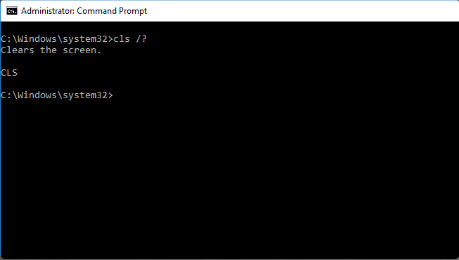
Previously entered commands are saved in the history buffer. The up-arrow key moves through the previously entered commands. If you type a command incorrectly, you can use the up-arrow key to recall it to the command line and edit it to correct it before executing.
Displays a list of the commands previously entered. Use the arrow keys to select a previously entered command and press to execute it. Use Esc to hide the window.
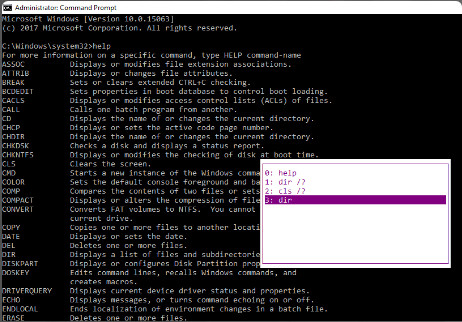
Press and hold the control key and then tap the c key. This will kill whatever command or script that is running.
Type exit to stop command execution and close the command window.
11.4.1.4 – Video Demonstration – Managing CLI Sessions
Working at a command line may be new to some people. Watch the video to see a demonstration of how it is done.
Click Play in the figure to view a demonstration of how to work in the Windows command line.
Click here to read the transcript of this video.
11.4.1.5 – Lab – Work in the Windows Command Shell
In this lab, you will practice techniques for working in the Windows Command Shell.
11.4.1.5 – Lab – Work in the Windows Command Shell
11.4.1.6 – Check Your Understanding – Basic Command Line Commands
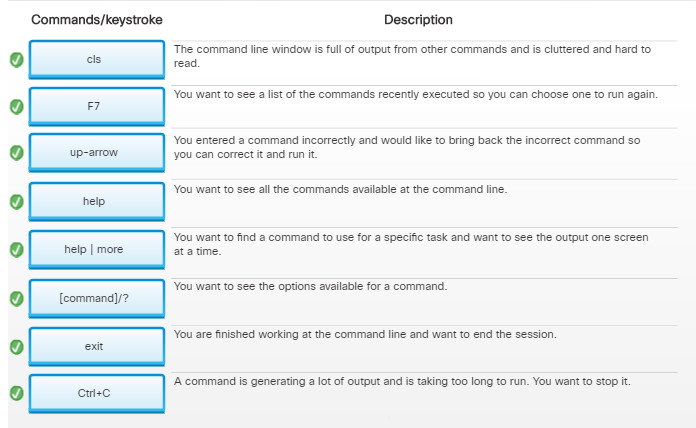
11.4.1.6 – Check Your Understanding – Basic Command Line Commands
11.4.2 – File System CLI Commands
11.4.2.1 – Command Syntax Conventions
It is important to be able to use technical resources to learn how to use CLI commands. Different software vendors and organizations use different conventions to indicate syntax for commands. Microsoft provides an online command reference that can be found on the web. Many conventions used by Microsoft for CLI commands are summarized in the figure.

Command Syntax Conventions
Special characters, called wildcards, can be substituted for characters or groups of characters in filenames. Wildcards can be used when you only know part of a filename that you are trying to find or when you want to perform a file operation on a group of files that share elements of a filename or extension. The two wildcards that can be used at the Windows command line are:
- The asterisk (*) – This character matches groups of characters, including entire filenames and file extensions. The asterisk (commonly called the star) will match any character that is permitted in a filename and will also match any group of characters. For example myfile.* will match files that are called myfile with any file extension. The asterisk can be used with a pattern of characters too. For example, my*.txt will match all filenames that start with my and have the .txt extension. Finally, *.* refers to any file name with any extension.
- The question mark (?) – This character stands for any single character. It does not stand for a group of characters. For example, to match myfile.txt using the question mark, you would need to use my????.txt. This will match filenames that start with my, any four characters, and that have a .txt file extension.
11.4.2.2 – File System Navigation

File System Navigation
When working at the command line, there is no File Explorer to help you get to the files and folders that you want to work with. Instead, you need to move through the folder structure using a combination of commands, normally displaying the contents of a drive or directory and changing directories until you find what you are looking for.
11.4.2.3 – File System Navigation – Commands
11.4.2.4 – Video Demonstration – Working with Files and Folders
Click Play in the figure to view a review of some basic CLI commands and a demonstration of CLI commands for manipulating files and folders. The operating system is Windows 7, however, the commands are the same as Window 8 and 10.
Click here to read the transcript of this video.
11.4.2.5 – Manipulating Folders – Commands
11.4.2.6 – Manipulating Files – Commands
11.4.2.7 – Lab – File System Commands
In this lab, you will work with file system commands.
11.4.2.7 – Lab – File System Commands
11.4.2.8 – Check Your Understanding – File System CLI Commands
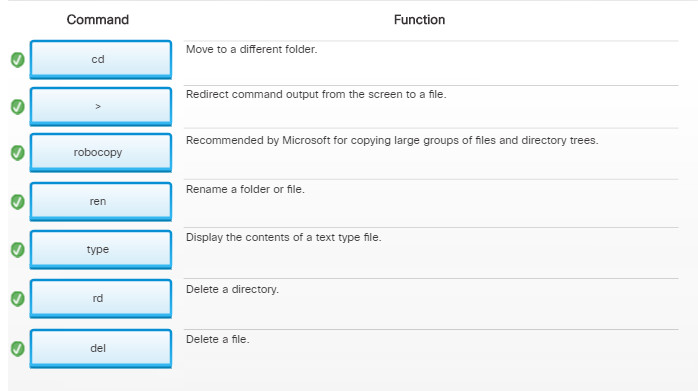
11.4.2.8 – Check Your Understanding – File System CLI Commands
11.4.3.1 – Disk Operations – Commands
11.4.3.2 – Lab – Disk CLI Commands
In this lab, you will work with disk CLI commands.
11.4.3.2 – Lab – Disk CLI Commands
11.4.3.3 – Check Your Understanding – Disk Operations Commands
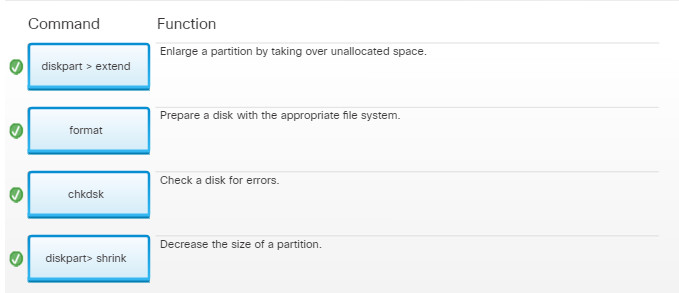
11.4.3.3 – Check Your Understanding – Disk Operations Commands
11.4.4 – Task and System CLI Commands
11.4.4.1 – System CLI Commands
11.4.4.2 – Lab – Task and System CLI Commands
In this lab, you will work with task and system CLI commands.
11.4.4.2 – Lab – Task and System CLI Commands
11.4.4.3 – Check Your Understanding – Task and System Commands
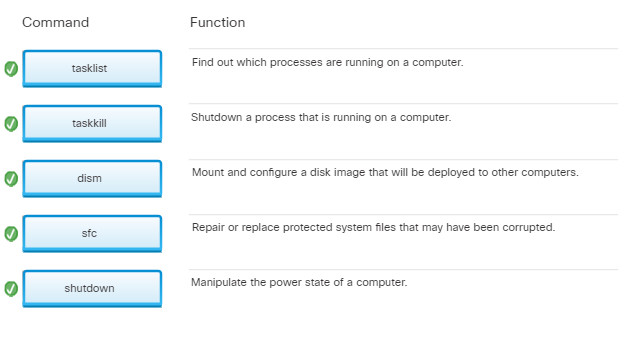
11.4.4.3 – Check Your Understanding – Task and System Commands
11.4.5 – Other Useful CLI Commands
11.4.5.1 – Other Useful Commands
11.4.5.2 – Running System Utilities
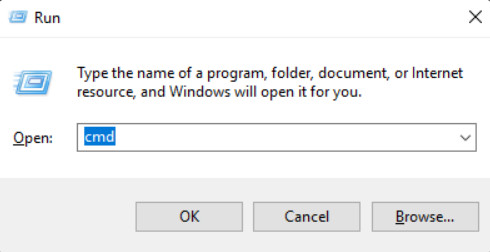
Running System Utilities
The Windows run line utility can be opened by pressing the Win+R keys and entering cmd to open the command line window, as shown in the figure. The following windows utilities and tools can also be run by entering the commands shown in the run line utility.
- EXPLORER – Opens File Explorer or Windows Explorer.
- MMC – Opens Microsoft Management Console (MMC). Specify the path and .msc filename to open a saved console.
- MSINFO32 – Opens the System Information window, which shows a summary of system components, including hardware components and software information.
- MSTSC – Opens the Remote Desktop utility.
- NOTEPAD – Opens the Notepad basic text editor.
11.4.5.3 – Lab – Other Useful Commands
In this lab, you will work other useful commands.
11.4.5.3 – Lab – Other Useful Commands
11.4.5.4 – Check Your Understanding – Other Useful CLI Commands
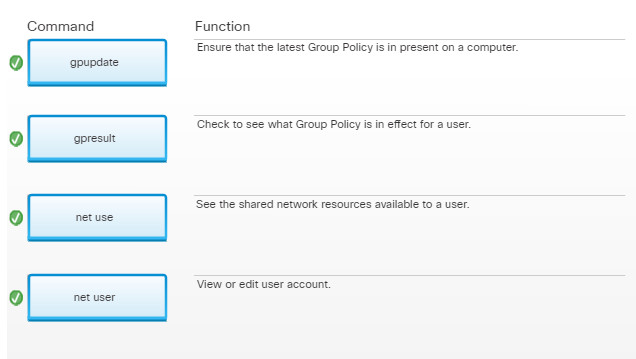
11.4.5.4 – Check Your Understanding – Other Useful CLI Commands
11.5 – Windows Networking
11.5.1 – Network Sharing and Mapping Drives
11.5.1.1 – Domain and Workgroup
Domain and workgroup are methods for organizing and managing computers on a network. They are defined as:
- Domain – A domain is a group of computers and electronic devices with a common set of rules and procedures administered as a unit. Computers in a domain can be located in different locations in the world. A specialized server called a domain controller manages all security-related aspects of users and network resources, centralizing security and administration. For example, within a domain, Lightweight Directory Access Protocol (LDAP) is a protocol used to allow computers to access data directories that are distributed throughout the network.
- Workgroup – A workgroup is a collection of workstations and servers on a LAN that are designed to communicate and exchange data with one another. Each individual workstation controls its user accounts, security information, and access to data and resources.
All computers on a network must be part of either a domain or a workgroup. When Windows is first installed on a computer, it is automatically assigned to a workgroup, as shown in the figure.
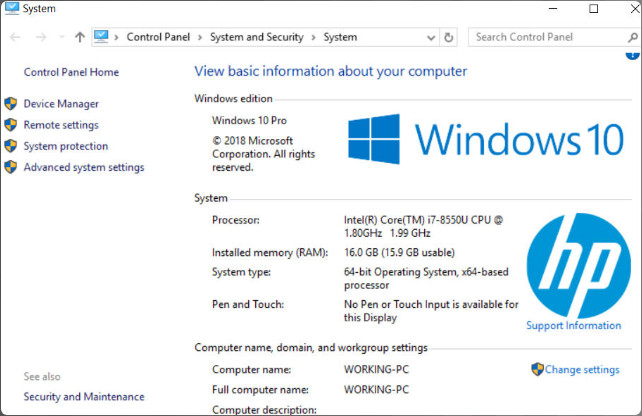
Domain and Workgroup
11.5.1.2 – Homegroup
A homegroup was a feature introduced in Windows 7 and is also available in Windows 8 to simplify secure access to shared resources such as folders, pictures, music, videos, and printers on a home network. Homegroup has been removed from Windows 10 with the release of Windows 10 (1803).
All Windows computers that belong to the same workgroup can also belong to a homegroup. There can only be one homegroup per workgroup on a network. Computers can only be a member of one homegroup at a time. Homegroups are secured with a simple password. A homegroup can be a mix of Windows 7 and Windows 8 computers.
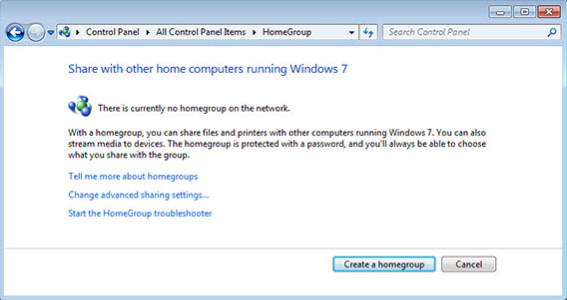
Create a Homegroup
One user in the workgroup creates the homegroup. The other users can join the homegroup, provided they know the homegroup password. Homegroup availability depends on your network location profile:
- Home Network – allowed to create or join a homegroup
- Work Network – not allowed to create or join a homegroup, but you can view and share resources with other computers
- Public Network – homegroup not available
When a computer joins a homegroup, all user accounts on the computer, except the Guest account, become members of the homegroup. Being part of a homegroup makes it easy to share pictures, music, videos, documents, libraries, and printers with other people in the same homegroup. Users control access to their own resources.
Note: If a computer belongs to a domain, you can join a homegroup and access files and resources on other homegroup computers. You are not allowed to create a new homegroup or share your own files and resources with a homegroup.
11.5.1.3 – Video Demonstration – Connecting to a Workgroup or Domain
Click Play in the figure to view a demonstration of how to connect to a Workgroup or domain.
Click here to read the transcript of this video.
11.5.1.4 – Network Shares and Mapping Drives
Network file sharing and mapping network drives is a secure and convenient way to provide easy access to network resources. This is especially true when different versions of Windows require access to network resources.

Mapping a local drive is a useful way to access a single file, specific folders, or an entire drive between different operating systems over a network. Mapping a drive is done by assigning a letter (A to Z) to the resource on a remote drive, and allows you to use the remote drive as if it was a local drive.
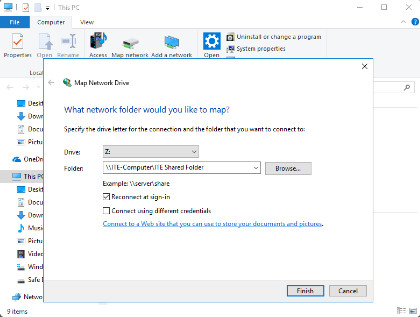
Determine which resources will be shared over the network and the type of permissions users will have to the resources. Permissions define the type of access a user has to a file or folder.
- Read – The user can view the file and subfolder names, navigate to subfolders, view data in files, and run program files.
- Change – In addition to Read permissions, the user can add files and subfolders, change the data in files, and delete subfolders and files.
- Full Control – In addition to Change and Read permissions, the user can change the permission of files and folders in an NTFS partition and take ownership of files and folders.
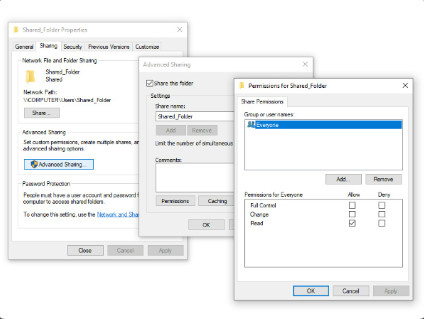
11.5.1.5 – Administrative Shares
Administrative shares, also called hidden shares, are identified with a dollar sign ($) at the end of the share name. By default, Windows creates several hidden administrative shares. These include the root folder of any local drives (C$), the system folder (ADMIN$), and the print driver folder (PRINT$). Administrative shares are hidden from users and only accessible by members of the local administrators’ group. The figure shows administrative shares on a Windows 10 PC. Note the $ after each share name making them hidden shares.
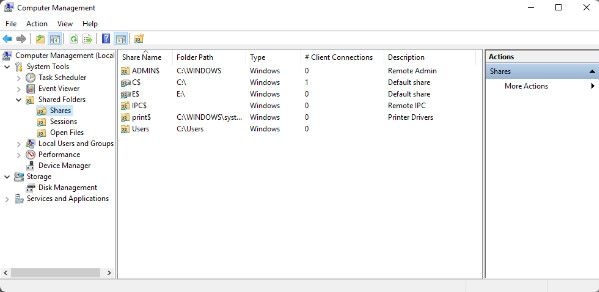
Administrative Shares
Adding a $ sign to the end of any local share name will cause it to become a hidden share. It will not be visible by browsing but can be accessed via the command-line by mapping a drive to the share name.
11.5.2 – Sharing Local Resources with Others
11.5.2.1 – Sharing Local Resources
Windows 10 controls which resources are shared and how they are shared by turning specific sharing features on and off. Advanced Sharing Settings, located in the Network and Sharing Center, manages the sharing options for three different network profiles; Private, Guest or Public, and All Networks. Different options can be chosen for each profile. The following items can be controlled:
- Network discovery
- File and printer sharing
- Public folder sharing
- Password protected sharing
- Media Streaming
To access Advanced Sharing Settings, use the following path:
Start > Control Panel > Network and Internet > Network and Sharing Center
To enable sharing resources between computers connected to the same workgroup, Network Discovery and File and printer sharing must be turned on, as shown in the figure.
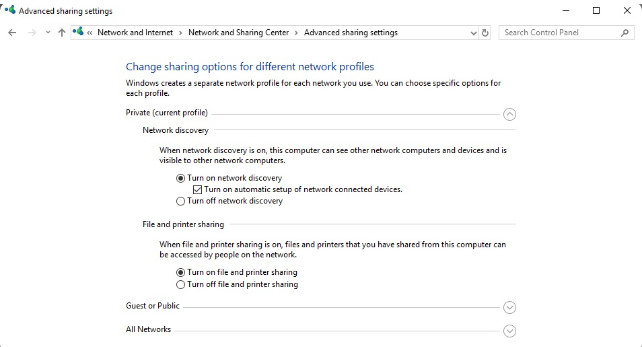
Sharing Local Resources
There are simple file sharing mechanisms developed by OS vendors. Microsoft’s file sharing mechanism is called Nearby Sharing. Nearby Sharing was introduced in Windows 10, partly replacing the previous Homegroup feature. Nearby Sharing provides the ability to share content with a nearby device using both Wi-Fi and Bluetooth.
AirDrop is supported by Apple iOS and macOS and uses Bluetooth to establish a Wi-Fi direct connection between devices for the file transfer to take place. There are also many third-party and open source alternatives, however, there is the potential for security vulnerabilities that allow unsolicited transfers.
11.5.2.2 – Printer Sharing vs. Network Printer Mapping
Printing is one of the most common tasks for users in both home and business environments.
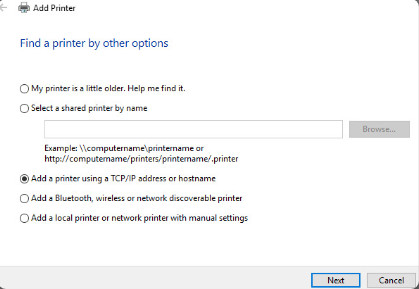
A print device can be directly attached to a computer via USB or direct network connection. This is considered a “local” printer and the PC it is attached to is acting as the print server. The local printer can be shared on the network via the Sharing tab on the Printer Properties dialog box as shown in the figure. Once a printer is shared, users with the correct permissions can connect to the network shared printer. Drivers for the print device can also be installed on the local computer so that clients obtain the driver when they connect to the print share.
To find the network shared printer users can browse through network resources using the Network object in File Explorer as shown.
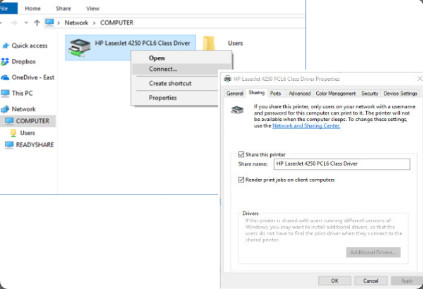
A print device can come with integrated Ethernet or Wi-Fi adapter and connected directly to the network. Once the print device is connected to the network it can be mapped using the Add printer wizard in the Devices and Printers window as shown. Mapping a printer to a computer allows the user to print over the network without the need for a direct connection to the print device. Once mapped the printer will show up in the list of available printers on the computer.
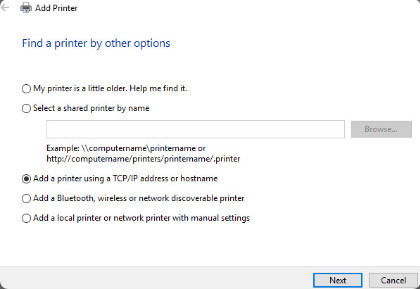
11.5.2.3 – Video Demonstration – Sharing Files and Folders on a Local Network
Click Play in the figure to view a demonstration of how to share a folder.
Click here to read the transcript of this video.
11.5.2.4 – Lab – Share Resources
In this lab, you will work with another student. You will create and share a folder. You will also set permissions for the share so your partner will only have read access.
11.5.2.4 – Lab – Share Resources
11.5.3 – Configure a Wired Network Connection
11.5.3.1 – Configuring Wired Network Interfaces in Windows 10
Windows 10 network settings are managed through the Network & Internet section in the Settings App. From the Network & Internet window, there are links to View network properties and to the Network and Sharing Center. Available network connections, both wired and wireless, can be viewed by selecting the Change Adapter Options link. From there, each network connection can be configured.
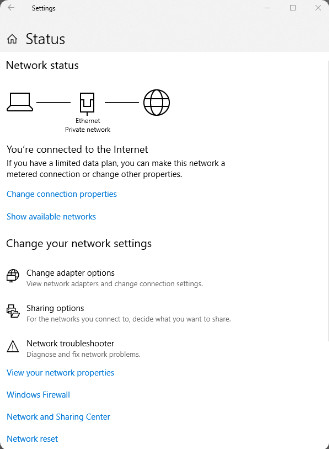
Configuring Wired Network Interfaces in Windows 10
Network card properties are configured in the Advanced tab of the adapter properties window. Navigate to Device Manager. Locate and right click the network adapter. Choose Properties > Advanced tab. A list of properties allows configuration of features such as Speed & Duplex, QoS, Wake-on LAN, and many others. Click the desired feature in the Property: drop down list. Each property has configurable values in the Value: drop list.
The Windows Internet Protocol Version 4 (TCP/IPv4) Properties window includes an Alternate Configuration tab which allows an administrator to configure an alternative IP address for the PC to use if it is unable to contact a DHCP server. Note that this tab is not visible if a static IPv4 address configuration is configured in the General tab.
11.5.3.2 – Configuring a Wired NIC
After the NIC driver is installed, the IP address settings must be configured. A computer can be assigned its IP configuration in one of two ways:
-
- Manually – The host is statically assigned a specific IP configuration.
- Dynamically – The host requests its IP address configuration from a DHCP server.
From the properties window of the wired NIC, both IPv4 and IPv6 addresses and other options such as the default gateway and DNS server address can be configured, as shown in the figure.
The default setting for both IPv4 and IPv6 is to obtain the IP settings automatically using DHCP in the case of IPv4 and Stateless Automatic Address Configuration (SLAAC) in the case of IPv6.
Note: Most computers today come with an onboard NIC. If you are installing a new NIC, it is considered a best practice to disable the onboard NIC in BIOS settings.
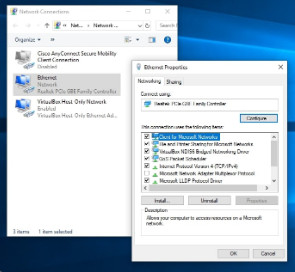
To configure the IPv4 setting manually click Use the following IP address and enter the appropriate IPv4 address, subnet mask, and default gateway. If a Windows machine fails to obtain an IPv4 address dynamically it will use an Automatic Private IP Addressing (APIPA) address from a reserved range in the 169.254.x.y network space.
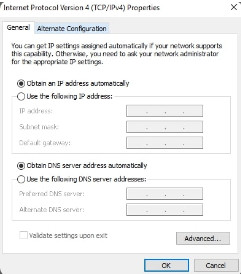
Windows 10 allows for an alternative IPv4 address configuration for a computer if it cannot access a DHCP server and if APIPA is unsuitable or not desired. This is useful for mobile devices that move between a network with DHCP and another network that needs a static IPv4 address.
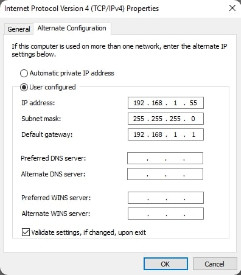
To configure IPv6 settings click Internet Protocol Version 6 (TCP/IPv6) > Properties to open the Internet Protocol Version 6 (TCP/IPv6) Properties window. Click Use the following IPv6 address and enter the appropriate IPv6 address, prefix length, and default gateway.
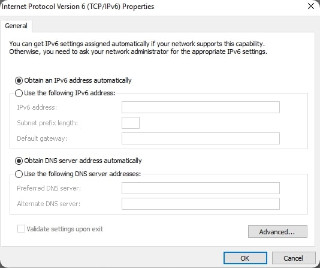
11.5.3.3 – Setting a Network Profile
The first time a computer with Windows 10 connects to a network, a network profile must be selected. Each network profile has different default settings. Depending on the profile selected, file and printer sharing, or network discovery can be turned off or on, and different firewall settings can be applied.
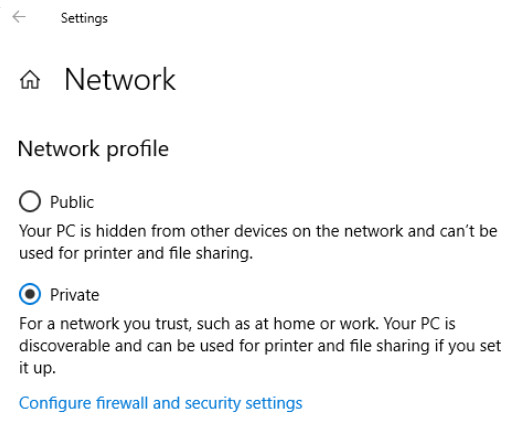
Setting a Network Profile
Windows 10 has two network profiles:
-
-
-
- Public – The public profile disables file and printer sharing and network discovery on the link. The PC is hidden from other devices.
- Private – The private profile allows the user to customize the sharing options. This profile is for use on trusted networks. The PC is discoverable by other devices.
-
-
11.5.3.4 – Verify Connectivity with the Windows GUI
The easiest way to test for an internet connection is to open a web browser and see if the internet is available. To troubleshoot a connection, you can use the Windows GUI or CLI.
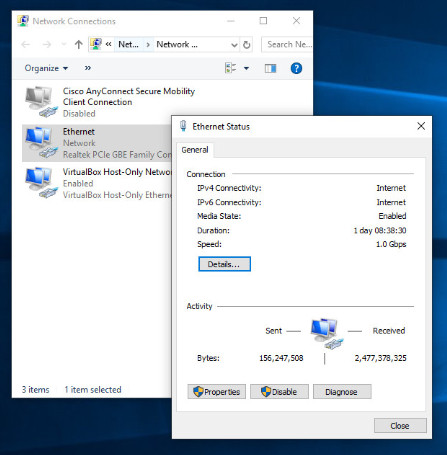
Verify Connectivity with the Windows GUI
In Windows 10, the status of a network connection can be viewed under the General tab, as shown in the figure. Click the Details button to view IP addressing information, subnet mask, default gateway, MAC address, and other information. If the connection is not functioning correctly, close the Details window and click Diagnose to have the Windows Network Diagnostics troubleshooter attempt to troubleshoot and fix the issue.
11.5.3.5 – ipconfig Command

ipconfig Command
The ipconfig command displays basic IP configuration information, to include the IP address, subnet mask, and default gateway for all network adapters to which TCP/IP is bound. There are several ipconfig switches and arguments which are useful to know. The table in the figure displays available command options. To use a command option, enter the ipconfig /option (e.g., ipconfig /all).
11.5.3.6 – Network CLI Commands
Network CLI Commands
There are several CLI commands that can be executed from the command prompt to test network connectivity.
-
-
-
- ping – The command tests basic connectivity between devices by using ICMP echo request and reply messages.
- tracert – The command traces the route that packets take from your computer to a destination host. At the command prompt, enter tracerthostname. The first listing in the results is your default gateway. Each listing after that is the router that packets are traveling through to reach the destination. Tracert shows you where packets are stopping, indicating where the problem is occurring.
- nslookup – The command tests and troubleshoots DNS servers. It queries the DNS server to discover IP addresses or host names. At the command prompt, enter nslookuphostname. Nslookup returns the IP address for the host name entered. A reverse nslookup command, nslookupIP_address returns the corresponding host name for the IP address entered.
-
-
11.5.3.7 – Video Demonstration – Network Testing and Verification with CLI Commands
Click Play in the video to see a demonstration of network testing and verification using CLI commands.
Click here to read a transcript of this video.
11.5.4 – Configure a Wireless Network Interfaces in Windows
11.5.4.1 – Wireless Settings
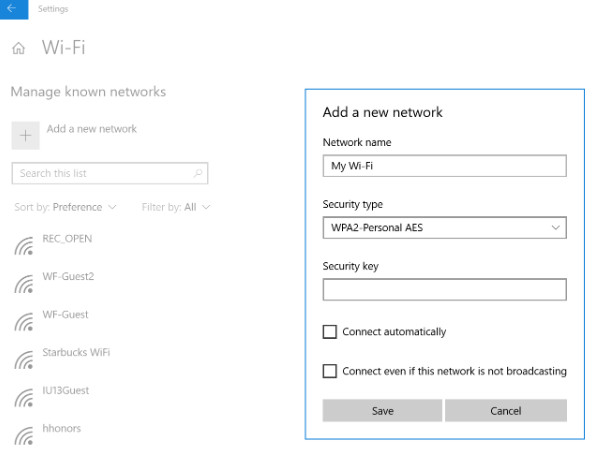
Wireless Settings
Wireless networks can be added in Windows 10 by going to Settings > Network & Internet > Wi-Fi > Manage known networks, as shown in the figure. Enter the network name and select a security type that matches the configuration on the wireless router. There are four security type options:
-
-
-
- No authentication (Open) – Data is sent unencrypted and with no authentication
- WEP – Provides very weak security and should not be relied upon for confidentiality
- WPA2-Personal – Uses the Advanced Encryption Standard (AES) cipher and a Pre-shared Key (PSK) to encrypt communications.
- WPA2-Enterprise – Authentication is passed from the access point to a centralized authentication server running Remote Authentication Dial-in User Service (RADIUS)
-
-
Remote authentication for wireless devices can be provided by a scalable authentication architecture by using RADIUS or Terminal Controller Access Control System Plus (TACACS+). Both technologies use a separate server (an Authentication, Authorization, and Accounting (AAA) server) that performs the authentication on behalf of network devices. Rather than the network devices storing and validating user credentials directly, they pass the request to the AAA server and forward the response to the user.
11.5.4.2 – Lab – Connect and Test the Wireless Connection
In this lab, you and your partner will connect your computers to a wireless router and test the wireless connection.
11.5.4.2 – Lab – Connect and Test the Wireless Connection
11.5.5 – Remote Access Protocols
11.5.5.1 – VPN Access in Windows
To communicate and share resources over a network that is not secure, a Virtual Private Network (VPN) is used. A VPN is a private network that connects remote sites or users together over a public network, like the internet. The most common type of VPN is used to access a corporate private network.
The VPN uses dedicated secure connections, routed through the internet, from the corporate private network to the remote user. When connected to the corporate private network, users become part of that network and have access to all services and resources as if they were physically connected to it.
Remote-access users must install a VPN client on their computers to form a secure connection with the corporate private network. Special routers can also be used to connect computers connected to it to the corporate private network. The VPN software encrypts data before sending it over the internet to the VPN gateway at the corporate private network. VPN gateways establish, manage, and control VPN connections, also known as VPN tunnels. A VPN client software is shown in Figure 1.
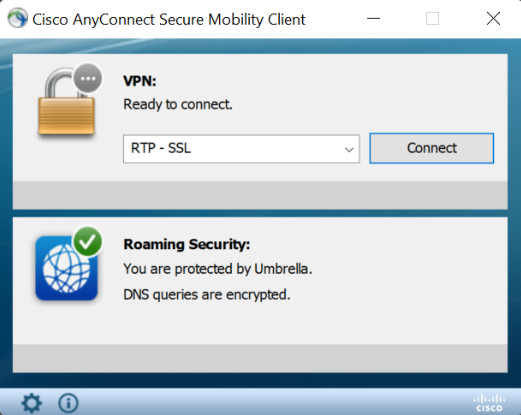
VPN Client Software
A VPN in Windows 10 can be set up from the Network and Sharing Center is shown in Figure 2.
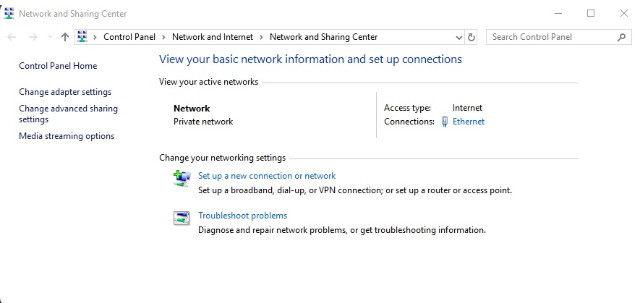
A VPN in Windows 10 can be set up from the Network and Sharing Center
Windows supports several VPN types, however, for some VPNs, third-party software may be required.
11.5.5.2 – Telnet and SSH
Telnet is a command-line terminal emulation protocol and program. The Telnet daemon listens for connections on TCP port 23. Telnet is sometimes used for troubleshooting services and for connecting to routers and switches for entering configurations. Telnet is not installed in Windows by default but can be added using Programs and Features. There are also third-party and free terminal emulation programs available that have support for Telnet. Telnet messages are sent in clear text. Anyone with a packet sniffer can capture and see the contents of Telnet messages. This is why it is advisable to use a secure connection rather than Telnet.
Telnet and SSH
Secure Shell (SSH) is a secure alternative to Telnet and other file copy programs such as FTP. SSH communicates over TCP port 22 and uses encryption to protect the session. There are several methods in which a client can authenticate to an SSH server:
-
-
-
- Username/Password – The client sends credentials to the SSH host, which are then verified against a local user database or sent to a centralized authentication server.
- Kerberos – Networks which use Kerberos authentication protocol, such as Windows Active Directory, allow for Single Sign-On (SSO). SSO allows users to sign in to multiple systems with only one username and password.
- Host-based authentication – The client requests authentication with a public key. The server generates a challenge with this key which the client must decrypt with the matching private key to complete the authentication.
-
-
Public key authentication – This provides additional protection over host-based authentication. The user must enter a passphrase to access the private key. This helps prevent the private key from becoming compromises.
11.5.5.3 – Packet Tracer – Use Telnet and SSH
In this Packet Tracer activity, you will establish remote sessions to two routers, using Telnet and SSH. You may also install a third-party terminal emulation program and access a dedicated SSH server provided by your instructor.
Packet Tracer – Using Telnet and SSH Instructions
Packet Tracer – Using Telnet and SSH PKA
11.5.6 – Remote Desktop and Assistance
11.5.6.1 – Video Demonstration – Remote Desktop and Remote Assistance
Click Play in the figure to view a demonstration of how to use Remote Desktop and Remote Assistance in Windows.
Other operating systems can also perform these functions. For example, in macOS, remote access functionality is provided by the Screen Sharing feature, which is based on Virtual Network Computing (VNC). Any VNC client can connect to a Screen Sharing server. VNC is a freeware product that is similar in functionality to RDP and works over port 5900.
Click here to read the transcript of this video.
11.5.6.2 – Lab – Windows Remote Desktop and Assistance
In this lab, you will partner with another student so you can configure a Remote Desktop connection for your partner and invite your partner to provide assistance on your computer via a Remote Assistance connection.
11.5.6.2 – Lab – Windows Remote Desktop and Assistance
11.5.6.3 – Check Your Understanding – Remote Desktop and Assistance
11.6 – Common Preventive Maintenance Techniques for Operating Systems
11.6.1 – OS Preventive Maintenance Plan
11.6.1.1 – Preventive Maintenance Plan Contents
To ensure that an OS remains fully functional, you must implement a preventive maintenance plan. A preventive maintenance plan provides many benefits to users and organizations such as decreased downtime, improved performance, improved reliability, and lower repair costs.
Preventive Maintenance Plan Contents
Preventive maintenance plans should include detailed information about the maintenance of all computers and network equipment. The plan should prioritize equipment that would affect the organization the most if that equipment fails. Preventive maintenance for an OS includes automating tasks to perform scheduled updates. Preventive maintenance also includes installing service packs that help keep the system up to date and compatible with new software and hardware. Preventive maintenance includes the following important tasks:
-
-
-
- Hard drive error checking, defragmentation, and backup
- Updates to the operating system, applications, antivirus, and other protective software
-
-
Perform preventive maintenance regularly, and record all actions taken and observations made. A repair log helps you determine which equipment is the most or least reliable. It also provides a history of when a computer was last fixed, how it was fixed, and what the problem was.
Preventive maintenance should take place when it causes the least amount of disruption to the users. This often means scheduling tasks at night, early in the morning, or over the weekend. There are also tools and techniques that can automate many preventive maintenance tasks.
Security
Security is an important aspect of your preventive maintenance program. Install virus and malware protection software and perform regular scans on computers to help ensure that they remain free of malicious software. Use the Windows Malicious Software Removal Tool to check a computer for malicious software. If an infection is found, the tool removes it. Each time a new version of the tool is available from Microsoft, download it and scan your computer for new threats. This should be a standard item in your preventive maintenance program, along with regular updates to your antivirus and spyware removal tools.
Startup Programs
Some programs, such as antivirus scanners and spyware removal tools, do not automatically start when the computer boots. To ensure that these programs run each time the computer is booted, add the program to the Startup folder of the Start Menu. Many programs have switches to allow the program to perform a specific action such as starting without being displayed. Check the documentation to determine if your programs allow the use of special switches.
11.6.1.2 – Lab – Manage the Startup Folder
In this lab, you will learn how to manage the Startup folder.
11.6.1.2 – Lab – Manage the Startup Folder
11.6.1.3 – Windows Updates
11.6.1.4 – Video Demonstration – Scheduling Tasks
Click Play in the video to see a demonstration of scheduling tasks.
Click here to read a transcript of this video.
11.6.1.5 – Lab – Schedule a Task using the GUI and the Command Line
In this lab, you will learn how to schedule a task using the GUI and at the command line.
11.6.1.6 – Lab – Schedule a Task using the GUI and the Command Line
11.6.2 – Backup and Restore
11.6.2.1 – Restore Points
Sometimes installing an application or hardware driver can cause instability or create unexpected problems. Uninstalling the application or hardware driver usually corrects the problem. If not, you can restore the computer to a time before the installation with the System Restore utility.
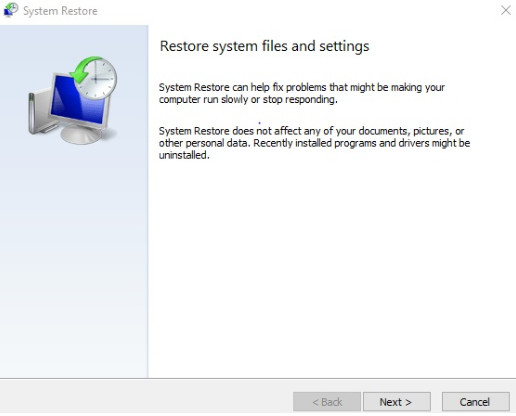
Restore Points
Restore points contain information about the operating system, installed programs, and registry settings. If a computer crashes or if an update causes a problem, the computer can be rolled back to a previous configuration using a restore point. System restore does not back up personal data files, nor does it recover personal files that have been corrupted or deleted. Always use a dedicated backup system, such as a tape drive, optical disc, or USB storage device to back up personal files.
A technician should always create a restore point before making changes to a system in the following situations:
-
-
-
- When updating the OS
- When installing or upgrading hardware
- When installing an application
- When installing a driver
-
-
To open the System Restore utility in Windows 10, shown in the figure, open System Properties and click System Restore.
11.6.2.2 – Hard Drive Backup
It is important to establish a backup strategy that includes data recovery of personal files. You can use the Microsoft Backup utility to perform backups as required. How the computer system is used, as well as organizational requirements, determines how often the data must be backed up and the type of backup to perform.
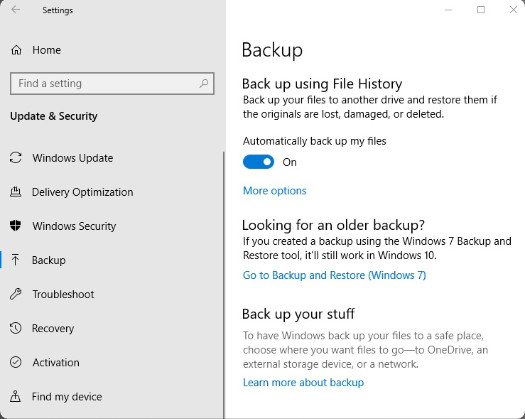
Hard Drive Backup
It can take a long time to run a backup. If the backup strategy is followed carefully, it is not necessary to back up all files every time. Only the files that have changed since the last backup need to be backed up.
The backup tool included with Windows 7 allowed users to back up files, or create and use a system image backup, or repair disc. Windows 8 and Windows 10 ship with File History which can be used to back up the files in the Documents, Music, Pictures, Videos, and Desktop folders. Over time, File History builds a history of your files, allowing you to go back and recover specific versions of a file. This is a helpful feature if there are damaged or lost files.
File History in Windows 10 is located in Settings > Update&Security > Backup, as shown in the figure.
11.6.2.3 – Video Demonstration – Back up and Restore
Click Play in the figure to view a demonstration of how to use hard drive backup tools.
Click here to read the transcript of this video.
11.6.2.4 – Lab – System Restore and Hard Drive Backup
In this lab, you will create a restore point and use it to restore your computer. You will also configure a hard drive backup.
11.6.2.4 – Lab – System Restore and Hard Drive Backup
11.7 – Basic Troubleshooting Process for Windows Operating Systems
11.7.1 – Applying Troubleshooting Process to Windows Operating Systems
11.7.1.1 – The Six Steps of the Troubleshooting Proce
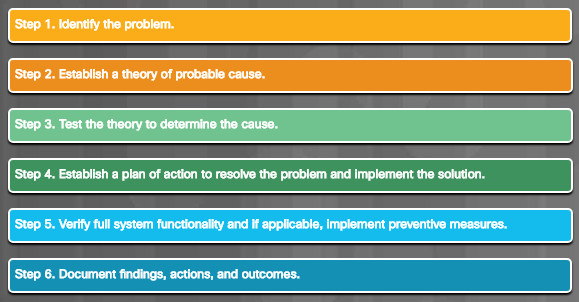
The Six Steps of the Troubleshooting Proce
11.7.1.2 – Identify the Problem
OS problems can result from a combination of hardware, software, and network issues. Computer technicians must be able to analyze the problem and determine the cause of the error to repair the computer. This process is called troubleshooting.
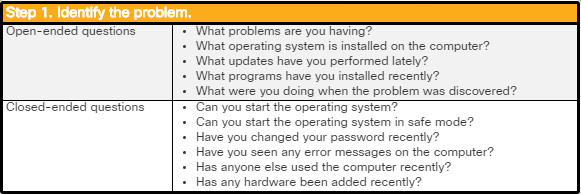
Identify the Problem
The first step in the troubleshooting process is to identify the problem. Click an option on the left side of the screen to see examples of open-ended and closed-ended questions.
11.7.1.3 – Establish a Theory of Probable Cause

Establish a Theory of Probable Cause
After you have talked to the customer, you can establish a theory of probable causes. The figure lists some common probable causes for OS problems.
11.7.1.4 – Test the Theory to Determine the Cause
After you have developed some theories about what is wrong, test your theories to determine the cause of the problem. The figure shows a list of quick procedures that can help determine the exact cause of the problem or even correct the problem. If a quick procedure does correct the problem, you can jump to verifying the full system functionality. If a quick procedure does not correct the problem, you need to research the problem further to establish the exact cause.
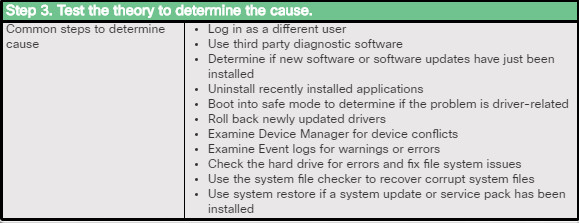
Test the Theory to Determine the Cause
11.7.1.5 – Establish a Plan of Action to Resolve the Problem and…
After you have determined the exact cause of the problem, establish a plan of action to resolve the problem and implement the solution. The figure shows some sources you can use to gather additional information to resolve an issue.

Establish a Plan of Action to Resolve the Problem and Implement the Solution
11.7.1.6 – Verify Full System Functionality and if Applicable…
After you have corrected the problem, verify full system functionality and, if applicable, implement preventive measures. The figure lists the steps to verify full system functionality.
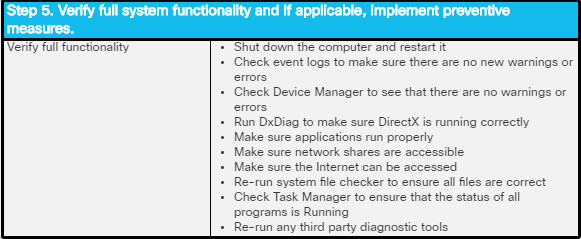
Verify Full System Functionality and if Applicable Implement Preventive Measures
11.7.1.7 – Document Findings, Actions, and Outcomes
In the final step of the troubleshooting process, you must document your findings, actions, and outcomes. The figure lists the tasks required to document the problem and the solution.

Document Findings, Actions, and Outcomes
11.7.2 – Common Problems and Solutions for Windows Operating Systems
11.7.2.1 – Common Problems and Solutions for Windows Operating Systems
The OS locks up.
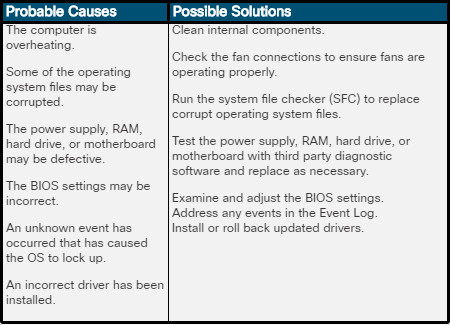
The computer displays a black or blue screen of death (BSOD).

The keyboard or mouse does not respond.
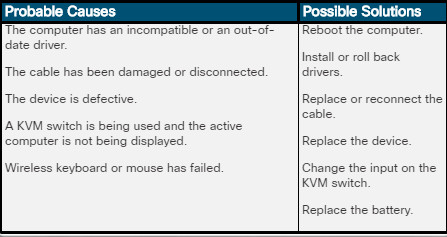
The computer locks up without any error messages.
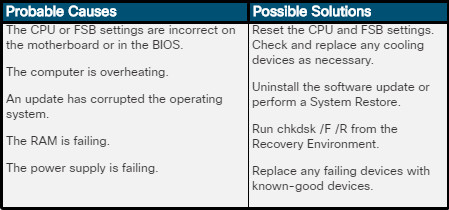
The operating system will not start.
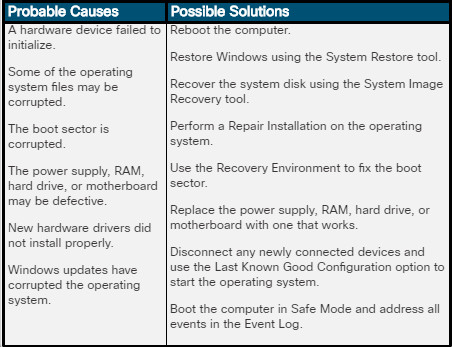
An application does not install.
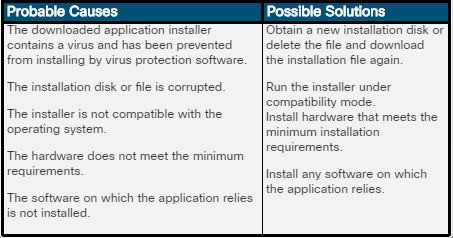
The computer displays an “Invalid Boot Disk” error after POST.
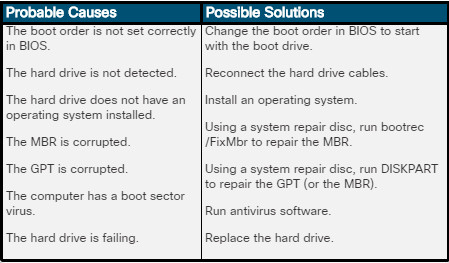
A computer with Windows 7 installed does not run Aero.

The computer displays a “BOOTMGR is missing” error after POST.
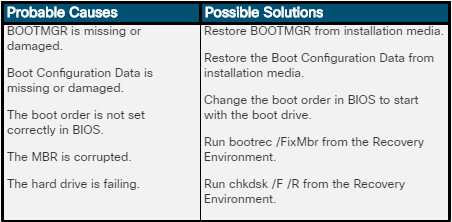
The UAC no longer prompts the user for permission.

A service failed to start when the computer booted.

No Gadgets appear on the desktop.

A device did not start when the computer booted.
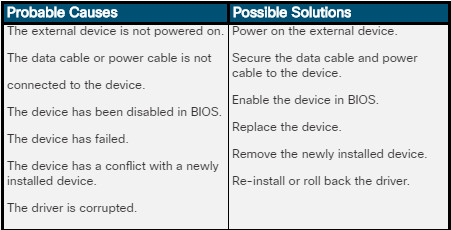
The computer is running slowly and has a delayed response.

The computer continually restarts without displaying the desktop.

The computer displays a “Boot Configuration Data missing” error while booting.

The computer displays a “BCD missing” error while booting.Windows update fails.

Cannot print from Windows.

Computer is slow to boot.

11.7.3 – Advanced Troubleshooting for Windows Operating Systems
11.7.3.1 – Advanced Problems and Solutions for Windows Operating Systems
The computer displays an “Invalid Boot Disk” error after the POST.
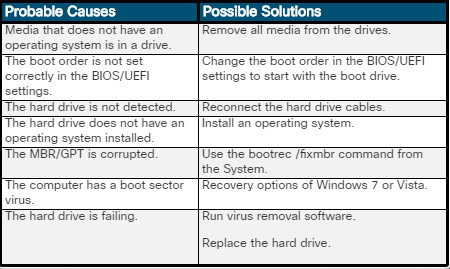
The computer locks up without any error messages.
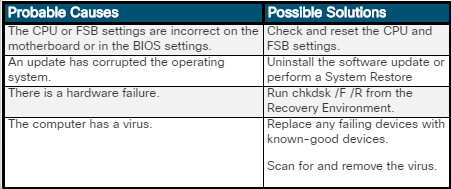
The computer displays an “Inaccessible Boot Device” error after the POST.

An application does not install.

The computer displays a “BOOTMGR is missing” error after the POST.
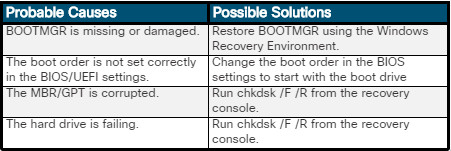
The search feature takes a long time to find results.

A service failed to start when the computer booted.

The computer is running slowly and has a delayed response. In a multiple monitor setup, the displays are not aligned or are incorrectly oriented.

A device did not start when the computer booted.

When you run a program, a missing or corrupt DLL message is displayed.
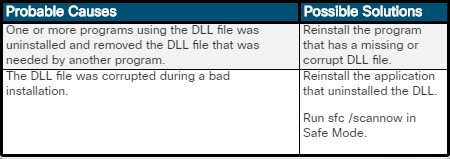
A program listed in the registry is not found.

RAID is not detected during installation.

The computer continually restarts without displaying the desktop.

A system file is corrupted.

The computer displays a black or blue screen of death (BSOD).

Computer boots to safe mode.

A file fails to open.

11.7.3.2 – Lab – Troubleshoot Operating System Problems
In this lab, you will diagnose the cause of various operating system problems and solve them.
11.7.3.2 – Lab – Troubleshoot Operating System Problems
11.8 – Summary
11.8.1 – Conclusion
11.8.1.1 – Chapter 11: Windows Configuration
The focus of this chapter was on Windows 7, Windows 8, and Windows 10. Each version comes in several editions, such as Home, Pro, Ultimate, or Enterprise, and come in either 32-bit or 64-bit versions. The Windows editions are tailored for the needs of corporate and personal users. You explored the Windows Desktop, Start Menu, and Taskbar and to work with the Task Manager and File Explorer to monitor system performance and manage files and folders on a computer running Windows in labs.
You learned about the various system tools used to configure the Windows operating system and to change settings. You learned that Control Panel offers many configuration tools that are used to create and modify user accounts, configure updates and backups, personalize the look and feel of Windows, install and uninstall apps, and configure network settings. You performed several lab exercises using tools found in the control panel. In these labs, you used the User Accounts Control Panel to create and modify users, configured Internet settings in Internet Explorer, used the System Control Panel to configure and manage virtual memory, used device manager to display devices and monitor settings, changed region and language options, and many other administrative tasks.
In addition to using the Control Panel GUI, you also learned how to use the Windows CLI and PowerShell command line utility to perform administrative tasks. You also learned system commands that provide the same functions as those found in Task Manager and how to run system utilities from the Windows CLI. To practice what you learned you performed several labs that involved working with file system commands, disk CLI commands, task and system CLI commands, and other useful commands.
You also learned about the two methods for organizing and managing Windows computers on a network, the domain and the workgroup. You learned how to share local computer resources, such as files, folders, and printers on the network and how to configure a wired network connection. You performed labs related to Windows networking where you created and shared a folder and set permissions, connected your computer to a wireless router and tested the wireless connection, and configured Windows for remote access using Remote Desktop and Remote Assistance.
At the end of the chapter, you learned the importance of a preventive maintenance plan to decrease downtime, improve performance, improve reliability, and lower repair costs. A good preventive maintenance plan includes detailed information about the maintenance of all computers and network equipment. Preventive maintenance should take place when it causes the least amount of disruption to the users. This often means scheduling tasks at night, early in the morning, or over the weekend. You scheduled a task using the GUI and at the command line in the lab.
Regular scans for viruses and malware are an important part of preventive maintenance. Some programs, such as antivirus scanners and spyware removal tools, do not automatically start when the computer boots. To ensure that these programs do run each time the computer is booted, they can be added to the Startup folder of the Start Menu. You managed startup applications using the Run key in the Registry in the lab.
Finally, you learned the six steps in the troubleshooting process as they are applied to Windows operating systems.

